Guide Plans and Subscriptions
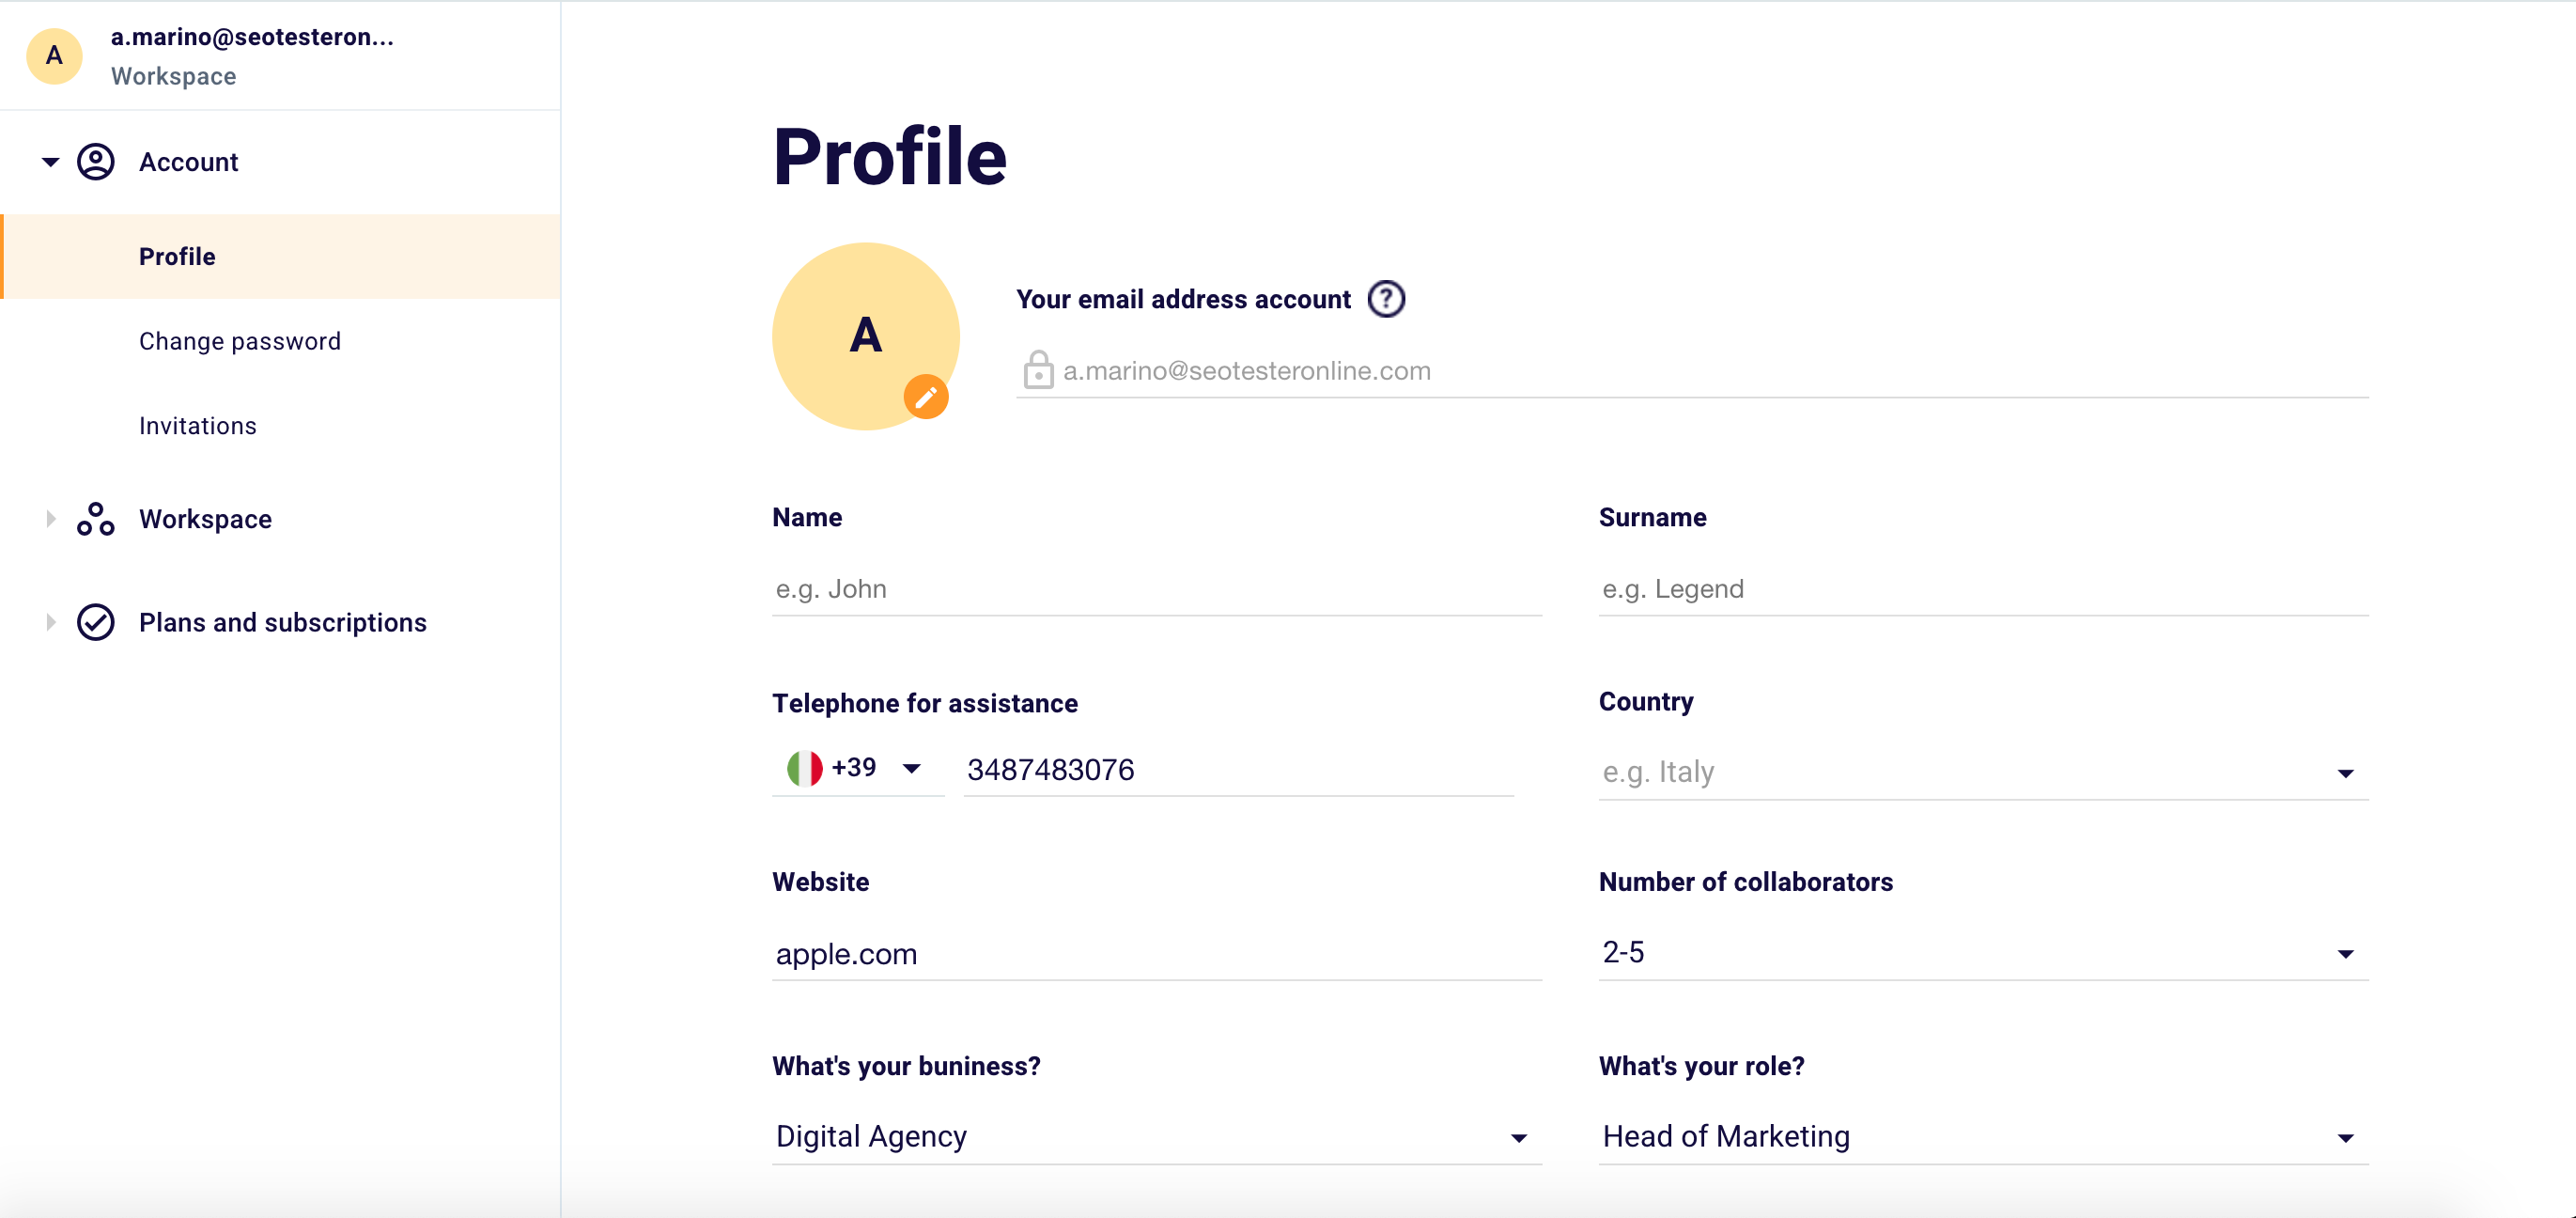
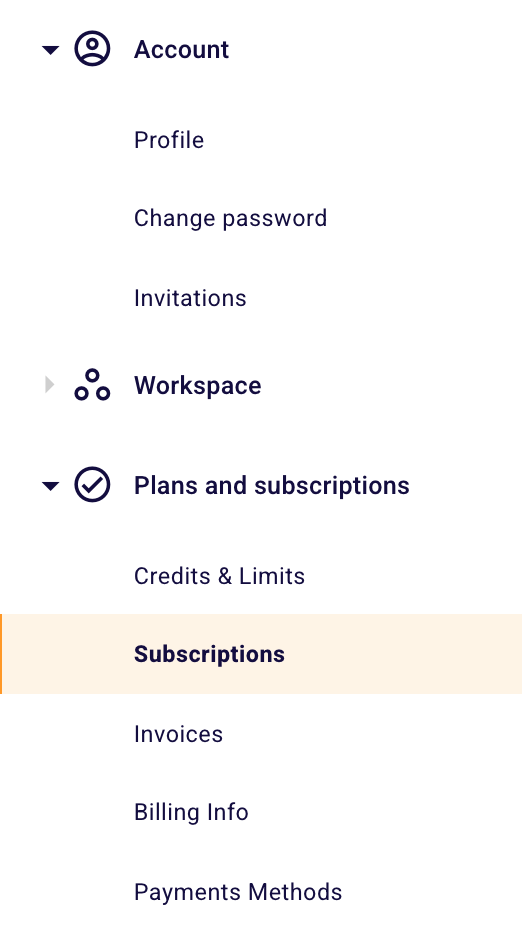
To reach the “Plans and Subscriptions” section, simply click on your profile icon at the top right and then “Account Settings“.
You will be redirected to this page.
From here, to reach the Plans and Subscriptions section, you will need to click the same item on the menu on the left. Once clicked, you will land on a similar screen.
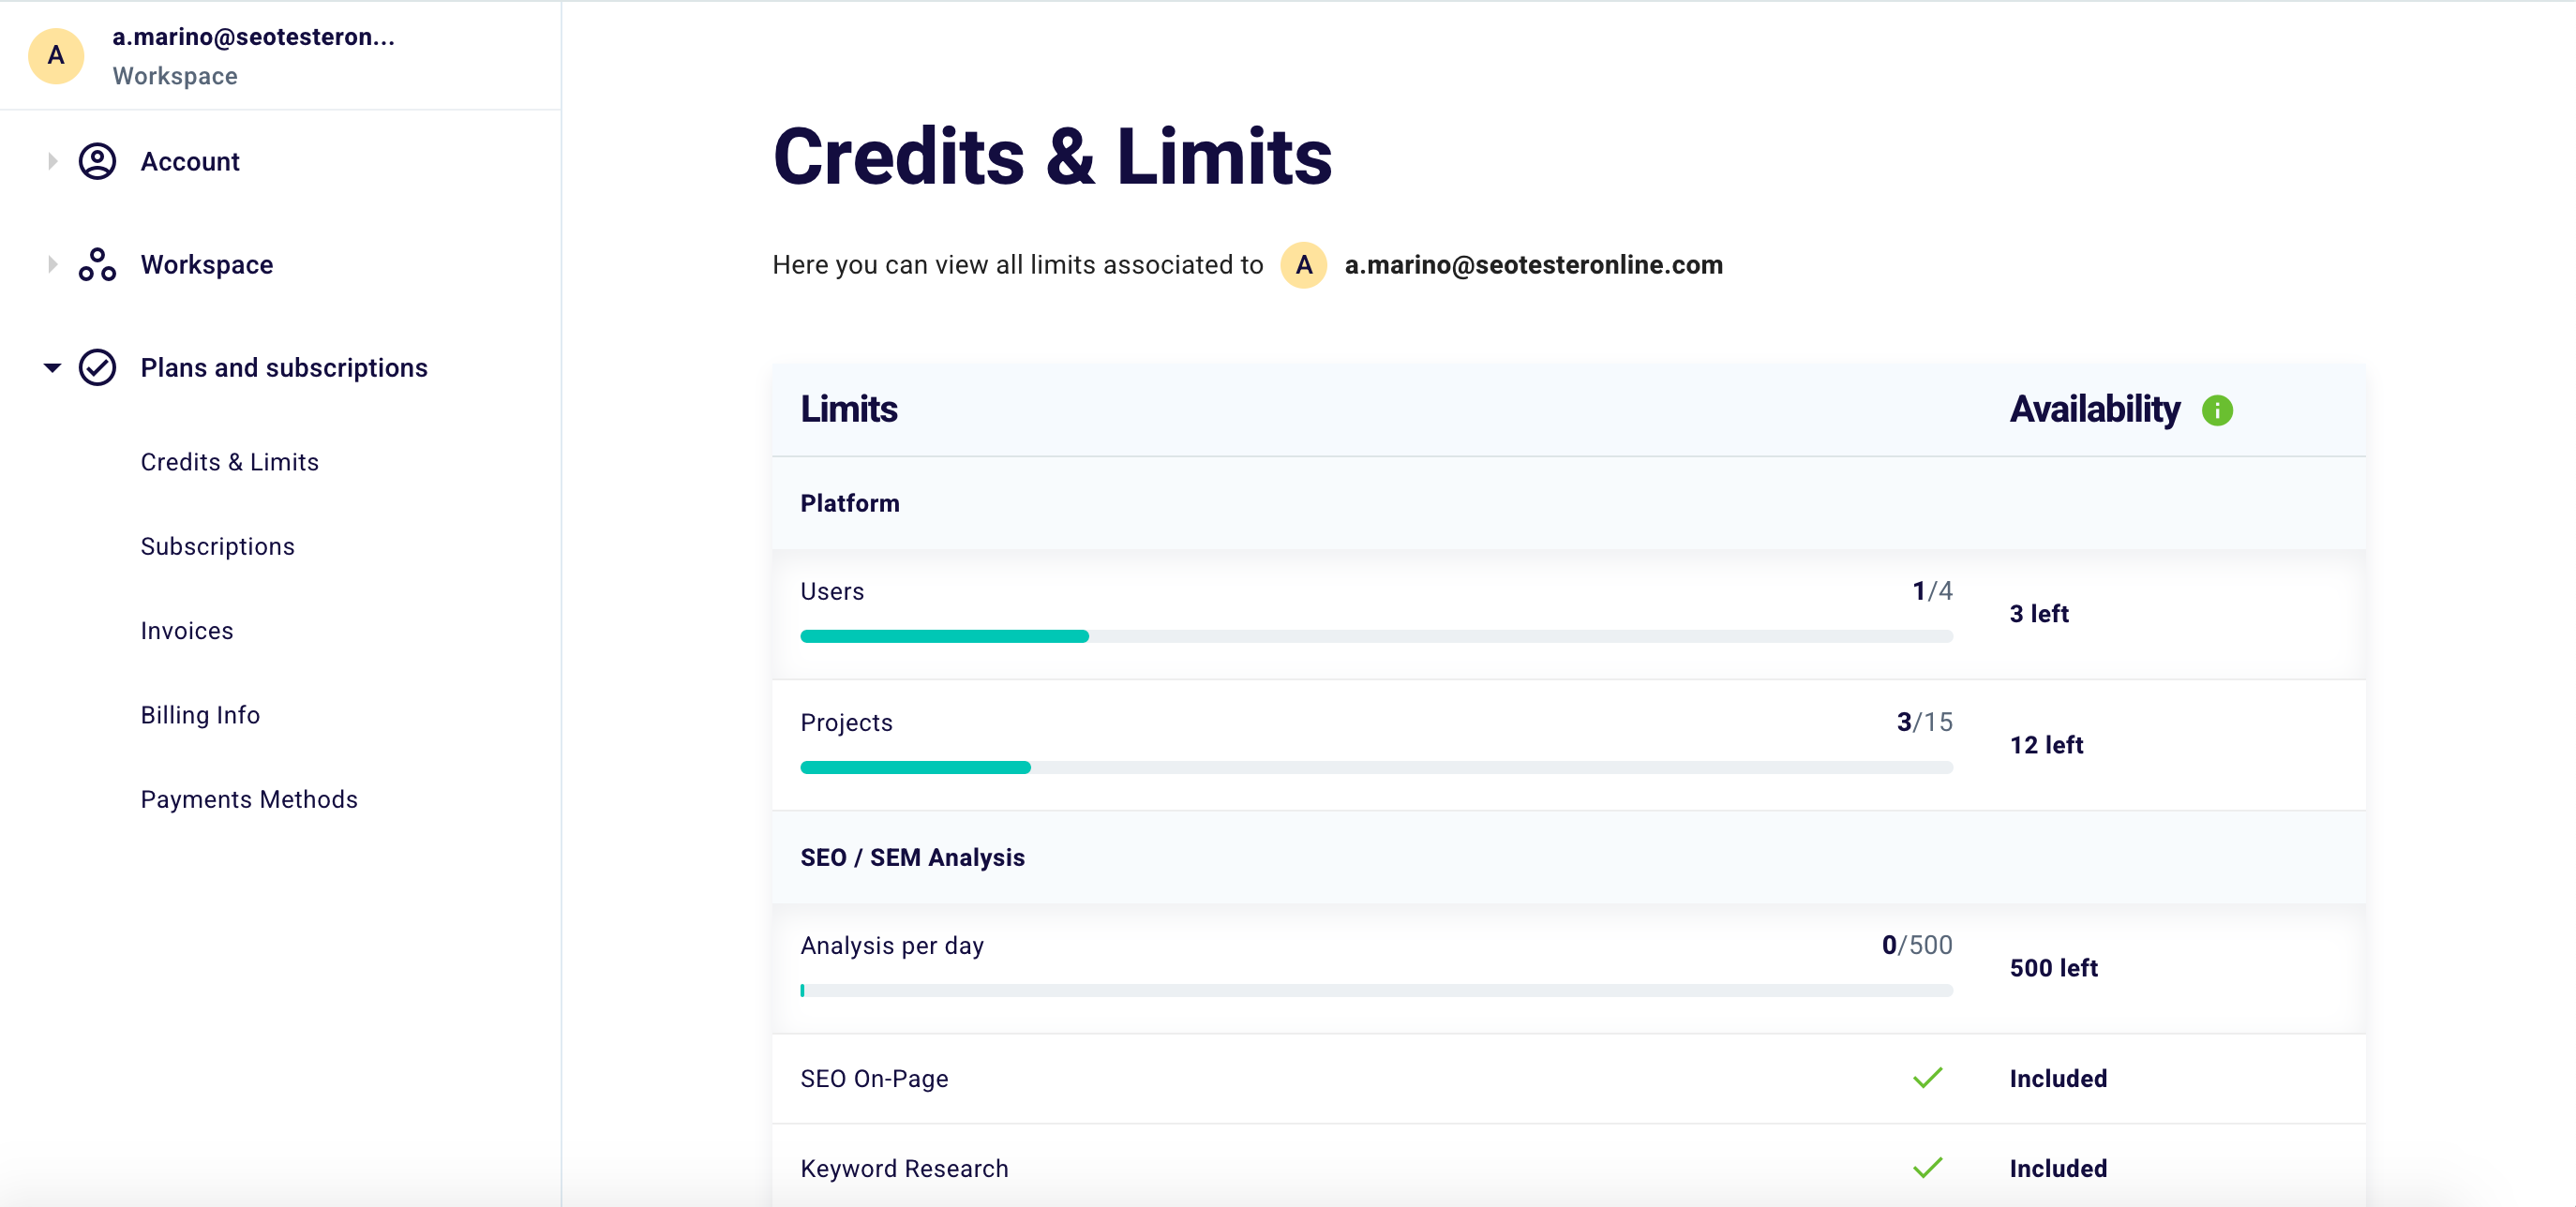
From here you just have to click “Plans and subscriptions” on the menu on the left of the screen and you will land on the corresponding page.
How to interpret the Credits and Limits section?
The first part of “Plans and subscriptions” is dedicated to “Credits and limits”.
In this section, you can monitor all the limits associated with your account, the credits you have left, the projects you can still create, the number of keywords you can still track the results, and so on. Here is a brief description of all the items within this section.
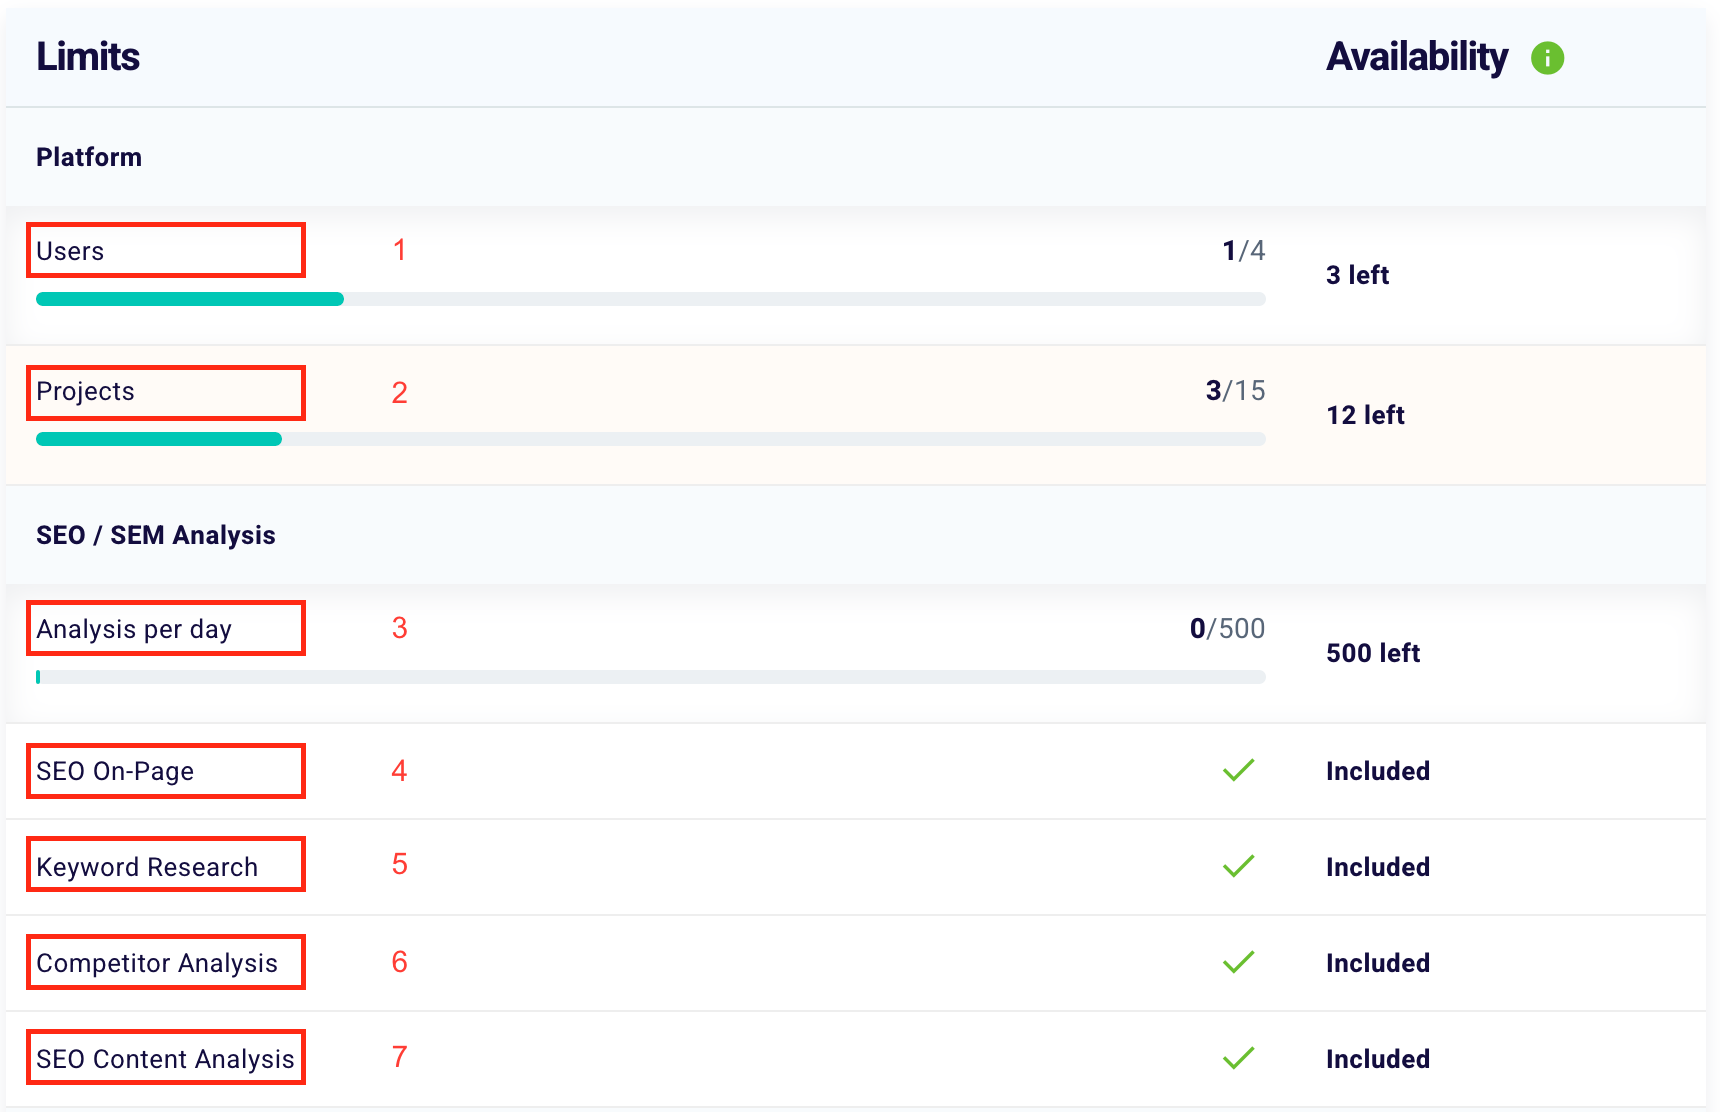
“Users” (1) means the maximum number of users included in your plan. In this case, “4” corresponds to the maximum number of users of the plan and “1” the users already included. “3 left” stands for the number of users still to be included.
By “Projects” (2) we mean the number of SEO Projects you can create with your account. Projects allow you to easily monitor all SEO aspects of your site. Monitor both from a technical point of view (with the SEO Spider) and from a positioning point of view (with the Keyword Rank Tracker) In this case “15” corresponds to the maximum number of SEO projects in the plan and “3” the projects already created. “12 left” stands for the number of projects you can still create. You can remove a project at any time to make room for a new one. However, remember that if you do this you will lose the data history of that project.
With “Analysis per day” (3) we mean the maximum number of SEO analyses that you can perform each day with your account with our 4 tools: SEO Checker, Copy Metrics, Keyword Explorer Tool, and SERP Checker. In this case, “500” corresponds to the maximum number of daily analyzes of the plan and “0” the analyzes already made. “500 missing” stands for the number of SEO analyses you can still do.
“SEO On-Page” (4) is the function that allows you to carry out in-depth On-Page SEO analyses, discover the SEO problems of your site and solve them in a simple way thanks to our advice.
“Keyword Research” (5) is the function that allows you to find thousands of long-tail keywords with low SEO difficulty and high traffic potential every day.
“Competitor Analysis” (6) is the function that allows you to spy on the SEO of your competitors and surpass them on search engines.
“SEO Content Analysis” (7) is the function that allows you to analyze the SEO copywriting metrics of your content or those of your competitors.
In the specific case of this plan, it is evident that all these functions are included in the corresponding written to the right of each item.
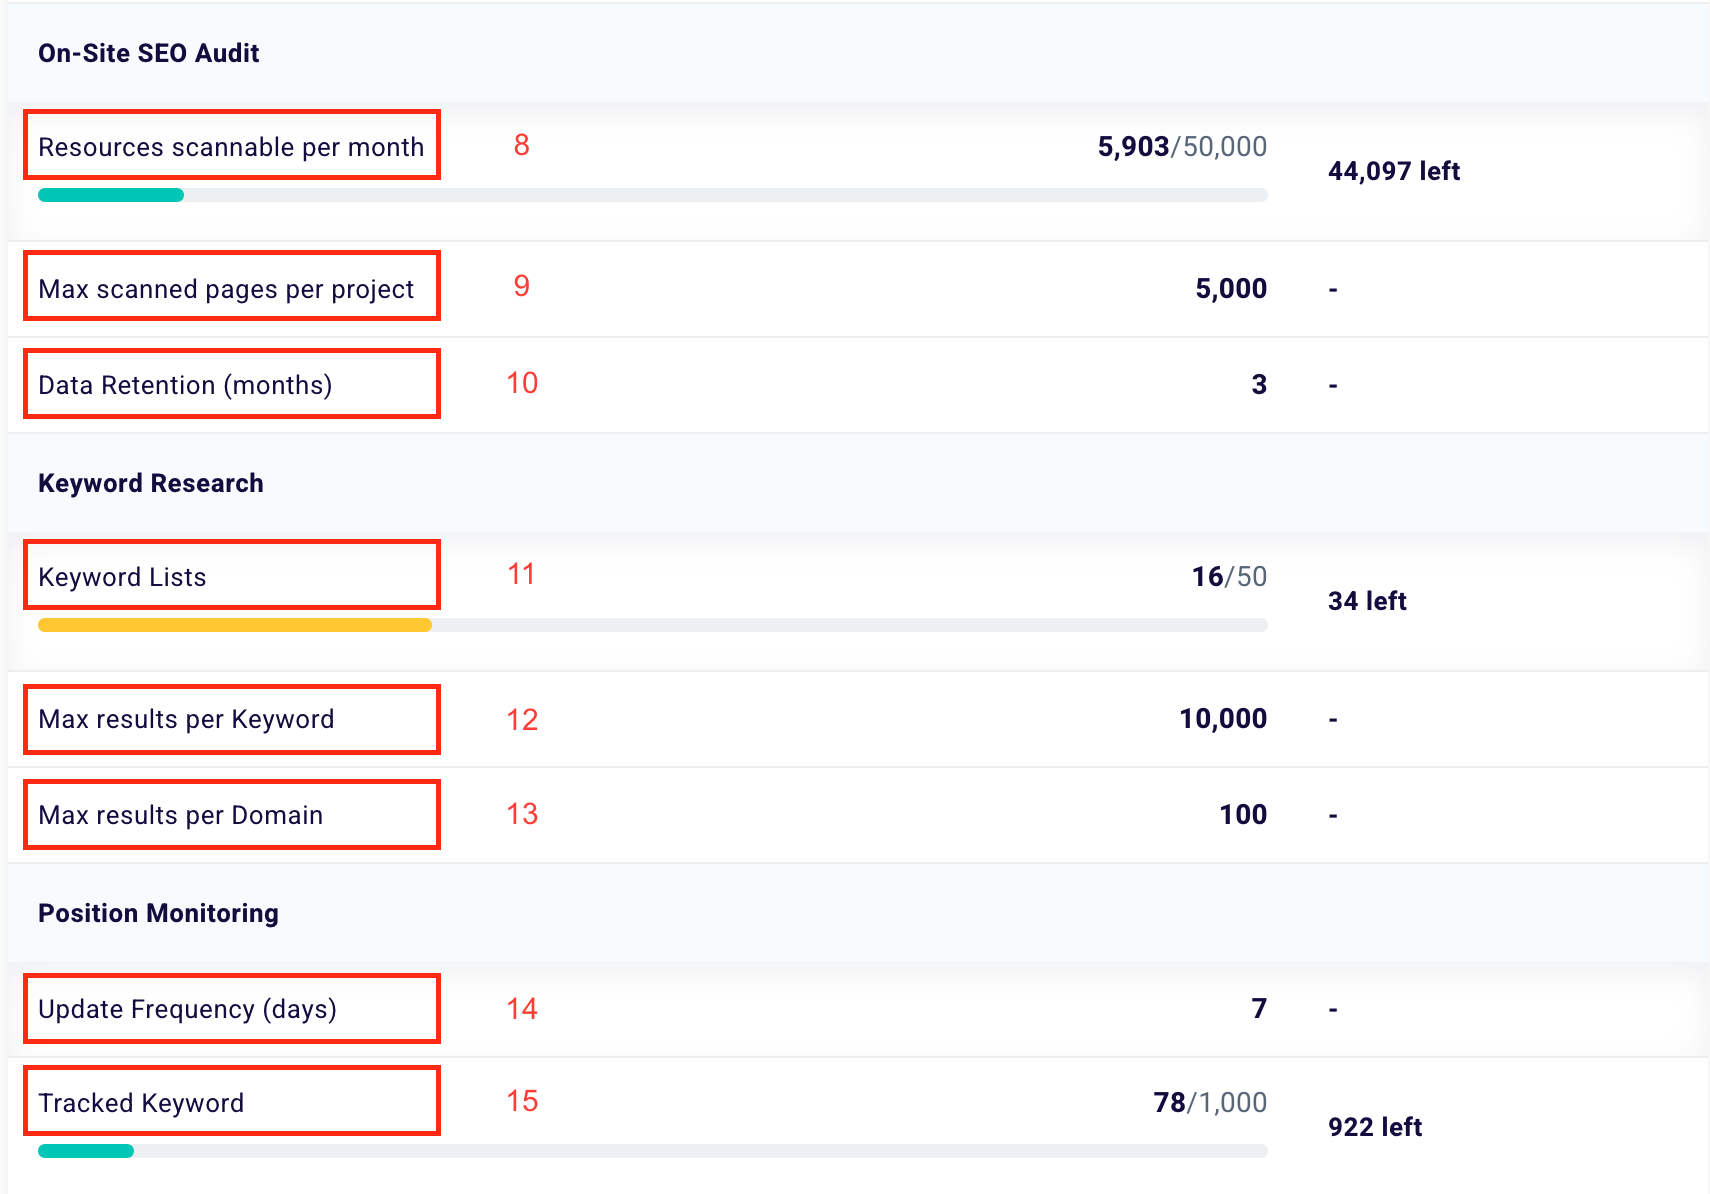
By “Resources scannable per Month” (8) we mean the number of web resources that you can crawl with our SEO Spider each month. In this case, “50,000” corresponds to the maximum number of scannable web resources of the plan and “5,903” the web resources already scanned. “44,097 left” stands for the number of web assets you can still scan.
By “Max scanned pages per project” (9) we mean the maximum number of web pages that you can scan in a single scan using our SEO Spider. In this case, “5,000” corresponds to the maximum number of scannable web resources per project included in the plan. In case you want to analyze a site that contains more than “5,000” pages all pages will be scanned, but you will be able to view the crawl of only the number of pages allowed by your subscription.
With “Data retention (months)” (10) we mean the maximum time for which we store historical data relating to the scans of your SEO projects. In this plan, the data retention months are “3”.
With “Keyword List” (11) we mean the maximum number of keyword lists that you can create on our platform. In this case “50 corresponds to the maximum number of keyword lists achievable with this plan and” 16 “the keyword lists already created. “34 missing” stands for the number of keyword lists you can still create.
With “Max results per keyword” (12) we mean the maximum number of results that can be displayed for each keyword analyzed. In this case, “10000” corresponds to the maximum number of results that you will be able to view compared to all those available.
With “Max results per domain” (13) we mean the maximum number of results that can be displayed for each analyzed domain. In this case “100” corresponds to the maximum number of results that you will be able to view compared to all those available.
With “Update frequency (days)” (14) we mean the frequency with which the results of each keyword monitored are updated. In this case, the data relating to each keyword traced is updated every 7 days.
“Tracked keywords” (15) means the maximum number of keywords that you can track among your active projects. In this case, “1,000” corresponds to the maximum number of keywords traceable with this plan and “78” to the keywords whose results are already being tracked. “922 left” stands for the number of keywords you can still track.
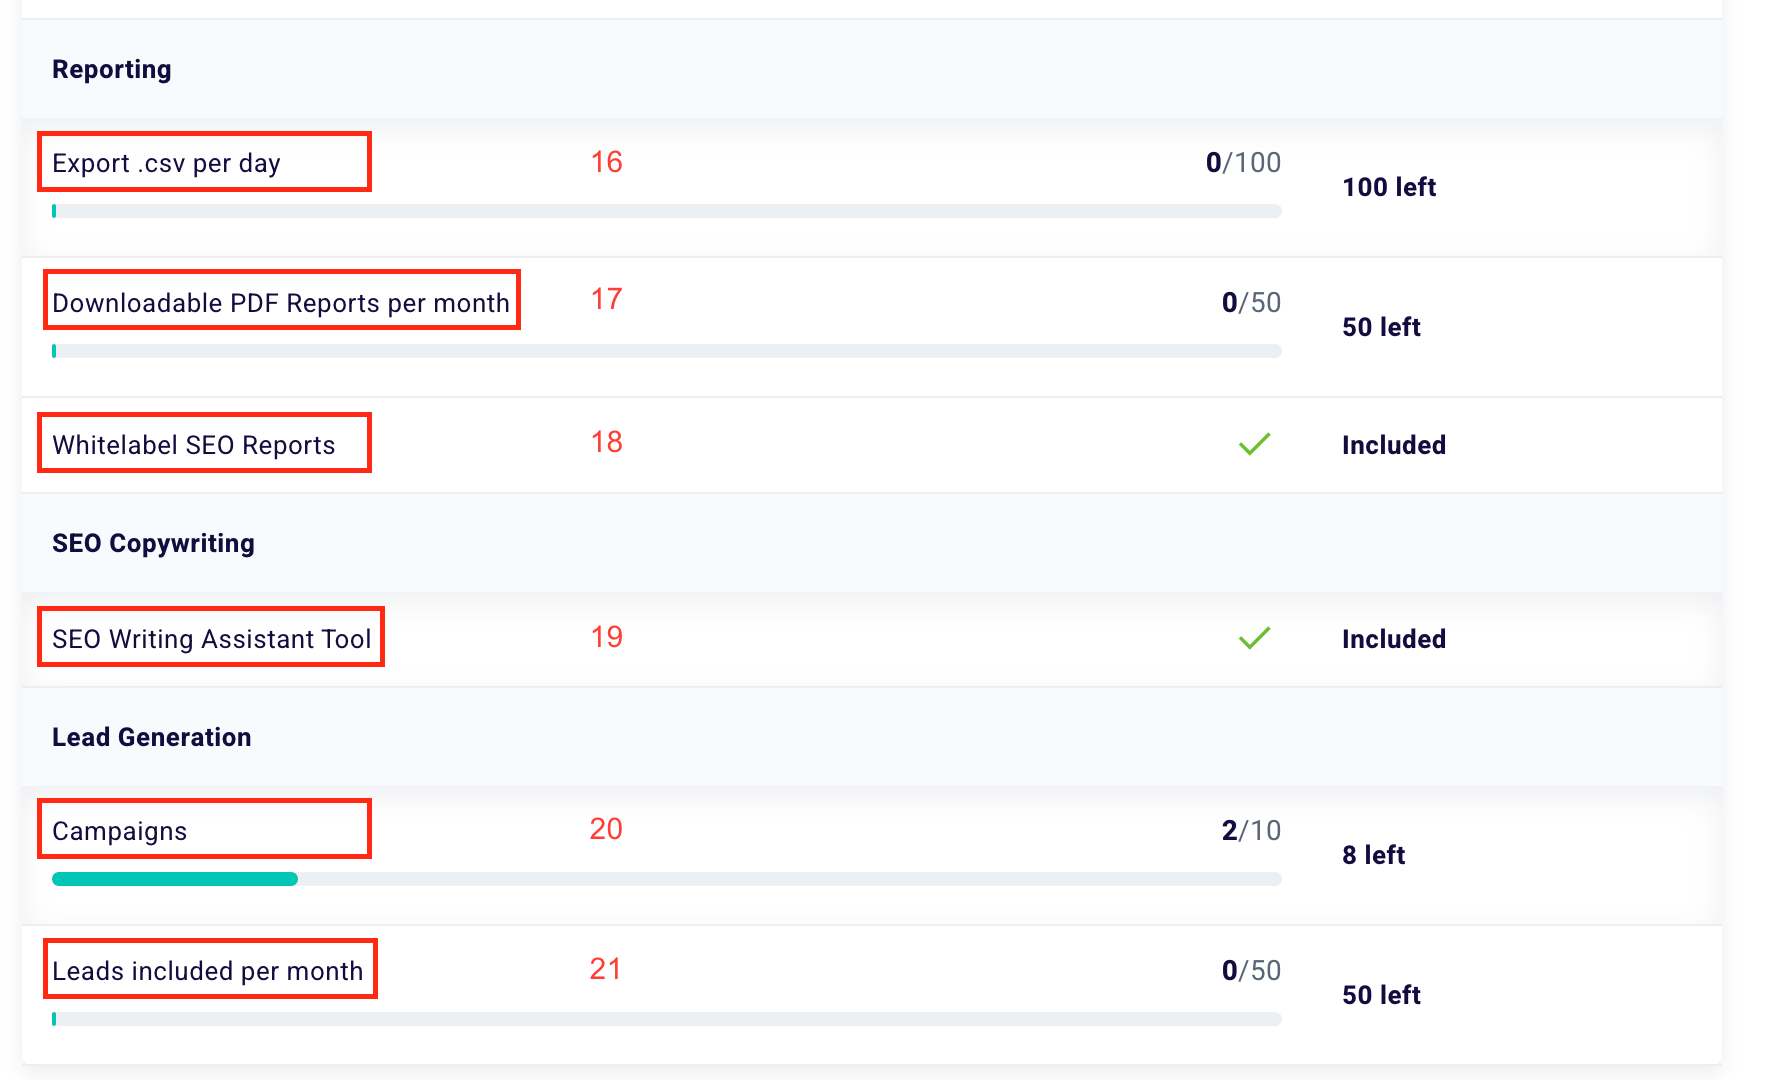
By “Exports .csv per day” (16) we mean the maximum number of data files (.csv) that you can download each day. In this case, “100” corresponds to the maximum number of .csv downloadable with this plan and “0” to the files you have exported. “0 left” stands for the number of .csvs you can still download.
With “Downloadable PDF Reports per Month” (17) we mean the maximum number of SEO PDF Reports that you can download each month. In this case “50” corresponds to the maximum number of Reports that can be downloaded with this plan and “0” to the Reports you have already downloaded. “100 left” stands for the number of SEO reports that you can still download.
“White-label Reports” (18) is the function that allows you to send customizable and White-label SEO Reports to your clients and collaborators. In this case, this feature is included in the user’s plan.
“SEO Writing Assistant Tool” (19) is the function that allows you to write contents that rank among the top positions thanks to SEO advice processed in real-time by our editorial assistant. In this case, this feature is included in the user’s plan.
“Campaigns” (20) means the maximum number of lead generation campaigns you can create with our platform. In this case, “10” corresponds to the maximum number of campaigns that you can set up with this plan and “2” to the campaigns you have already set up. “8 left” stands for the number of lead generation campaigns you can still create.
With “Leads included per month” (21) we mean the number of contacts included in your plan for which you can view all the information collected by your forms for free. In this case, “50” corresponds to the maximum number of leads whose information you can view with this plan and “0” to the leads you have already collected and whose information you have access to. “50 left” stands for the number of lead generations that you can still see the metrics for.
How can I expand the limits of my plan?
In case you are shown a screen that says “Insufficient Credits” and you want to create another project or expand the limits of your plan, just send an email to support@seotesteronline.com. We will help you understand how to do it in a few simple steps.
How to manage the subscription and payment methods?
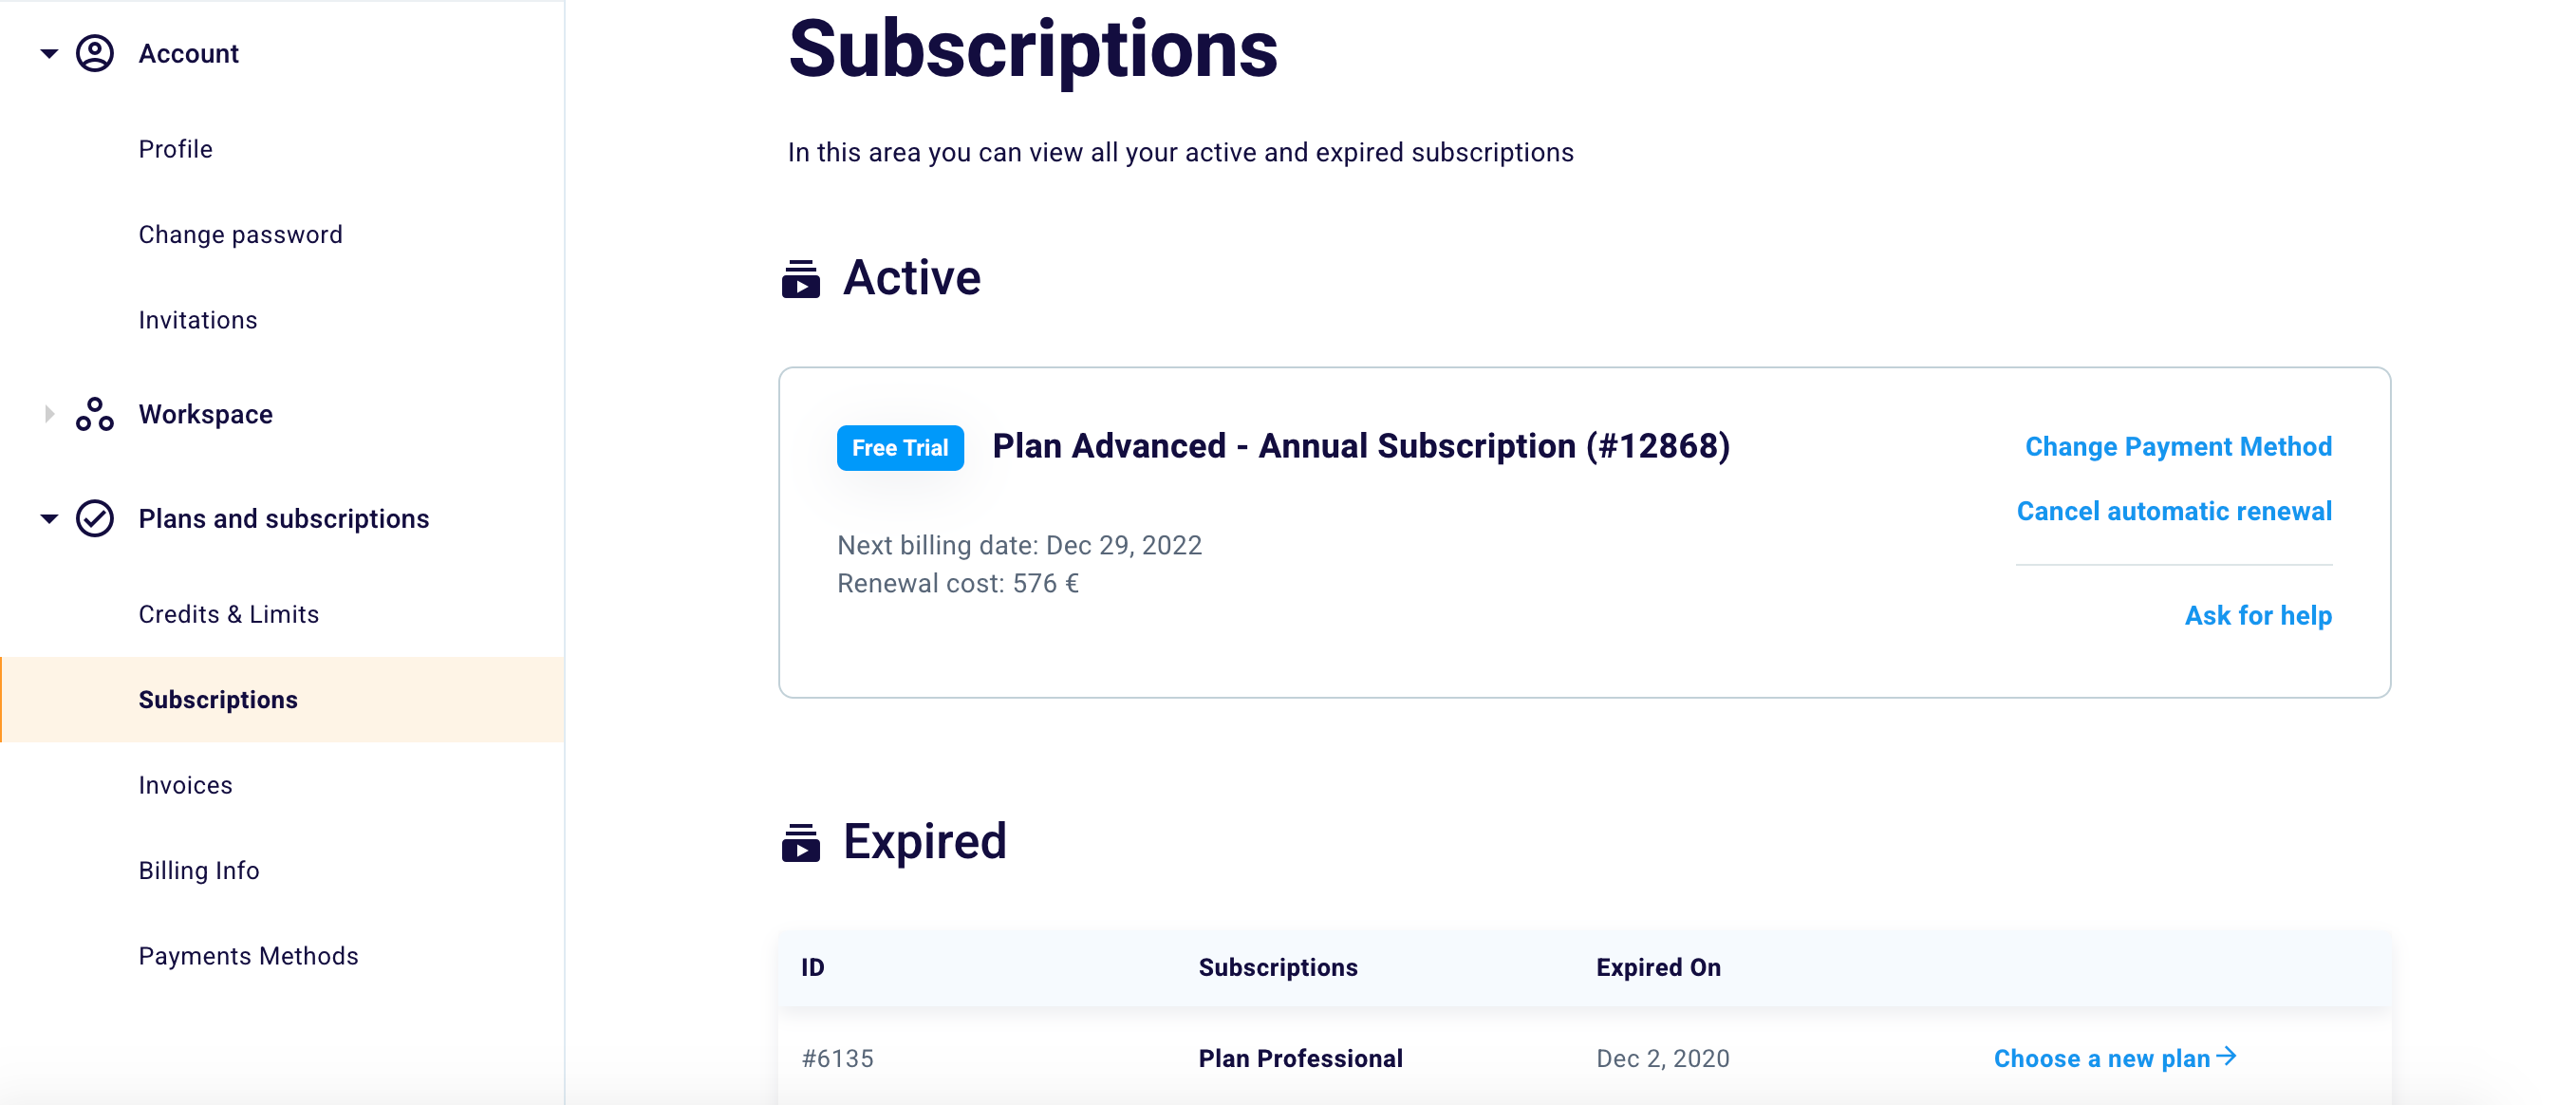
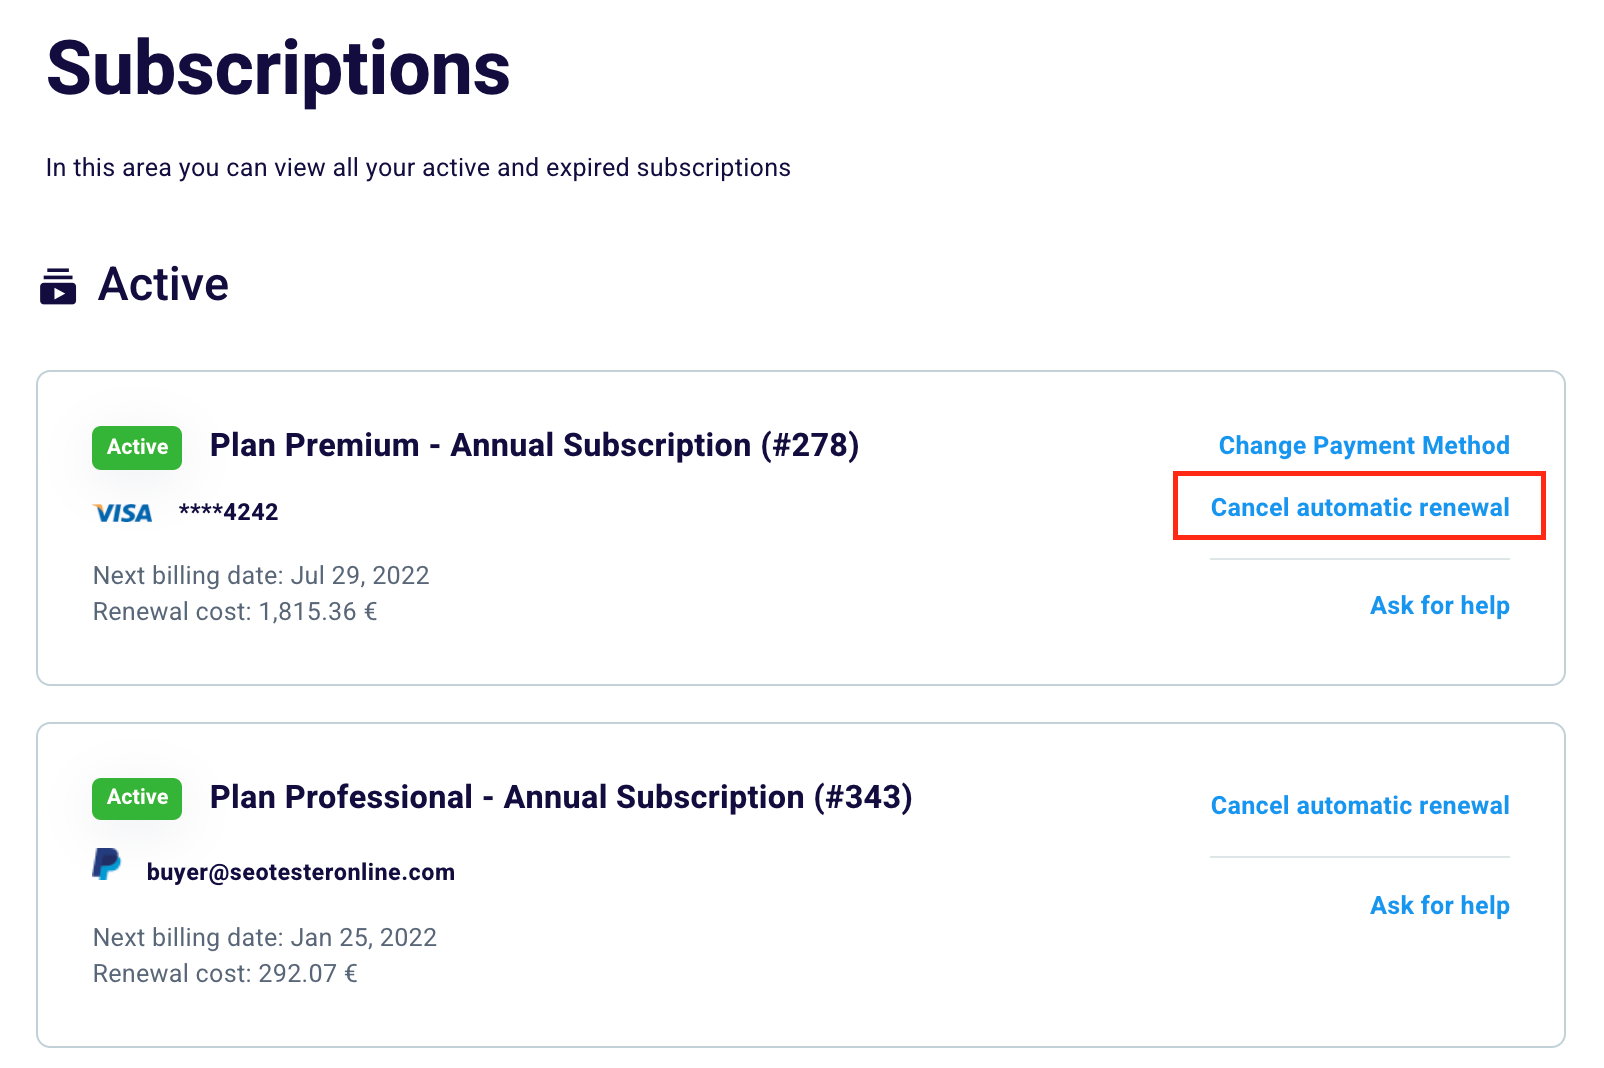
You can access this section by clicking “Subscriptions” on the left and monitoring all your active and expired subscriptions.
In the first part, you will have the opportunity to view the type of plan you have purchased, the next billing date, and the cost you will pay for the renewal of your plan.
How to change or add a payment method?
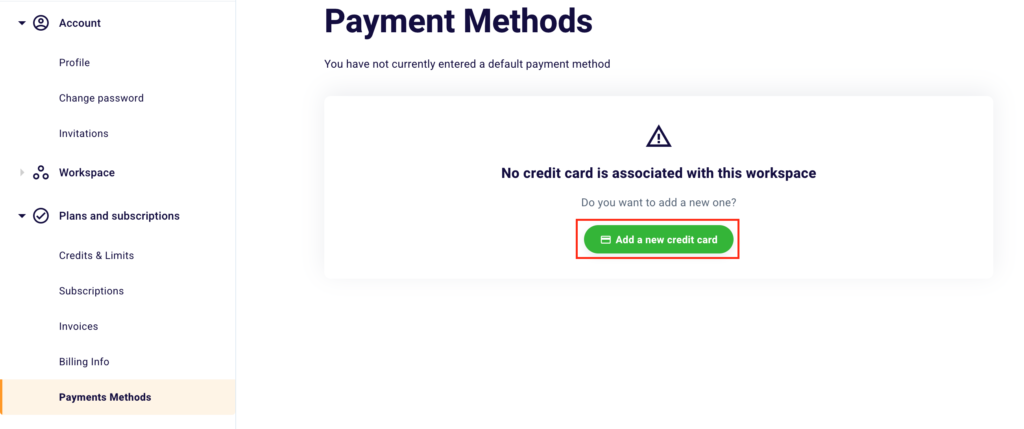
By clicking “Change Payment Method” (1) you will have the possibility to change the default payment method. Once clicked, you will land on “Payment Methods”, which you can also get to from the menu on the left.
To associate a new payment method, simply click the green button “Add a new credit card“.
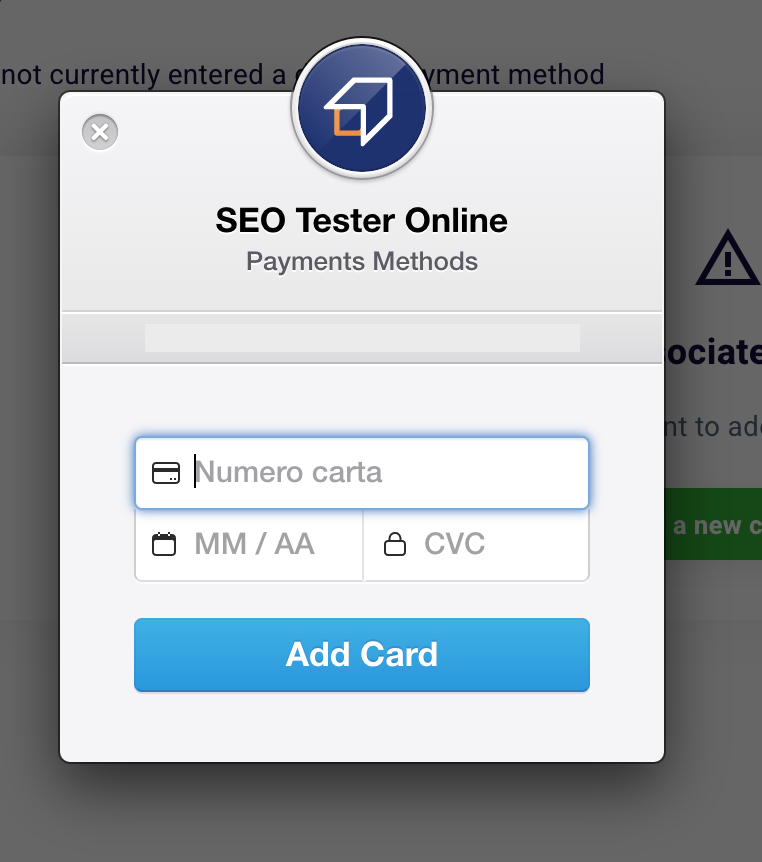
This screen will appear and you will only have to add your card number, the month and year of expiry, and the CVC code, present on the back of your payment card.
We remind you that we only use secure payment methods such as Stripe and PayPal and that we do not manage or store our customers’ payment data in any way to preserve their privacy and ensure payment security.
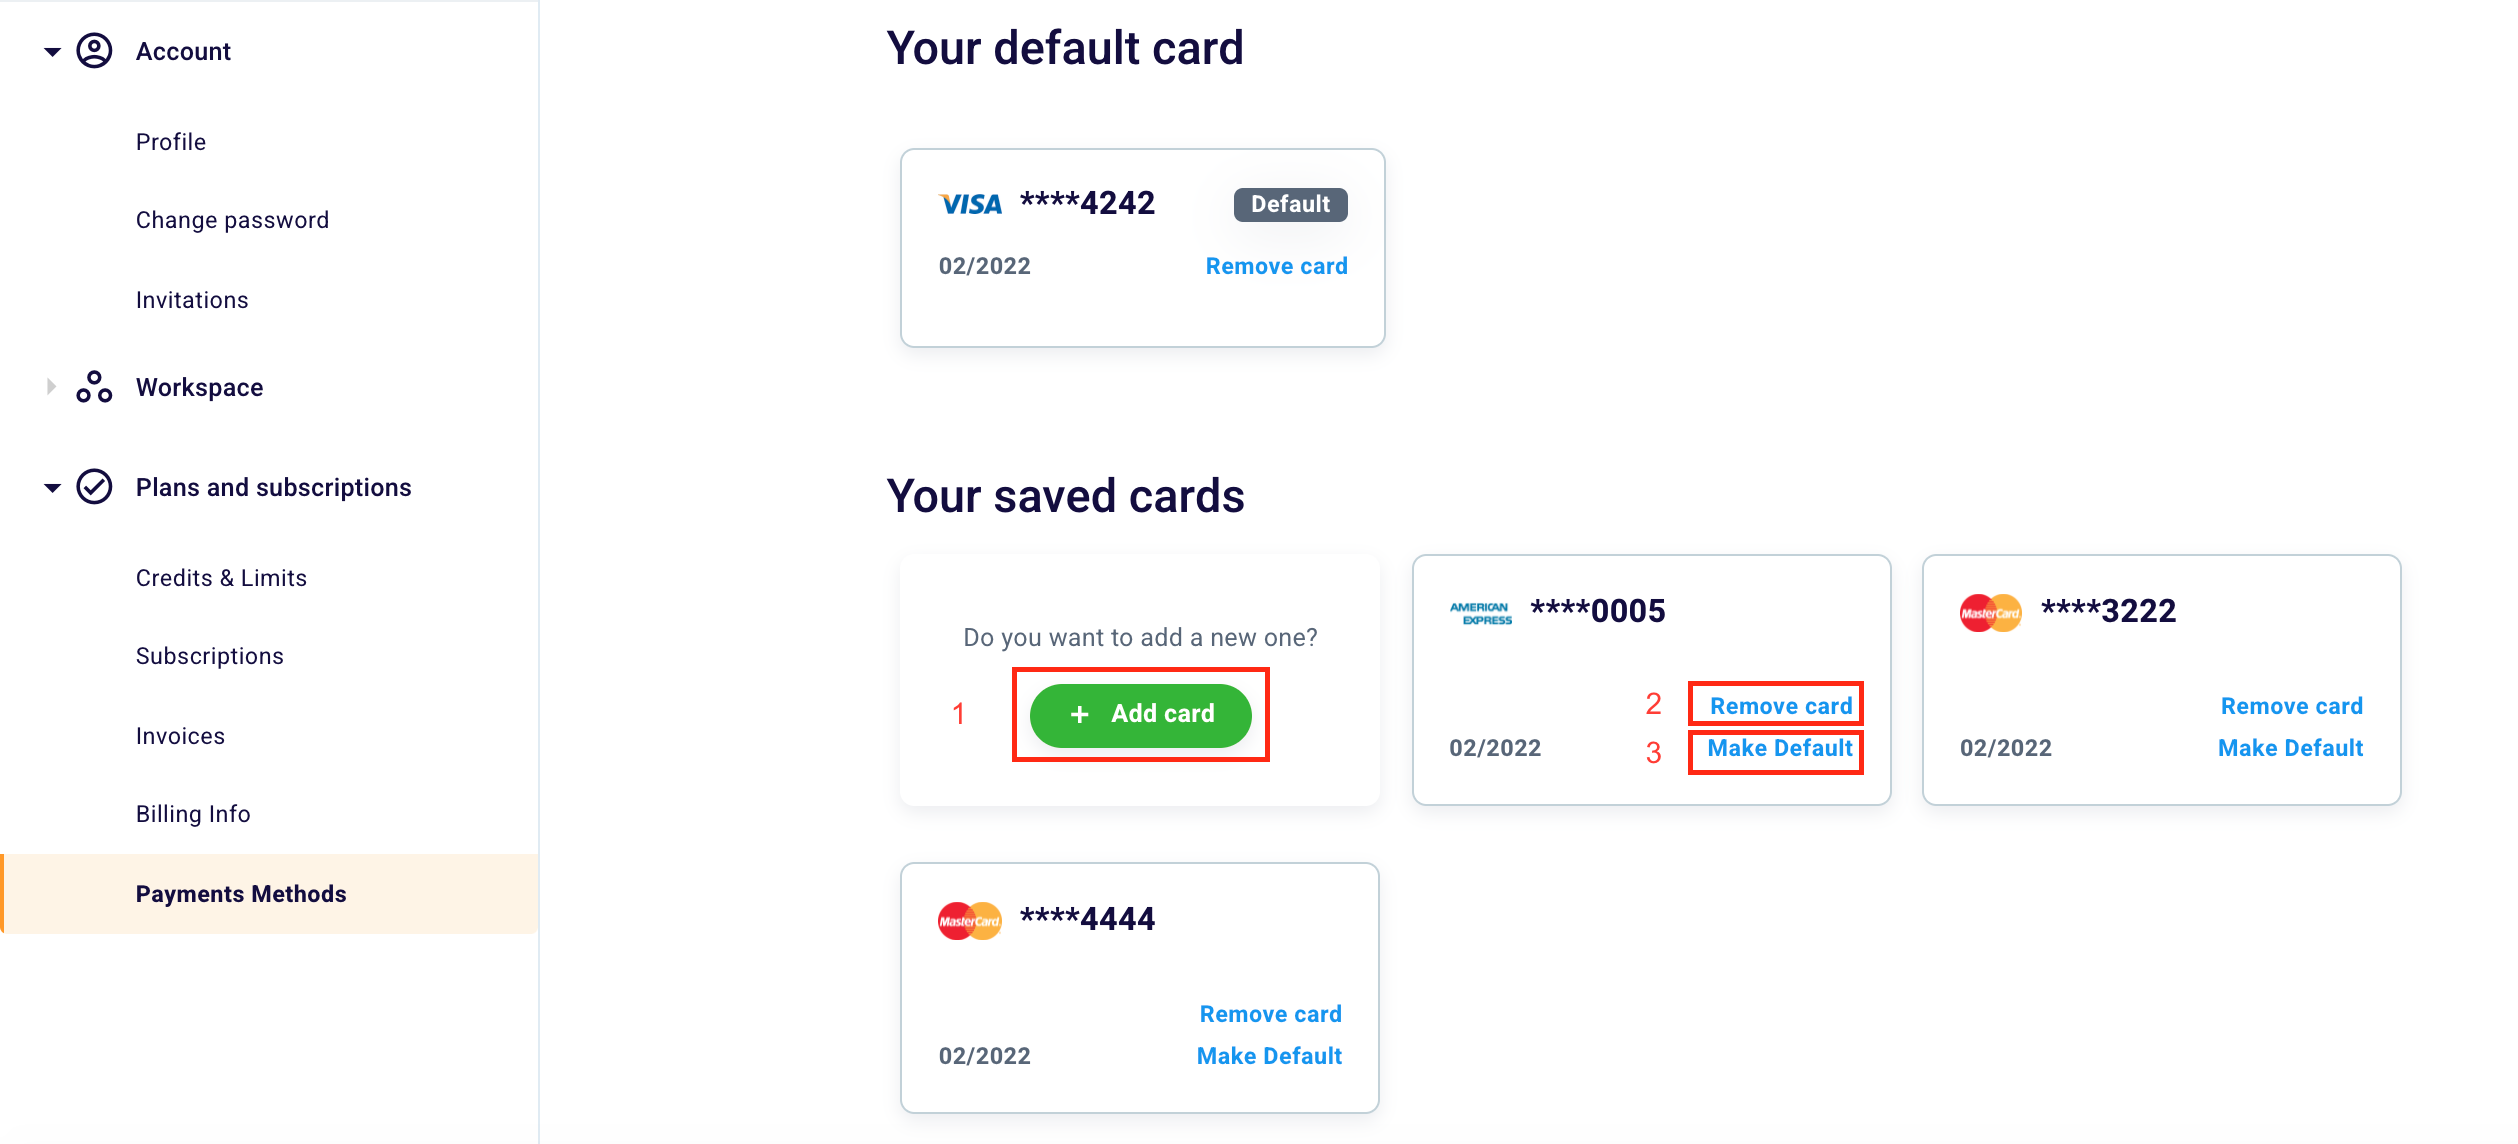
If you have set up more cards, always in the “Payment Methods” section, you will be faced with a similar situation.
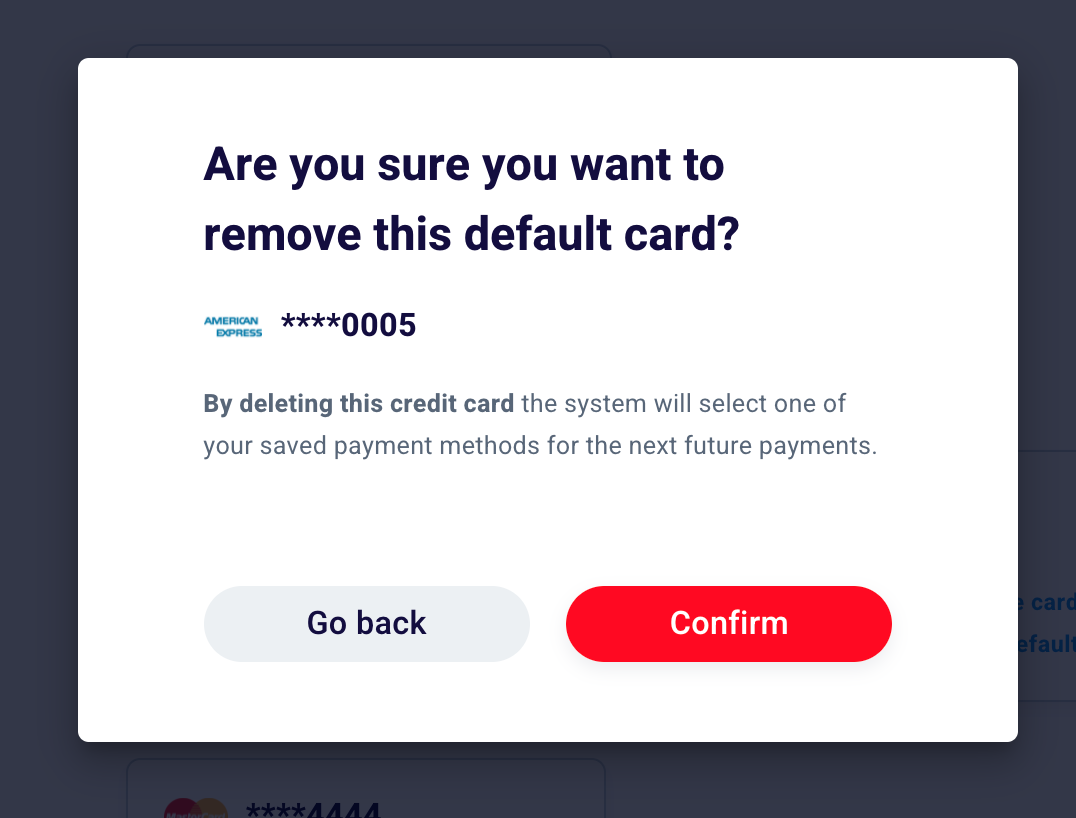
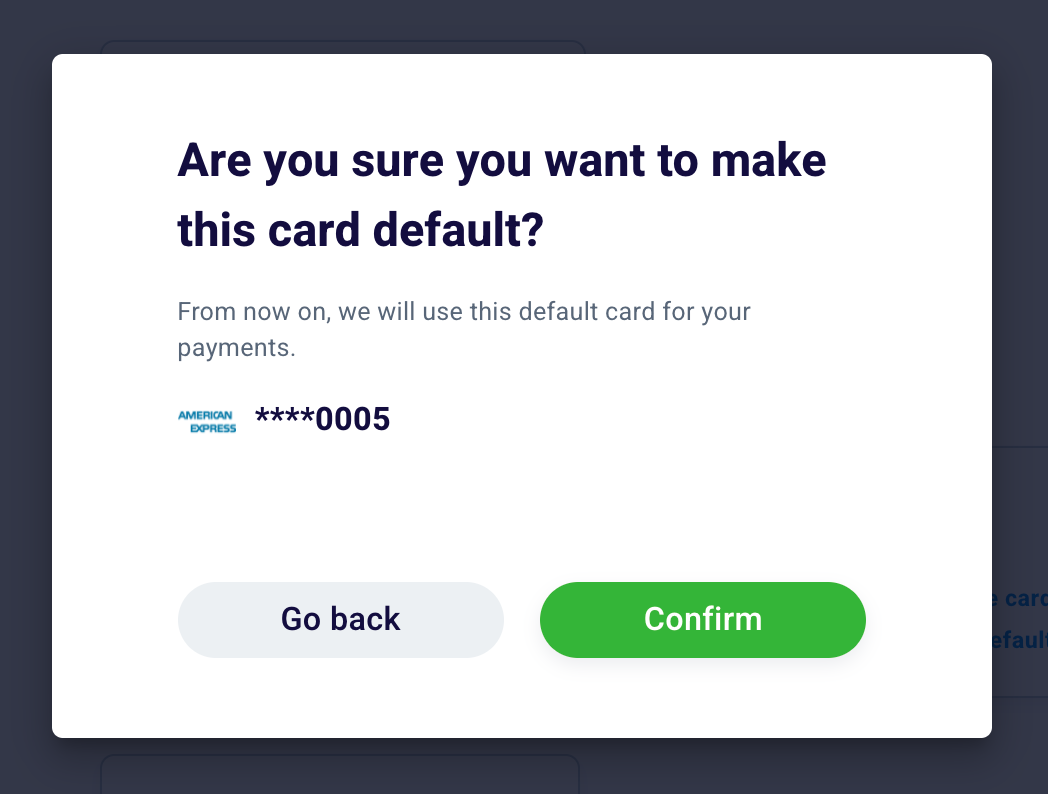
On this screen, you can connect a new payment method by selecting “Add Card” (1). If you want to remove a payment method, click on “Remove card” (2). To select a default payment method for your future payments, simply click on “Make Default” (3).
In both cases, our system will ask you to validate your choice. Click on “Confirm” if you really want to remove a card or make it a default.
How to disable automatic renewal?
To disable automatic renewal you will need to go to the “Subscriptions” section which you can find in your profile settings within the part relating to “Plans and Subscriptions”.
Your active subscriptions will appear here.
To deactivate the renewal you will then have to click “Cancel automatic renewal”. Just follow the deactivation flow to revoke the automatic renewal option.
How to activate automatic renewal?
If, on the other hand, you want to re-enable automatic renewal, just go to the “Subscriptions” section, and click the green button or the blue writing that says “Enable automatic renewal“.
Remember that, if you do not activate the automatic renewal, at the end of your subscription or free trial period, you will lose all the SEO data collected up to that moment!
In the same window, you can click “Contact us” if you want to speak to our Customer Care, which could help you solve your doubts and problems related to the use of the platform or your subscription.
How to choose a new subscription plan?
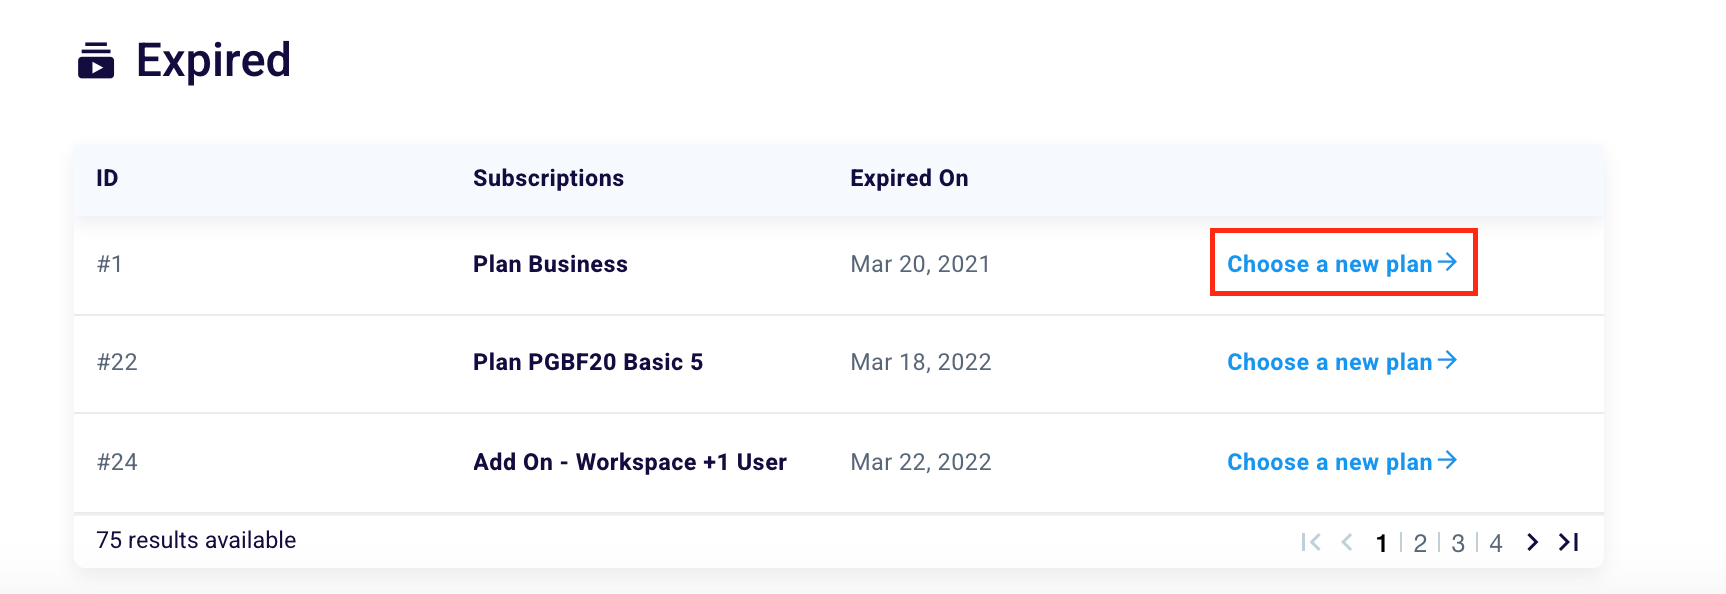
In the “Subscriptions” section you can also view your expired plans.
By clicking “Choose a new plan” you will be redirected to our Pricing Page where you can compare the different subscription solutions and choose the plan that best suits your needs.
How to download the payment invoice?
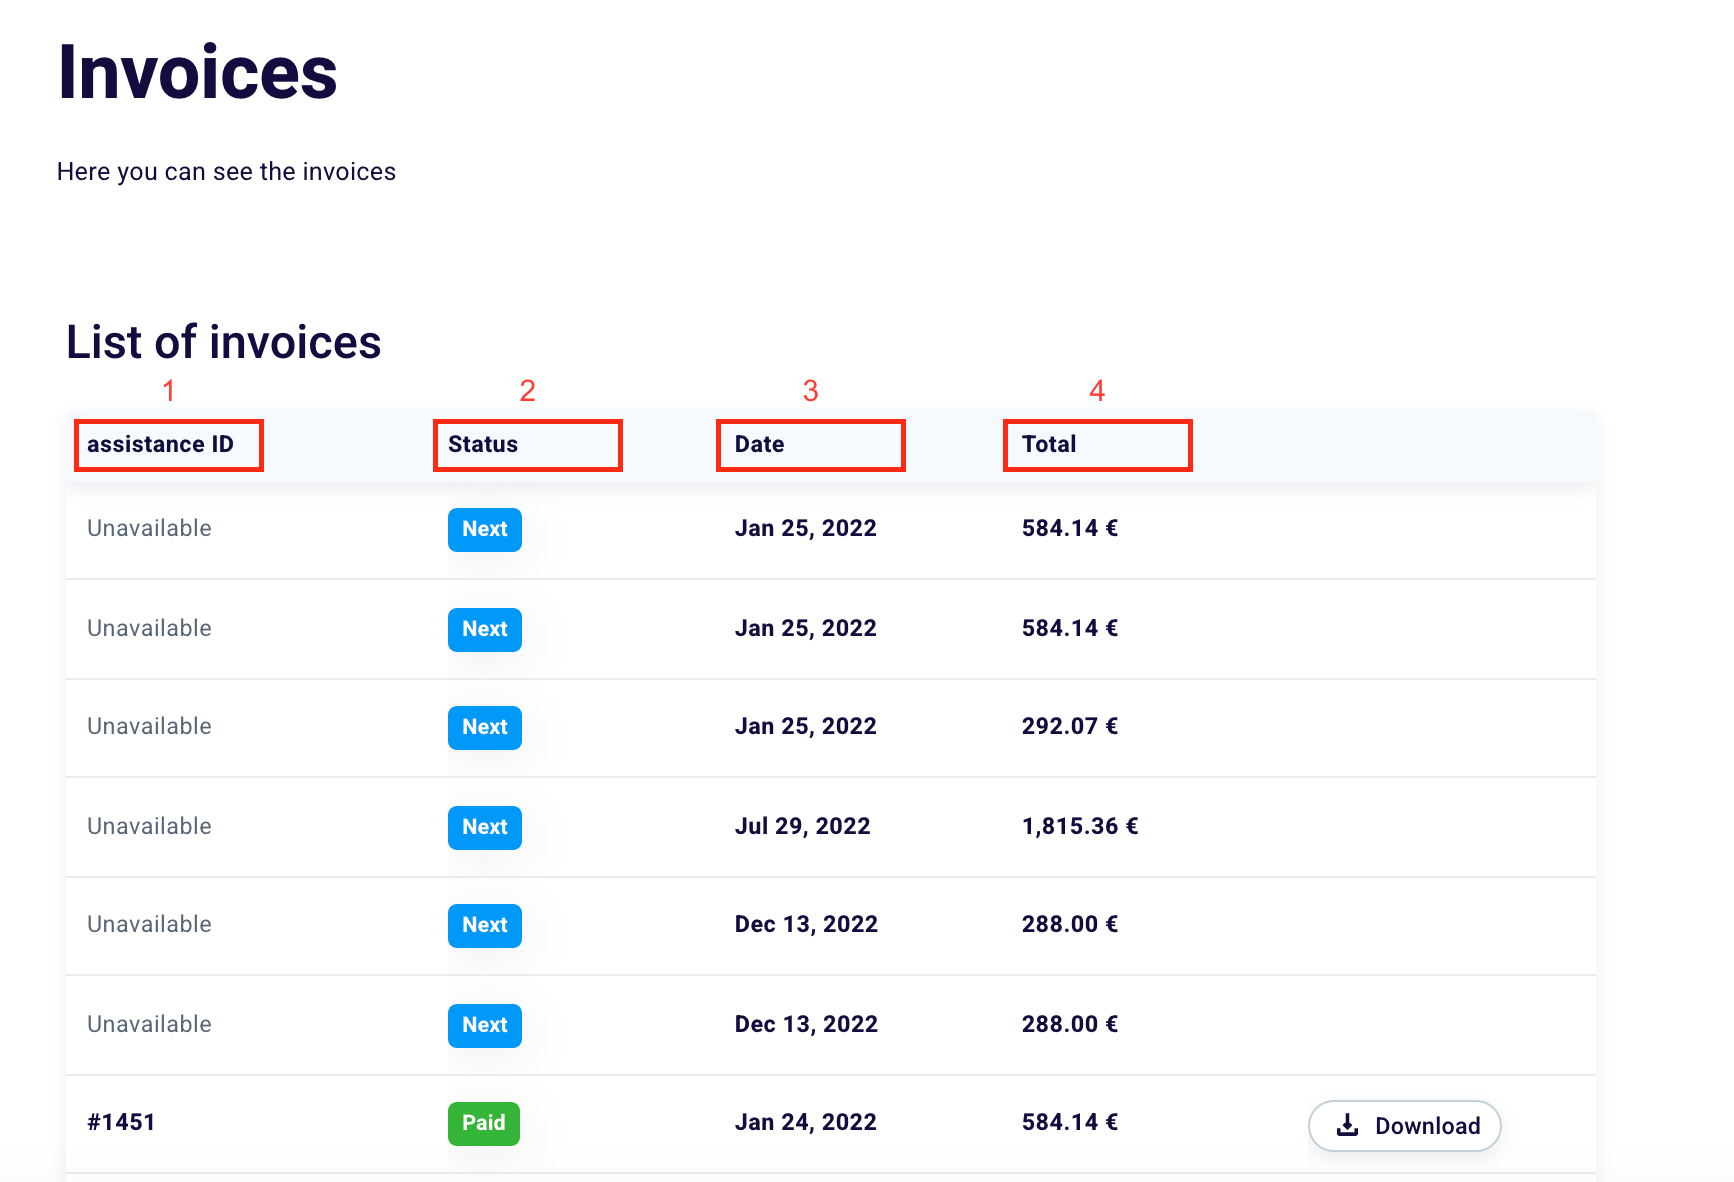
If you want to download the invoices relating to your plans, simply go to the “Invoices” section in the “Plans and Subscriptions” part of the Settings.
In the table, for each invoice, you can see 4 information.
“Assistance ID” (1) indicates, if available, the code to be communicated to the assistance to identify a specific invoice in case of doubts or problems.
The “Status” (2) suggests the condition of an invoice. It can be “Next” or still open and to be paid, or “Paid”.
The “Date” (3) indicates the month, day, and year (in that order) of the invoice issue.
The “Total” (4) reveals the amount in euros of the invoice.
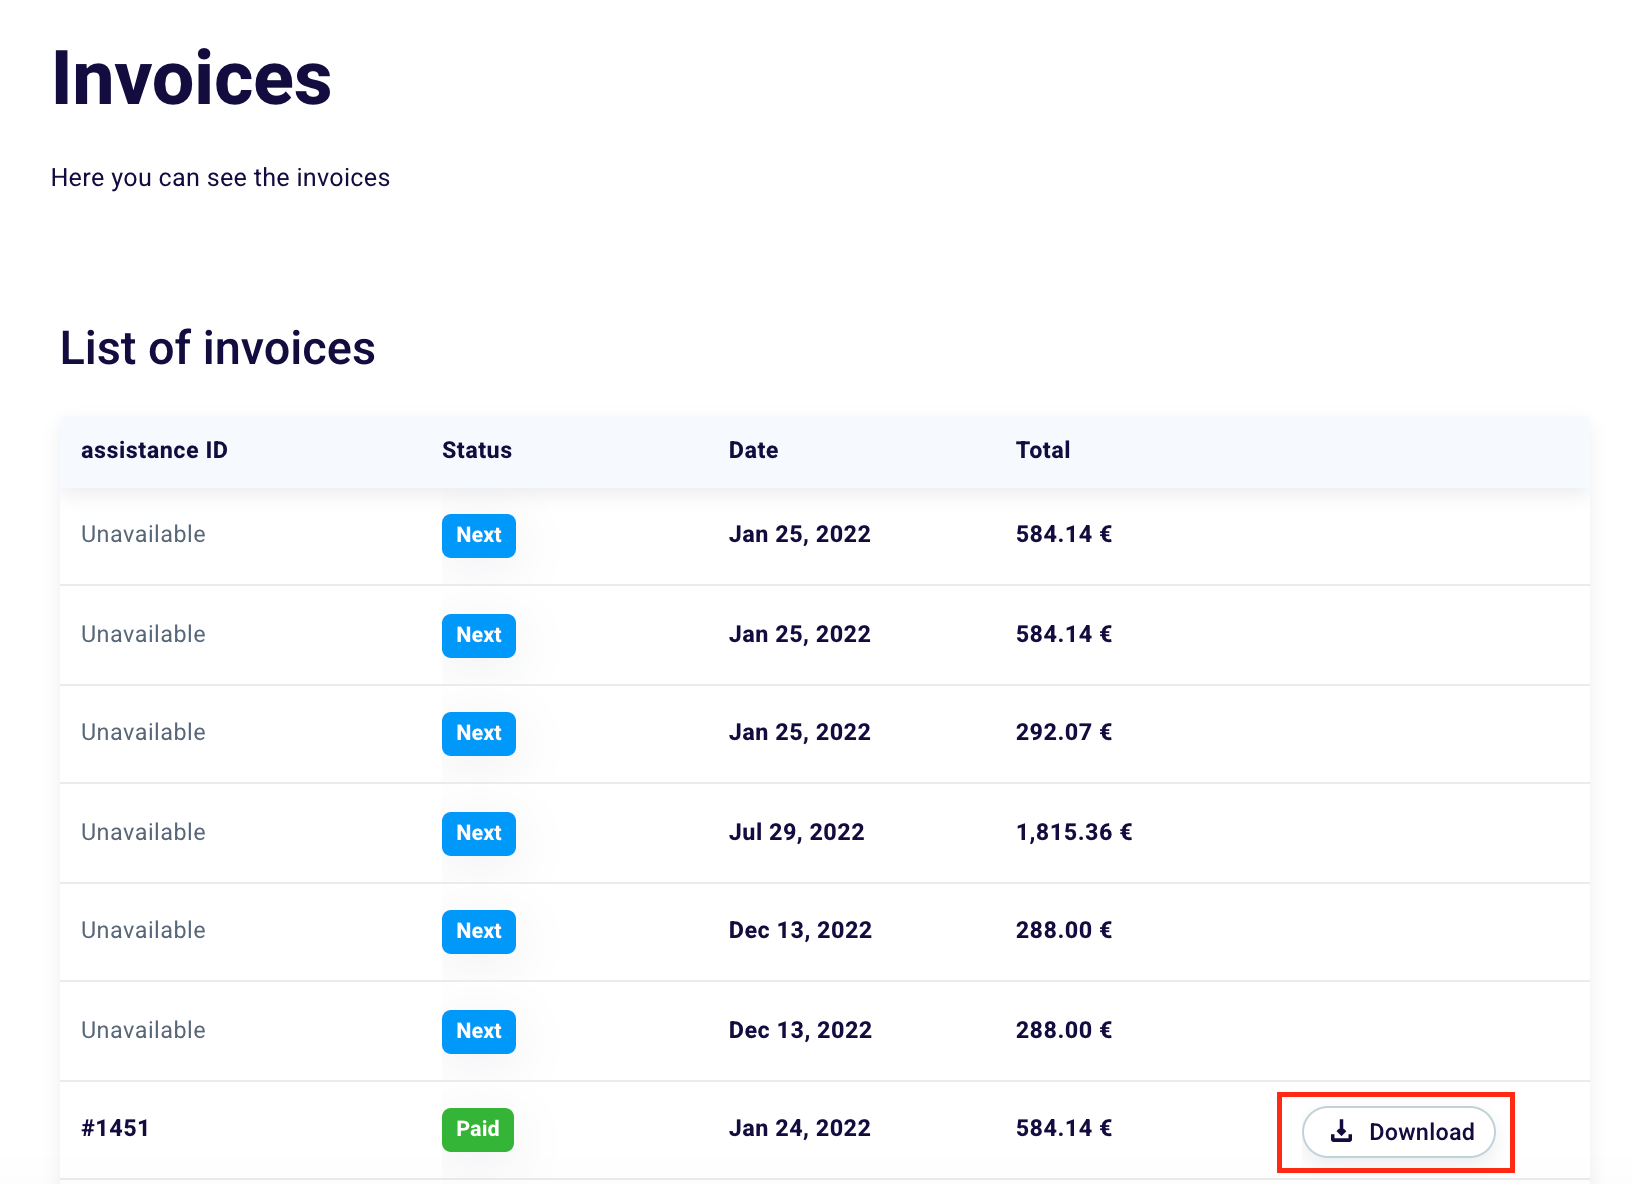
To download the invoice, you will need to click on the button of the same name to the right of the table.
How to change your billing information?
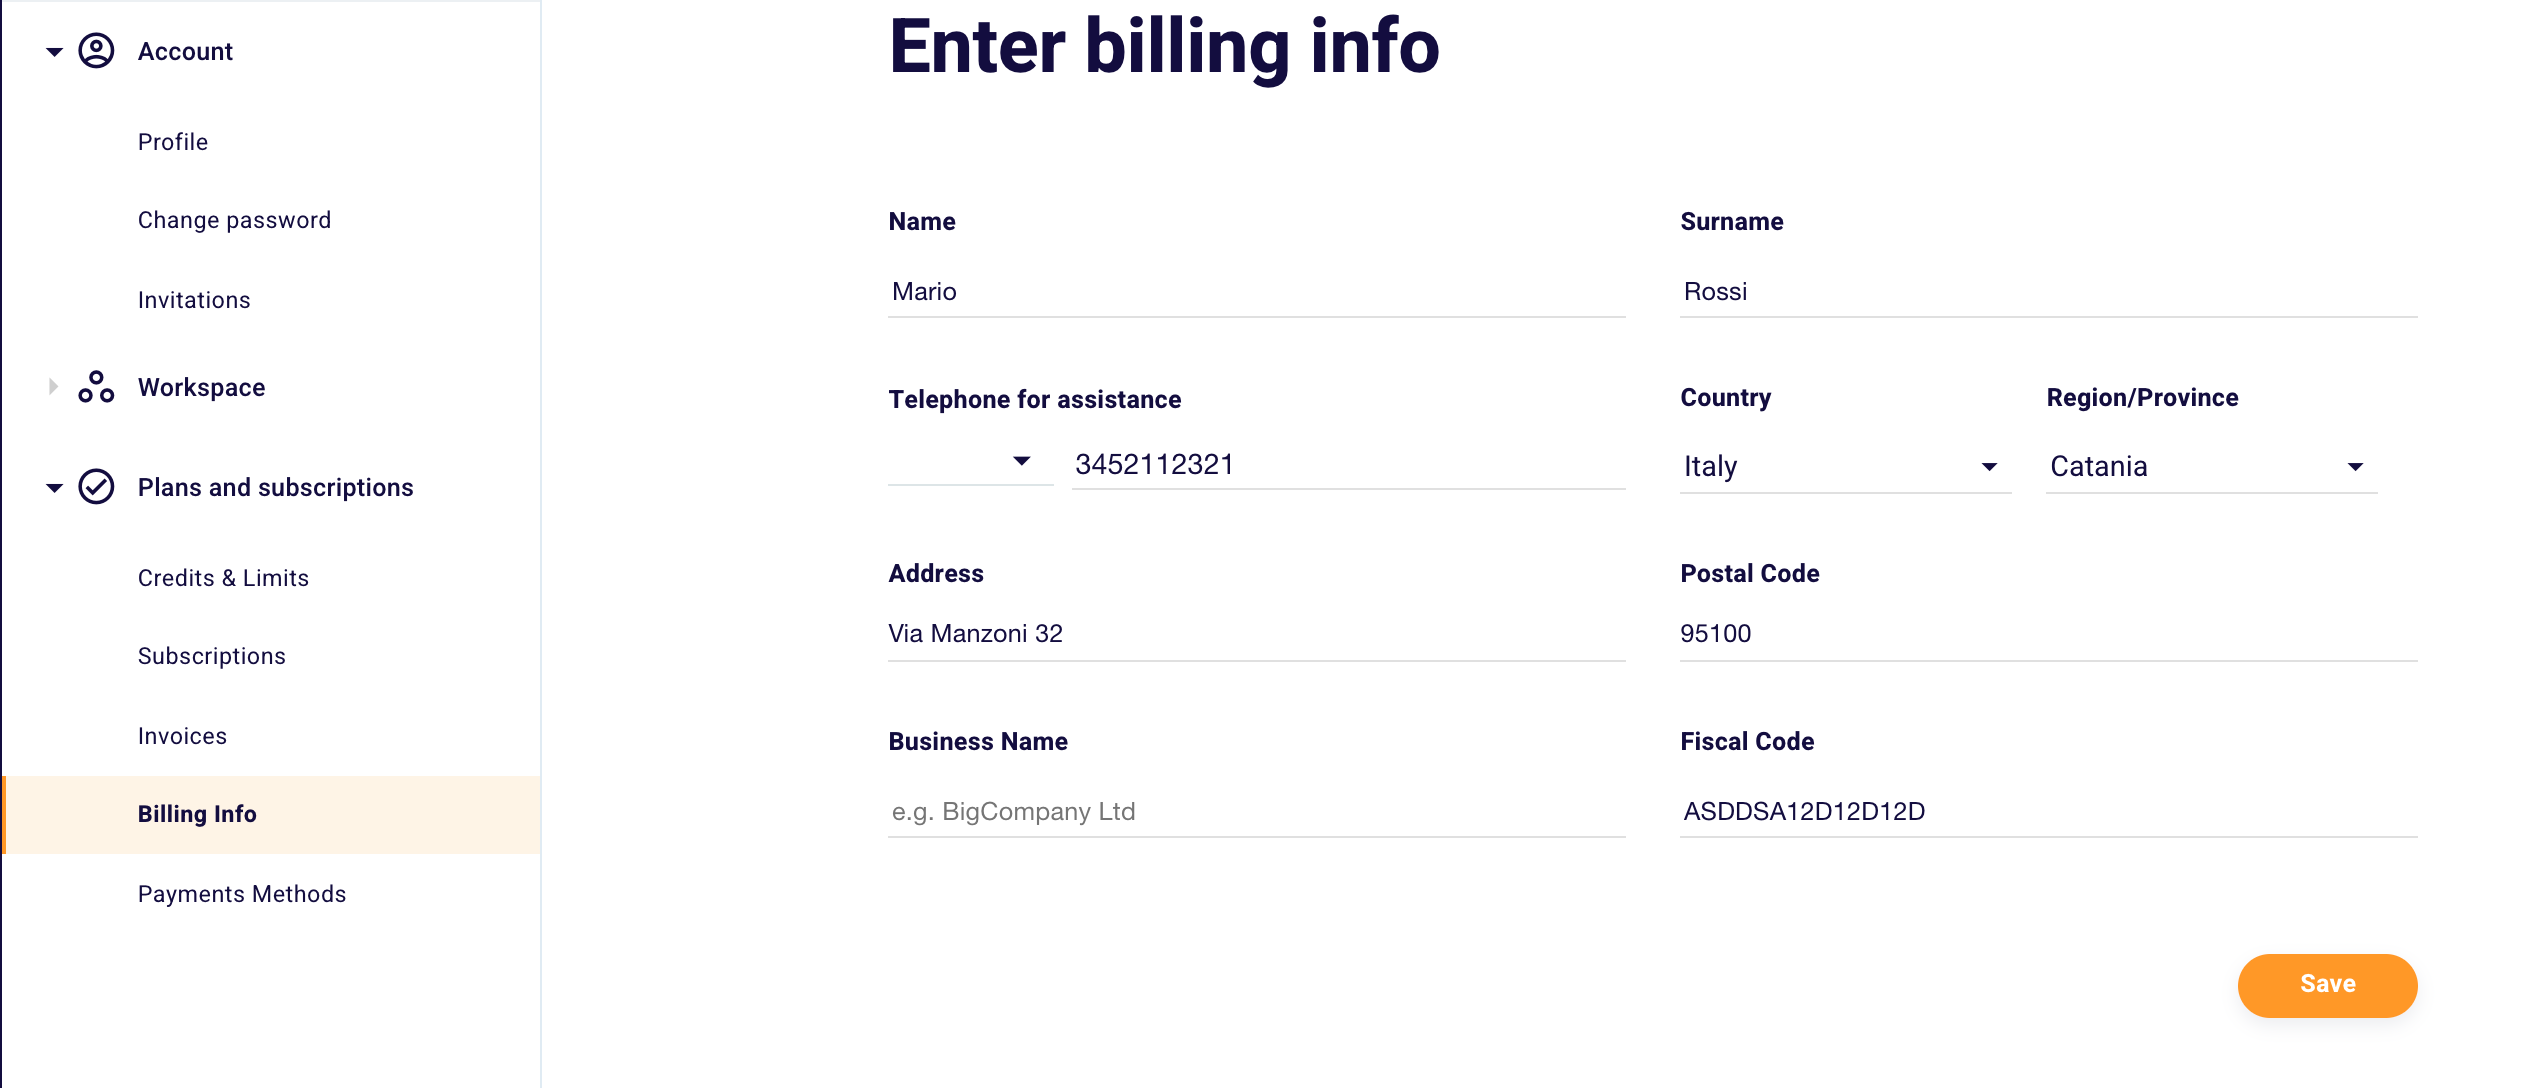
To change the billing information of your profile you must log in from here in the section of the same name.
After having entered or modified one or more data including Name, Surname, Telephone for assistance, Country, Province, Address, Postal Code, Company Fiscal Code, click on the orange button at the bottom right “Save” to confirm the changes made to your billing information.


