SERP Checker 360 ° Guide
Knowledge Base
  read
SERP Checker 360 °…
SEO Tester Online
18 November 2019

SERP Checker 360 ° Guide

SERP checker allows you to keep track of your competitors for a given keyword. With this tool, you can overview how the other websites are performing on the SERP for each query and why.

SERP Checker analyzes your competitors’ performances for what concerns the social signals, copywriting, and backlinks.

How to access SERP Checker 360°?

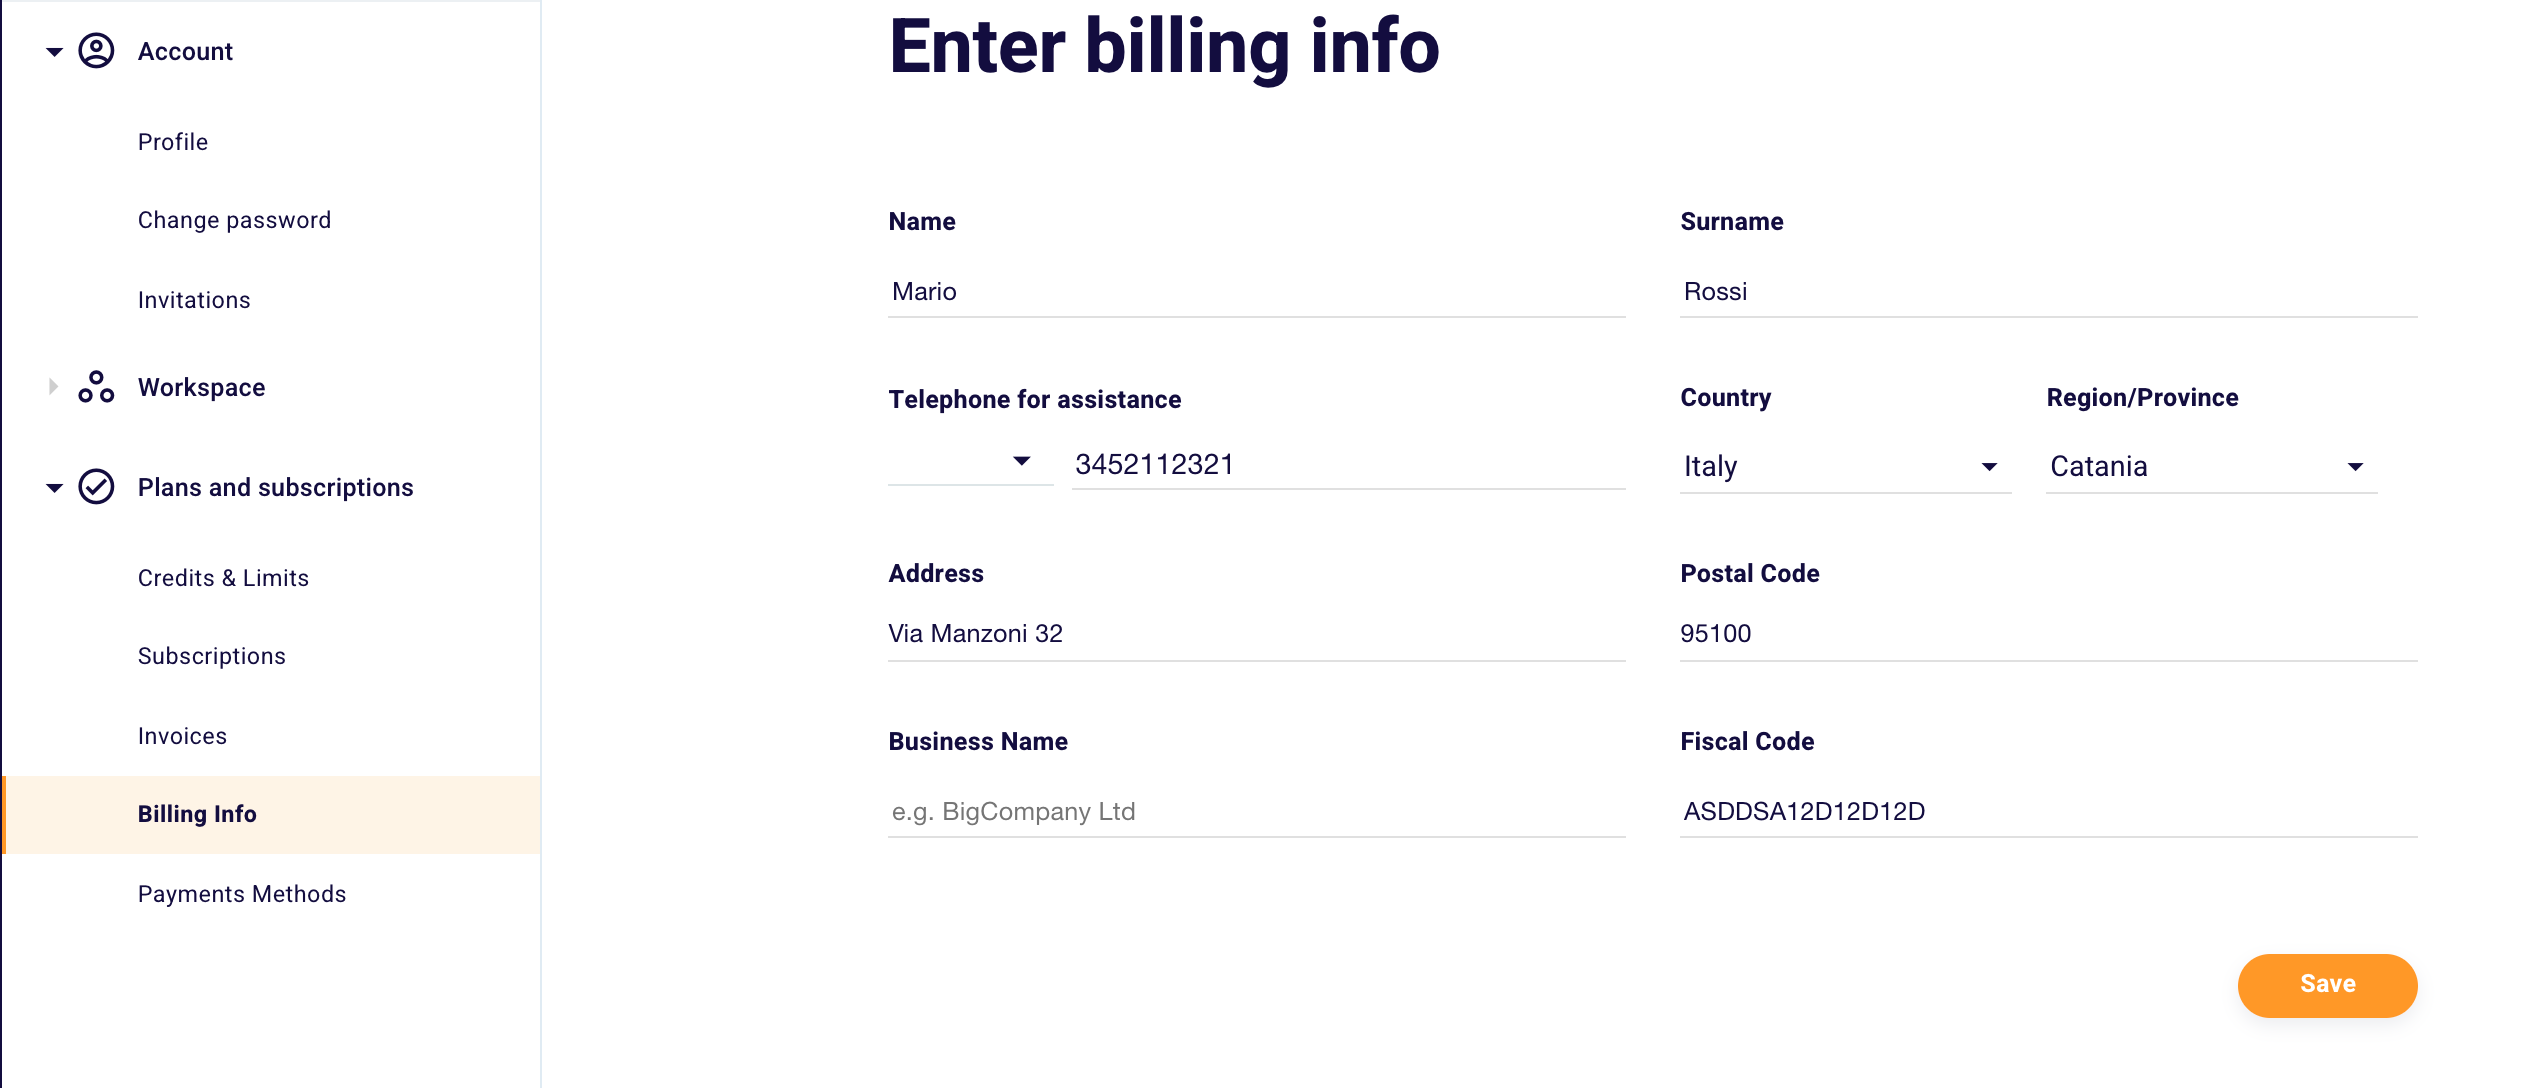
To enter our tool you can click here or click the respective icon in the side menu on the left.

How to use SERP Checker 360°?

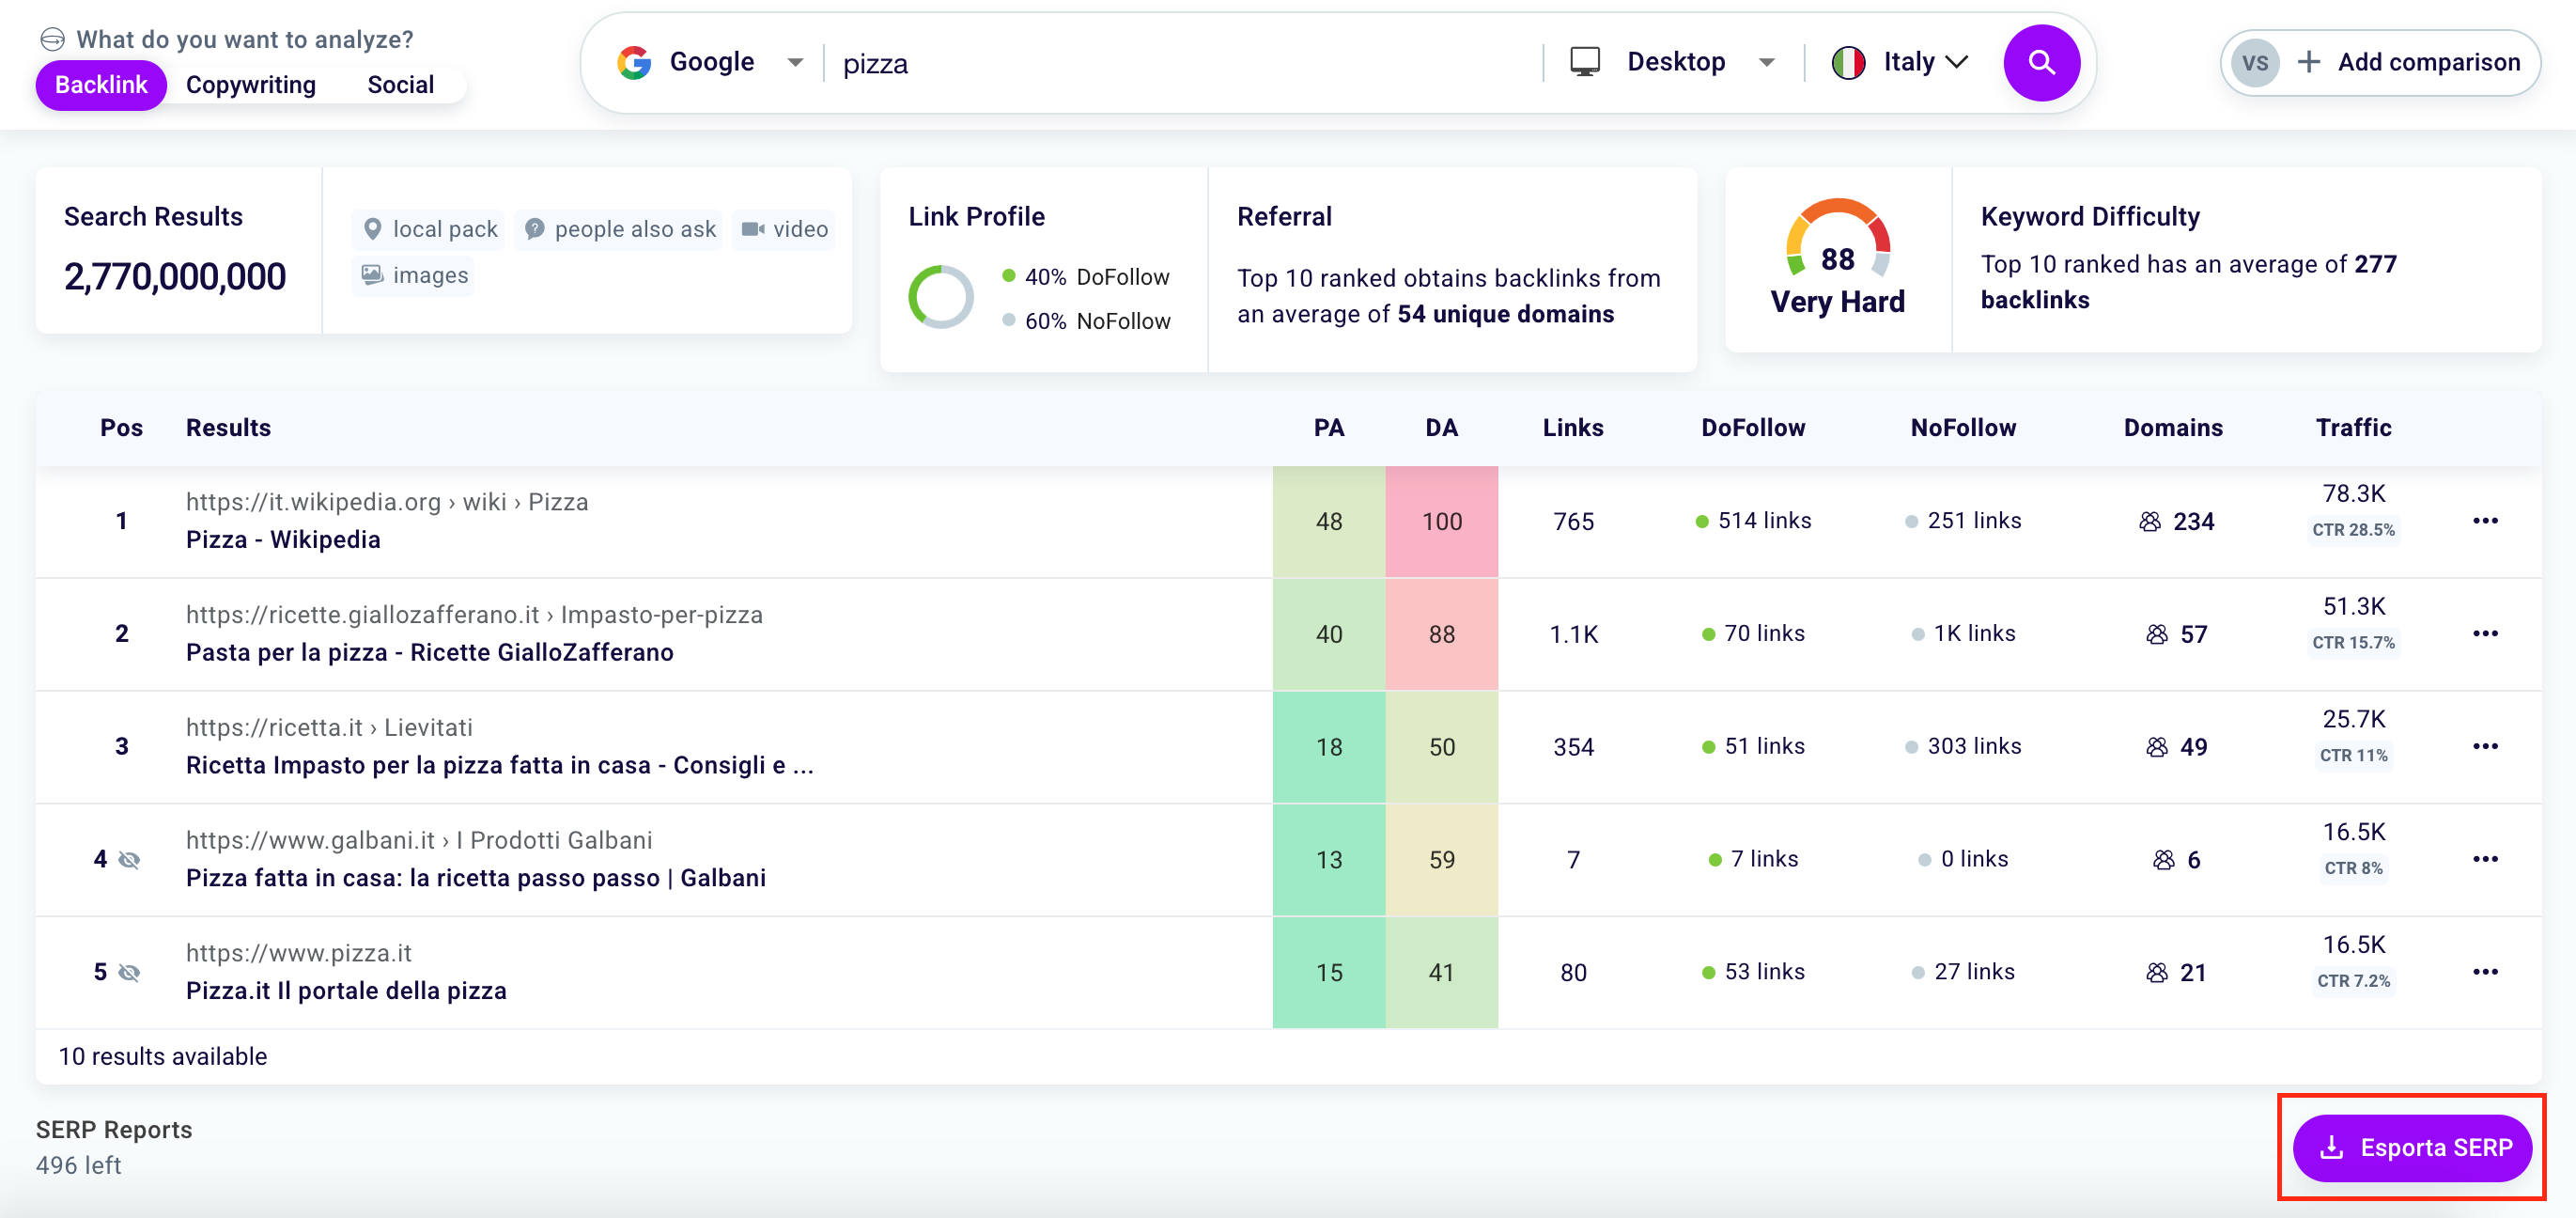
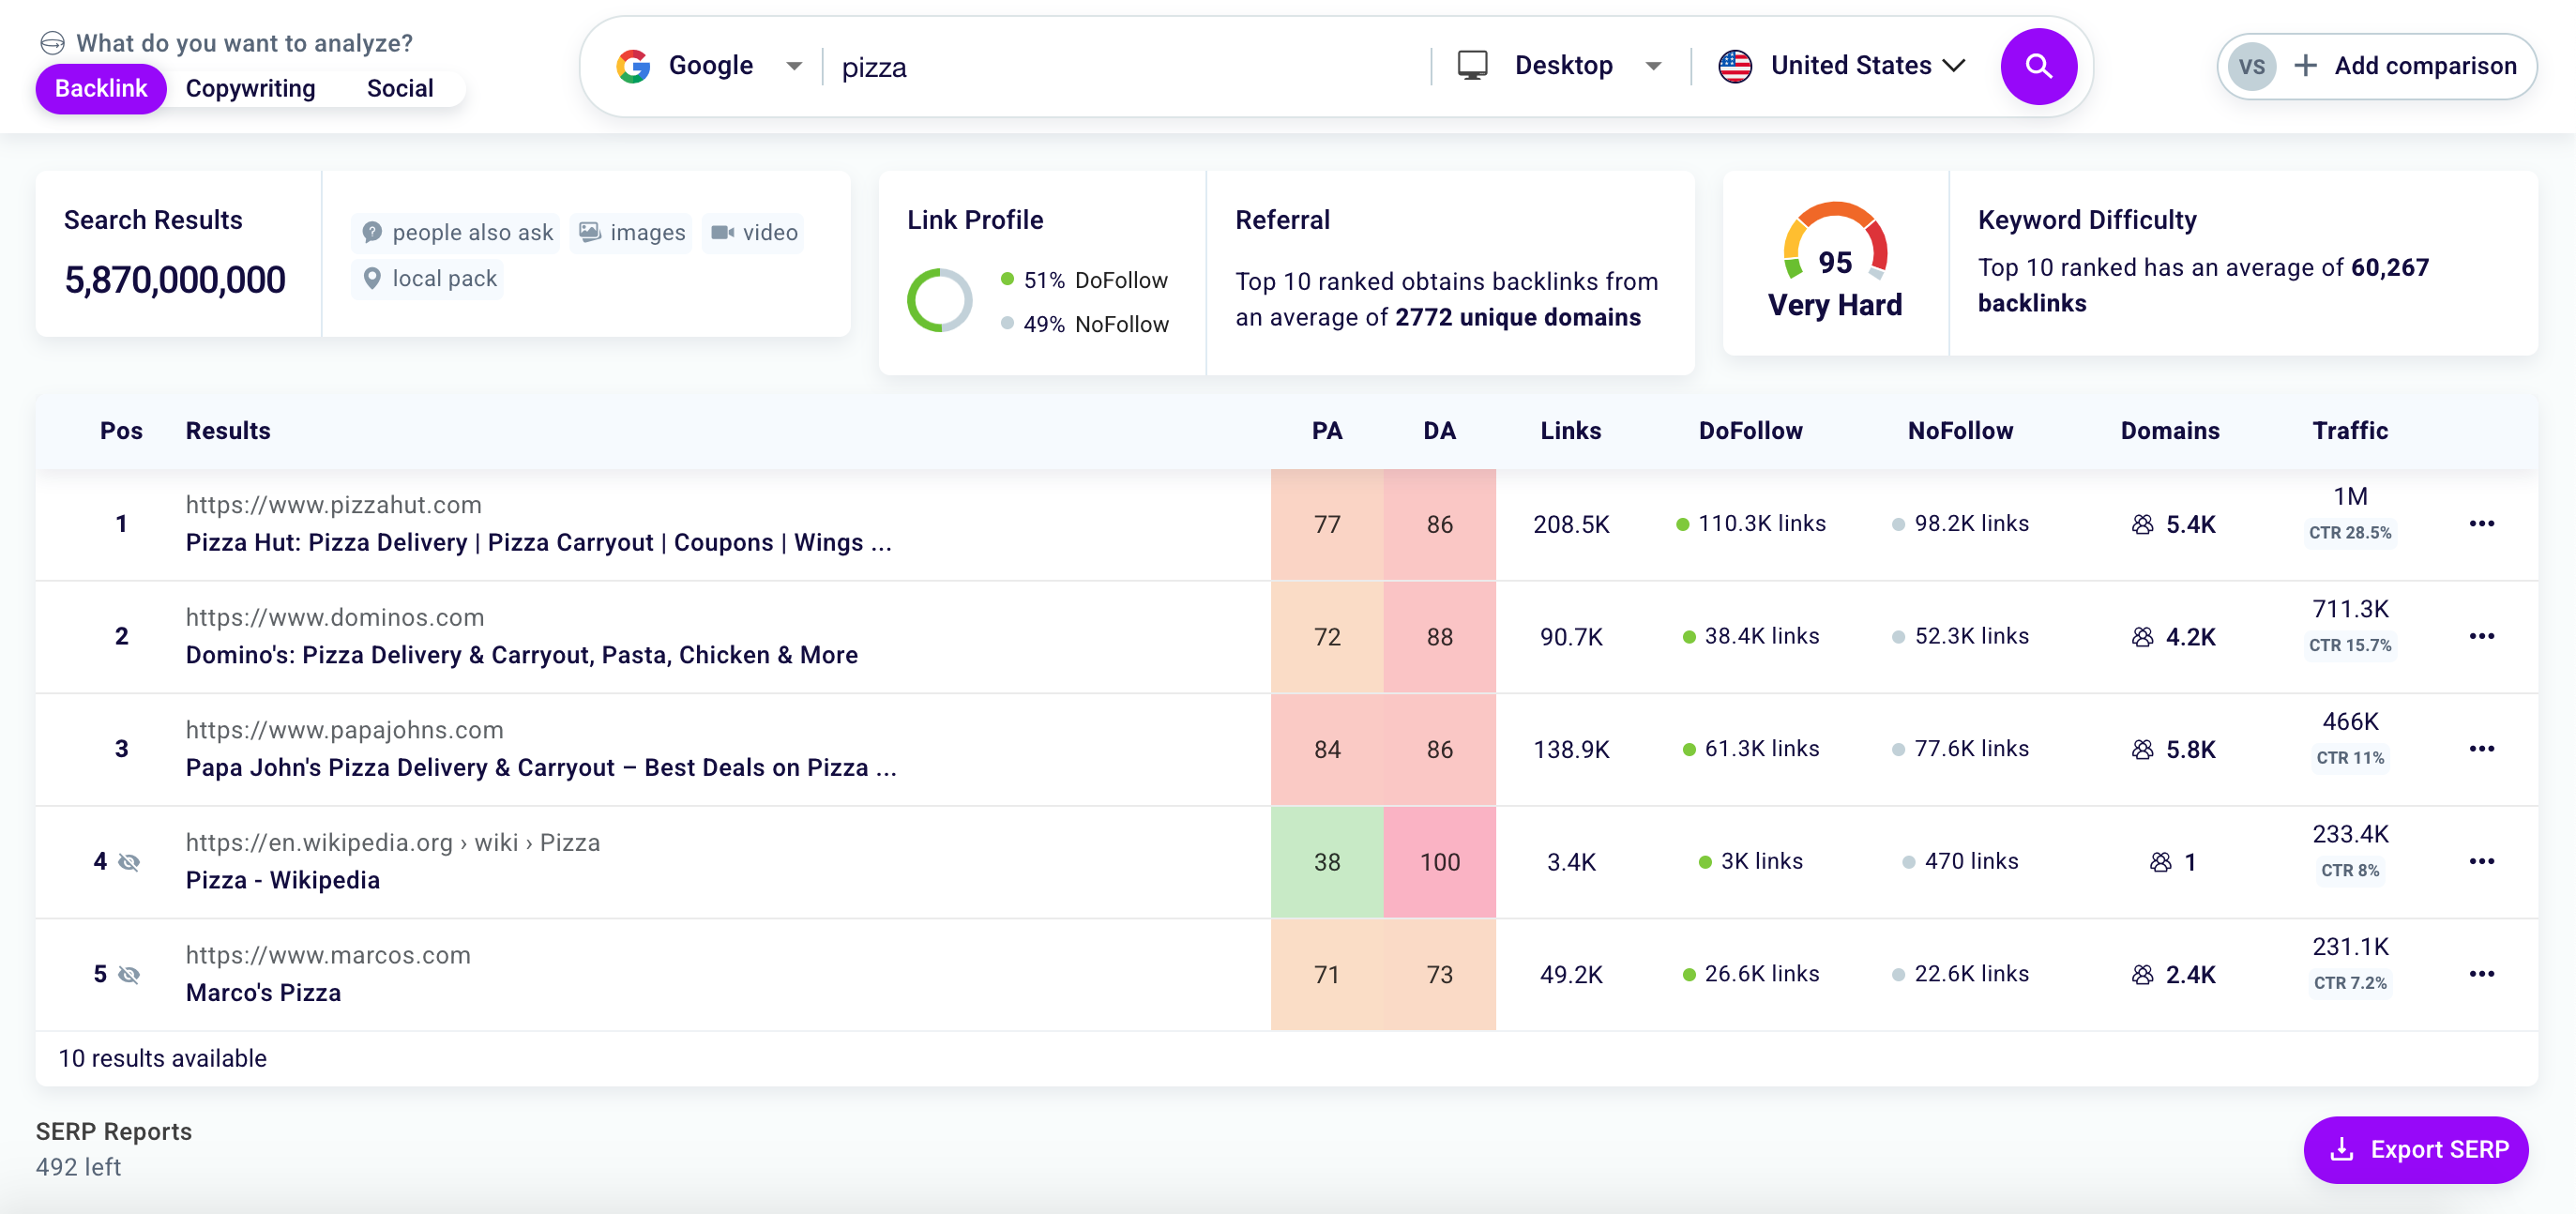
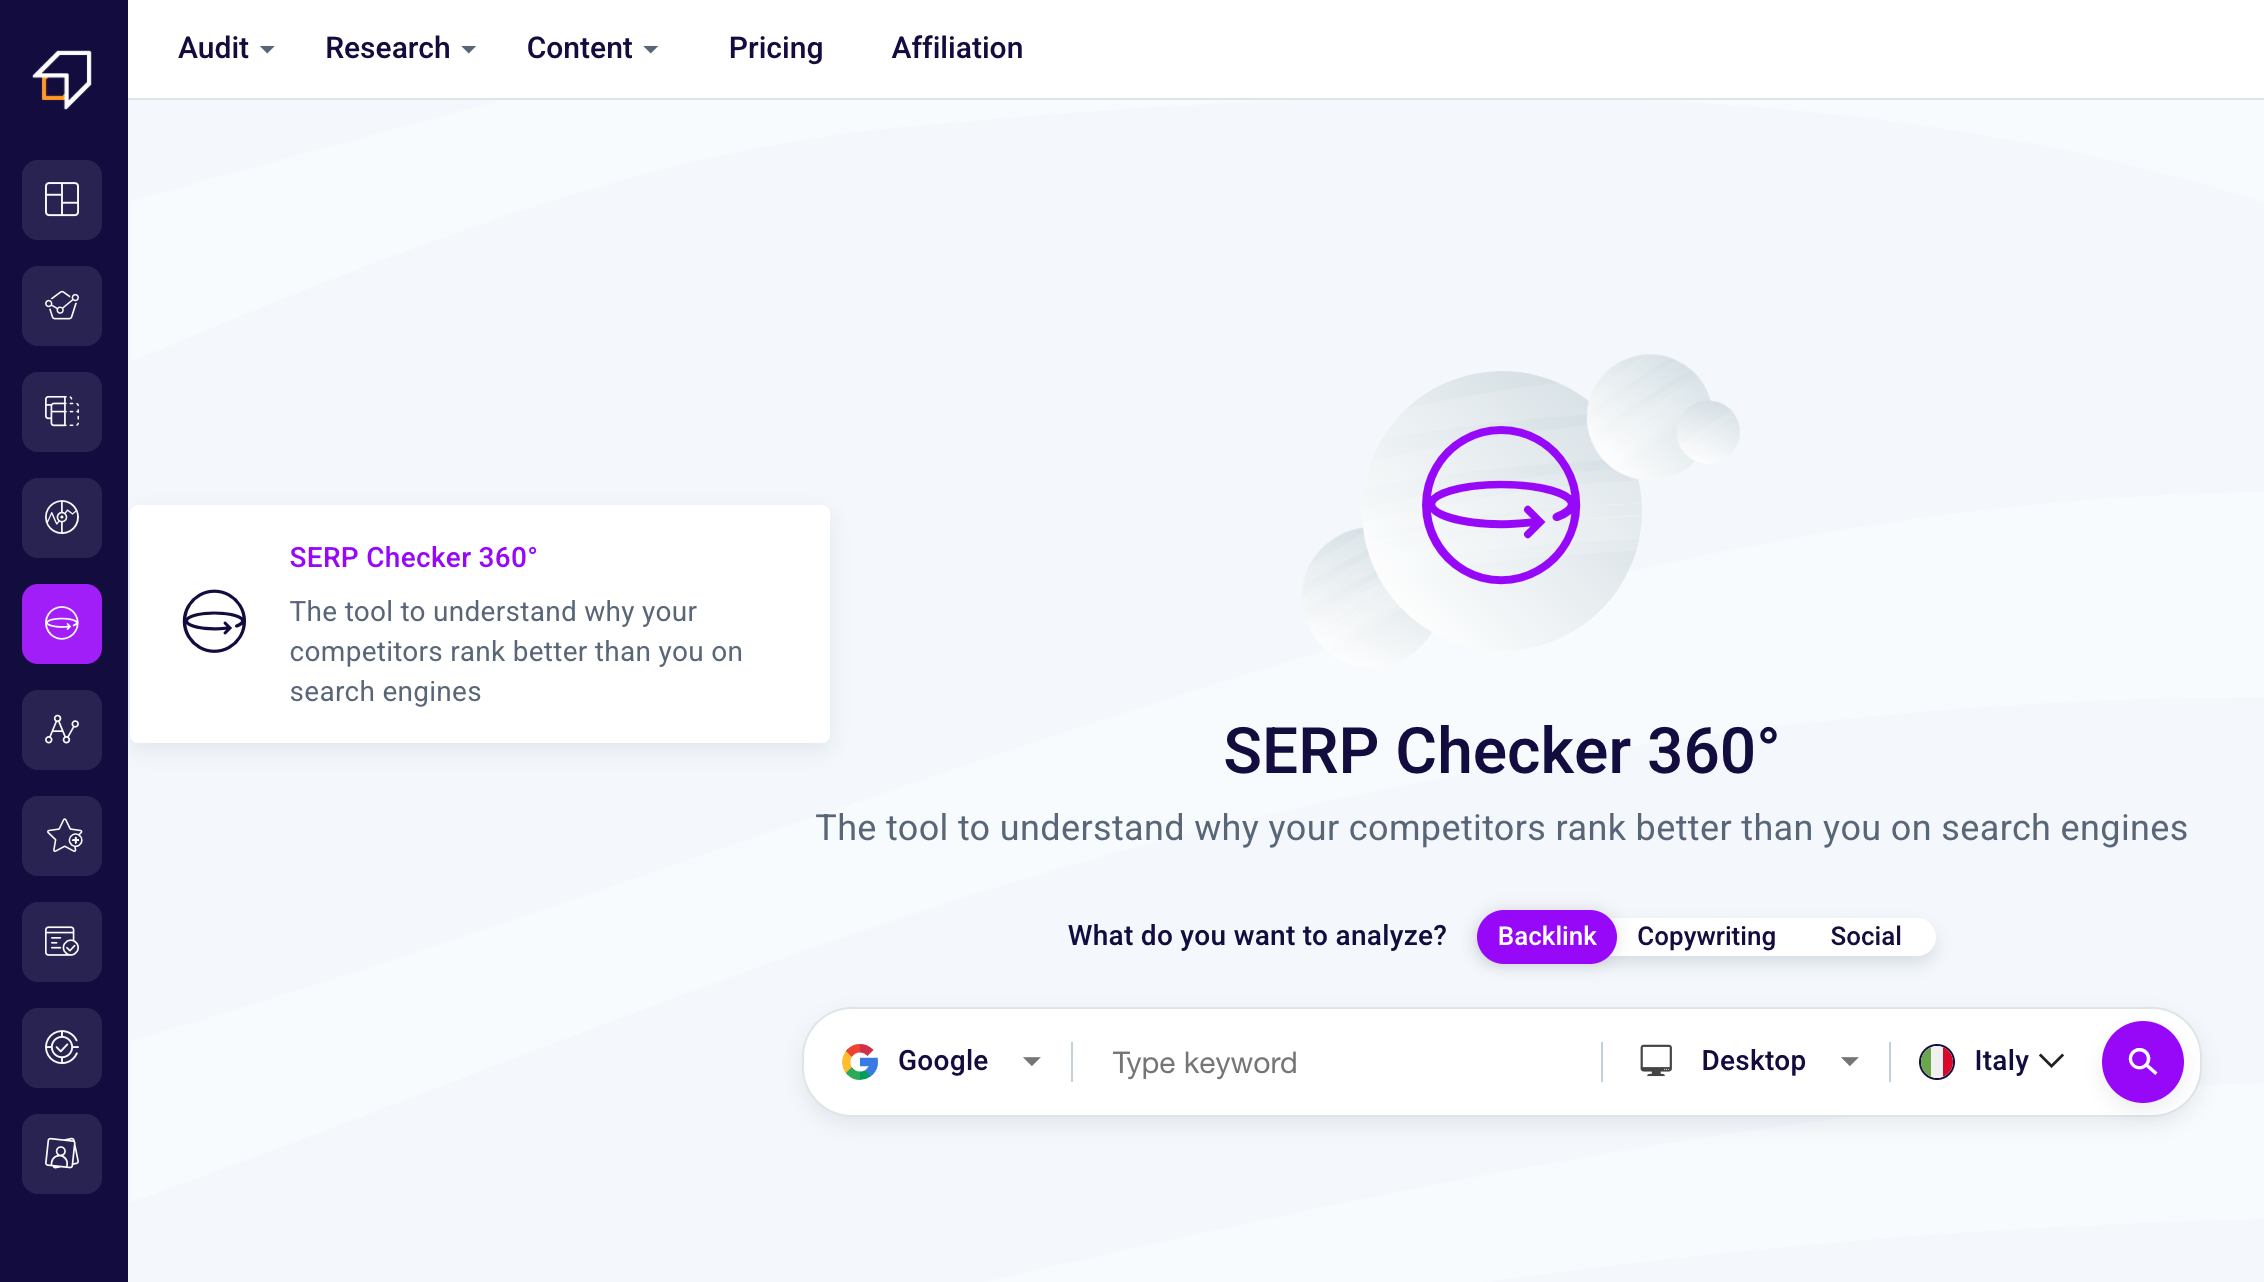
First choose which area to analyze from Backlinks, Copywriting, and Social (1). Then select a search engine from Google, Yahoo, Bing, and Yandex with the appropriate select (2). Enter the keyword for which you want to get the data in conjunction with the “Type a keyword” (3).

Want to understand how to find effective keywords? Follow our guidelines for keyword research.

Select the device for which to conduct the analysis between desktop and mobile (4) one of the 36 countries available (5) and start analyzing your competitors by clicking the magnifying glass in purple (6).

How to choose and switch the aspect analyze?

Finally, you have to choose the aspect you want to analyze. Just click either on Backlinks, Copywriting, or Social. If you’re undecided, don’t worry! You can always switch from one aspect to the other at any moment.

Backlinks

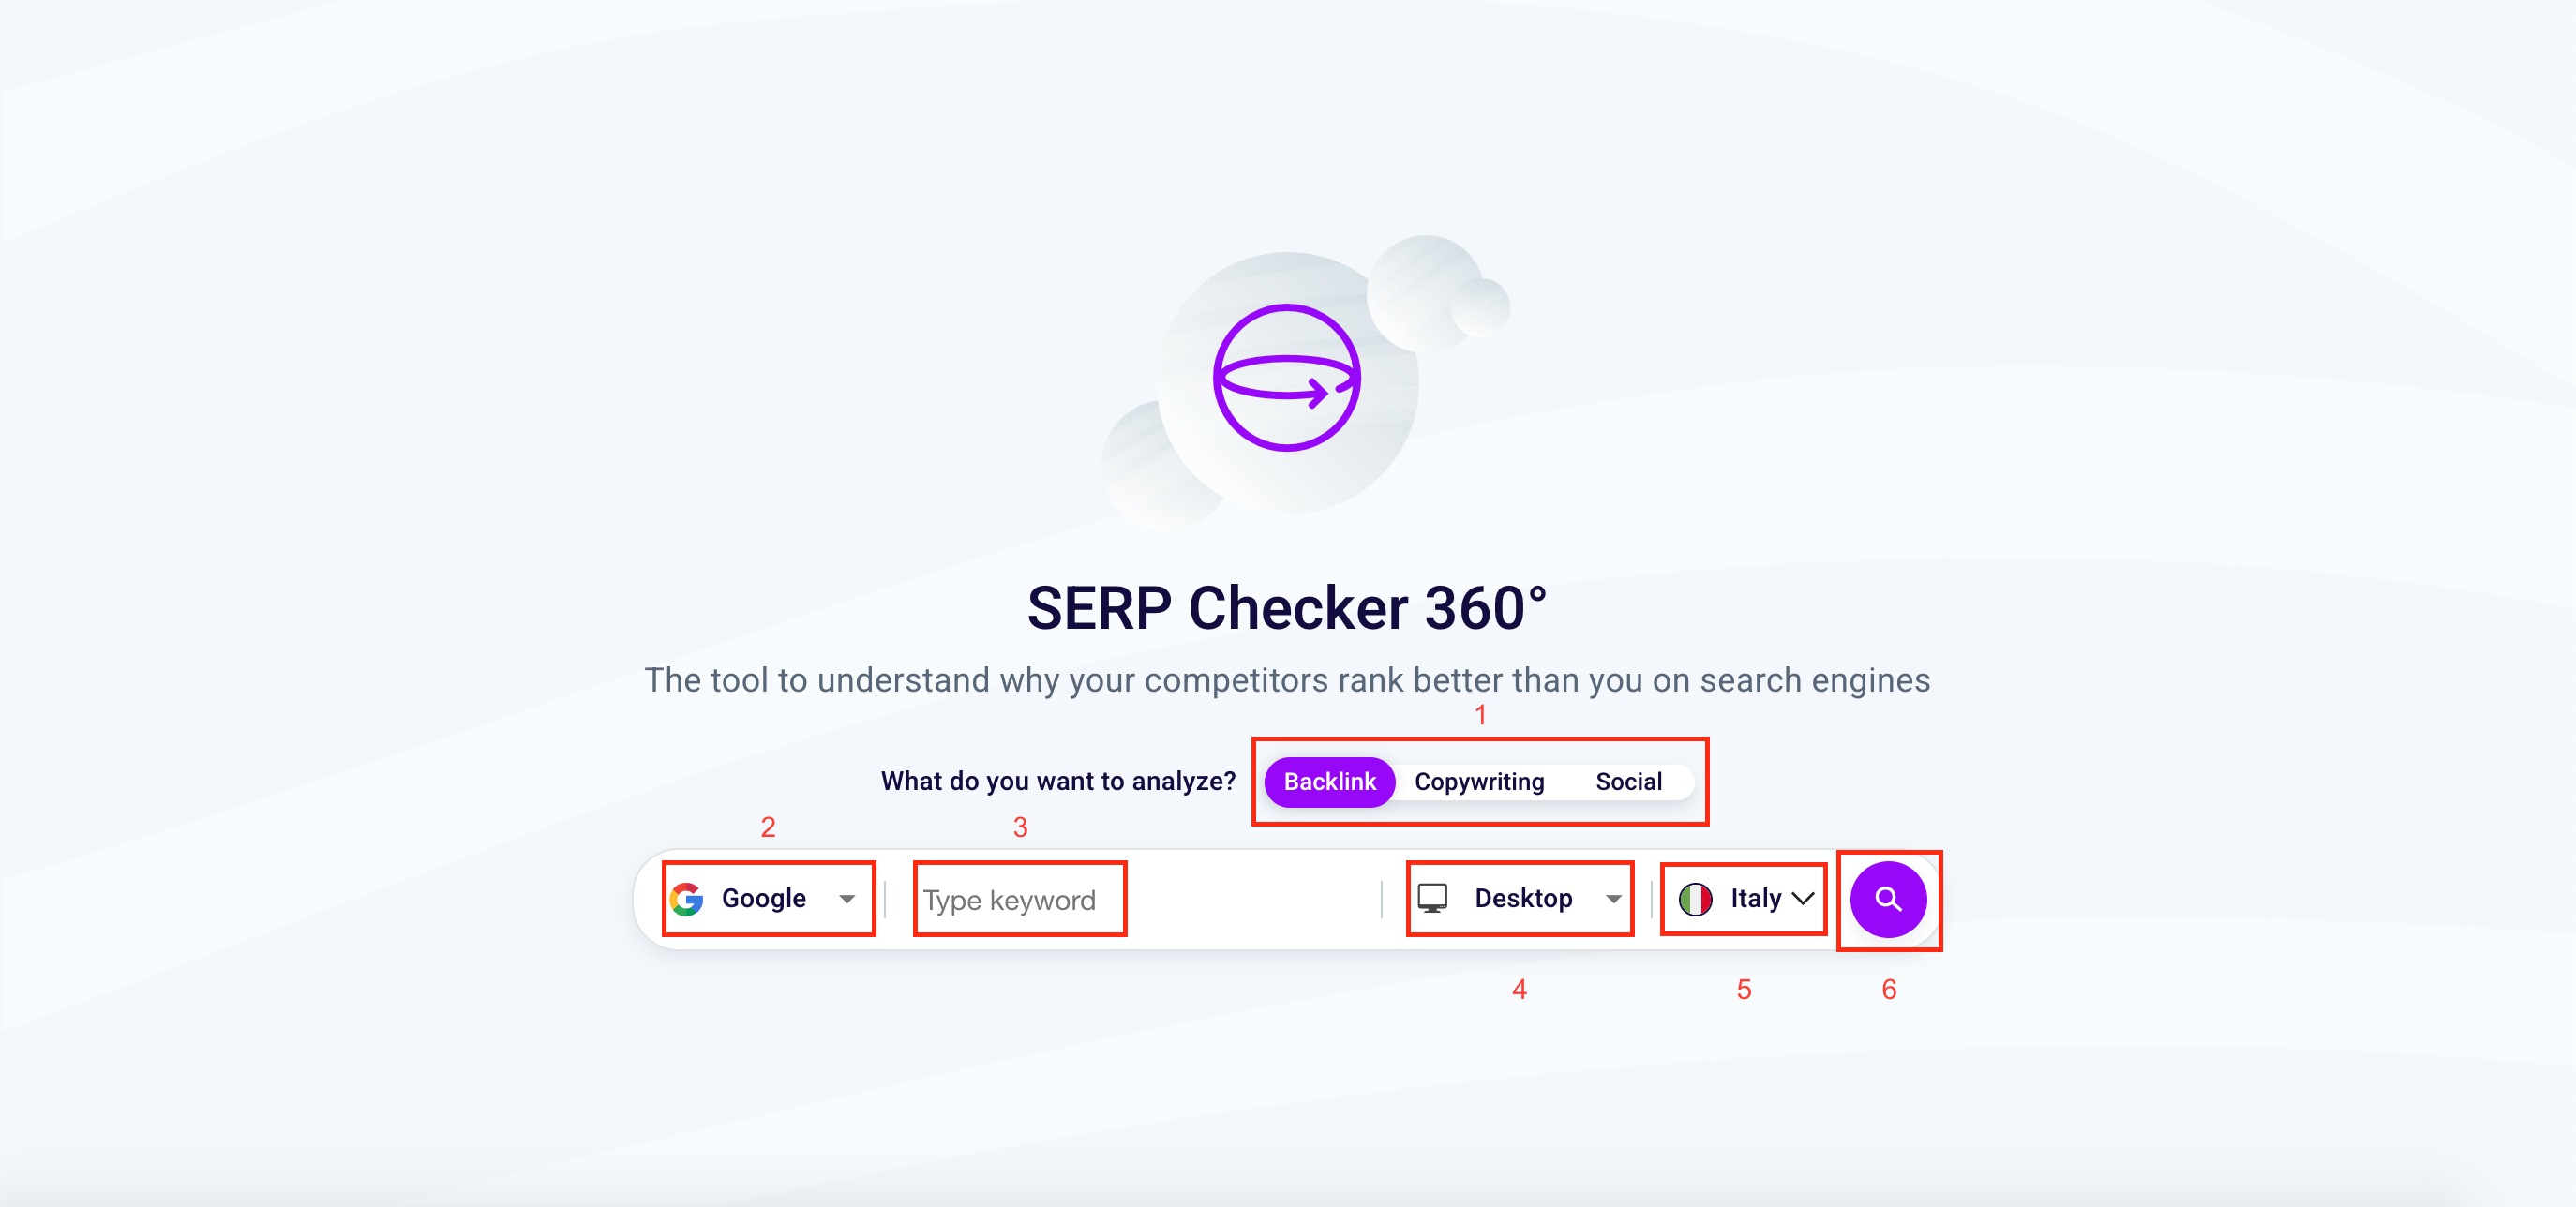
Here you’ll analyze the keyword difficulty, the number of inbound links for each result within the SERP, the domain and page authority, and the click-through rate. Go to the guide.

Copywriting

On this screen, for each result, you’ll be able to see the number of languages your competition’s content is translated into and all the metrics you can see on the copy metrics. Go to the guide.

Social

Here you’ll be able to see how your competitors’ content is performing on the social networks. You can see at a glance the number of shares, comments, and reactions for every result within the SERP. Go to the guide.

How to add competitors to your analysis?

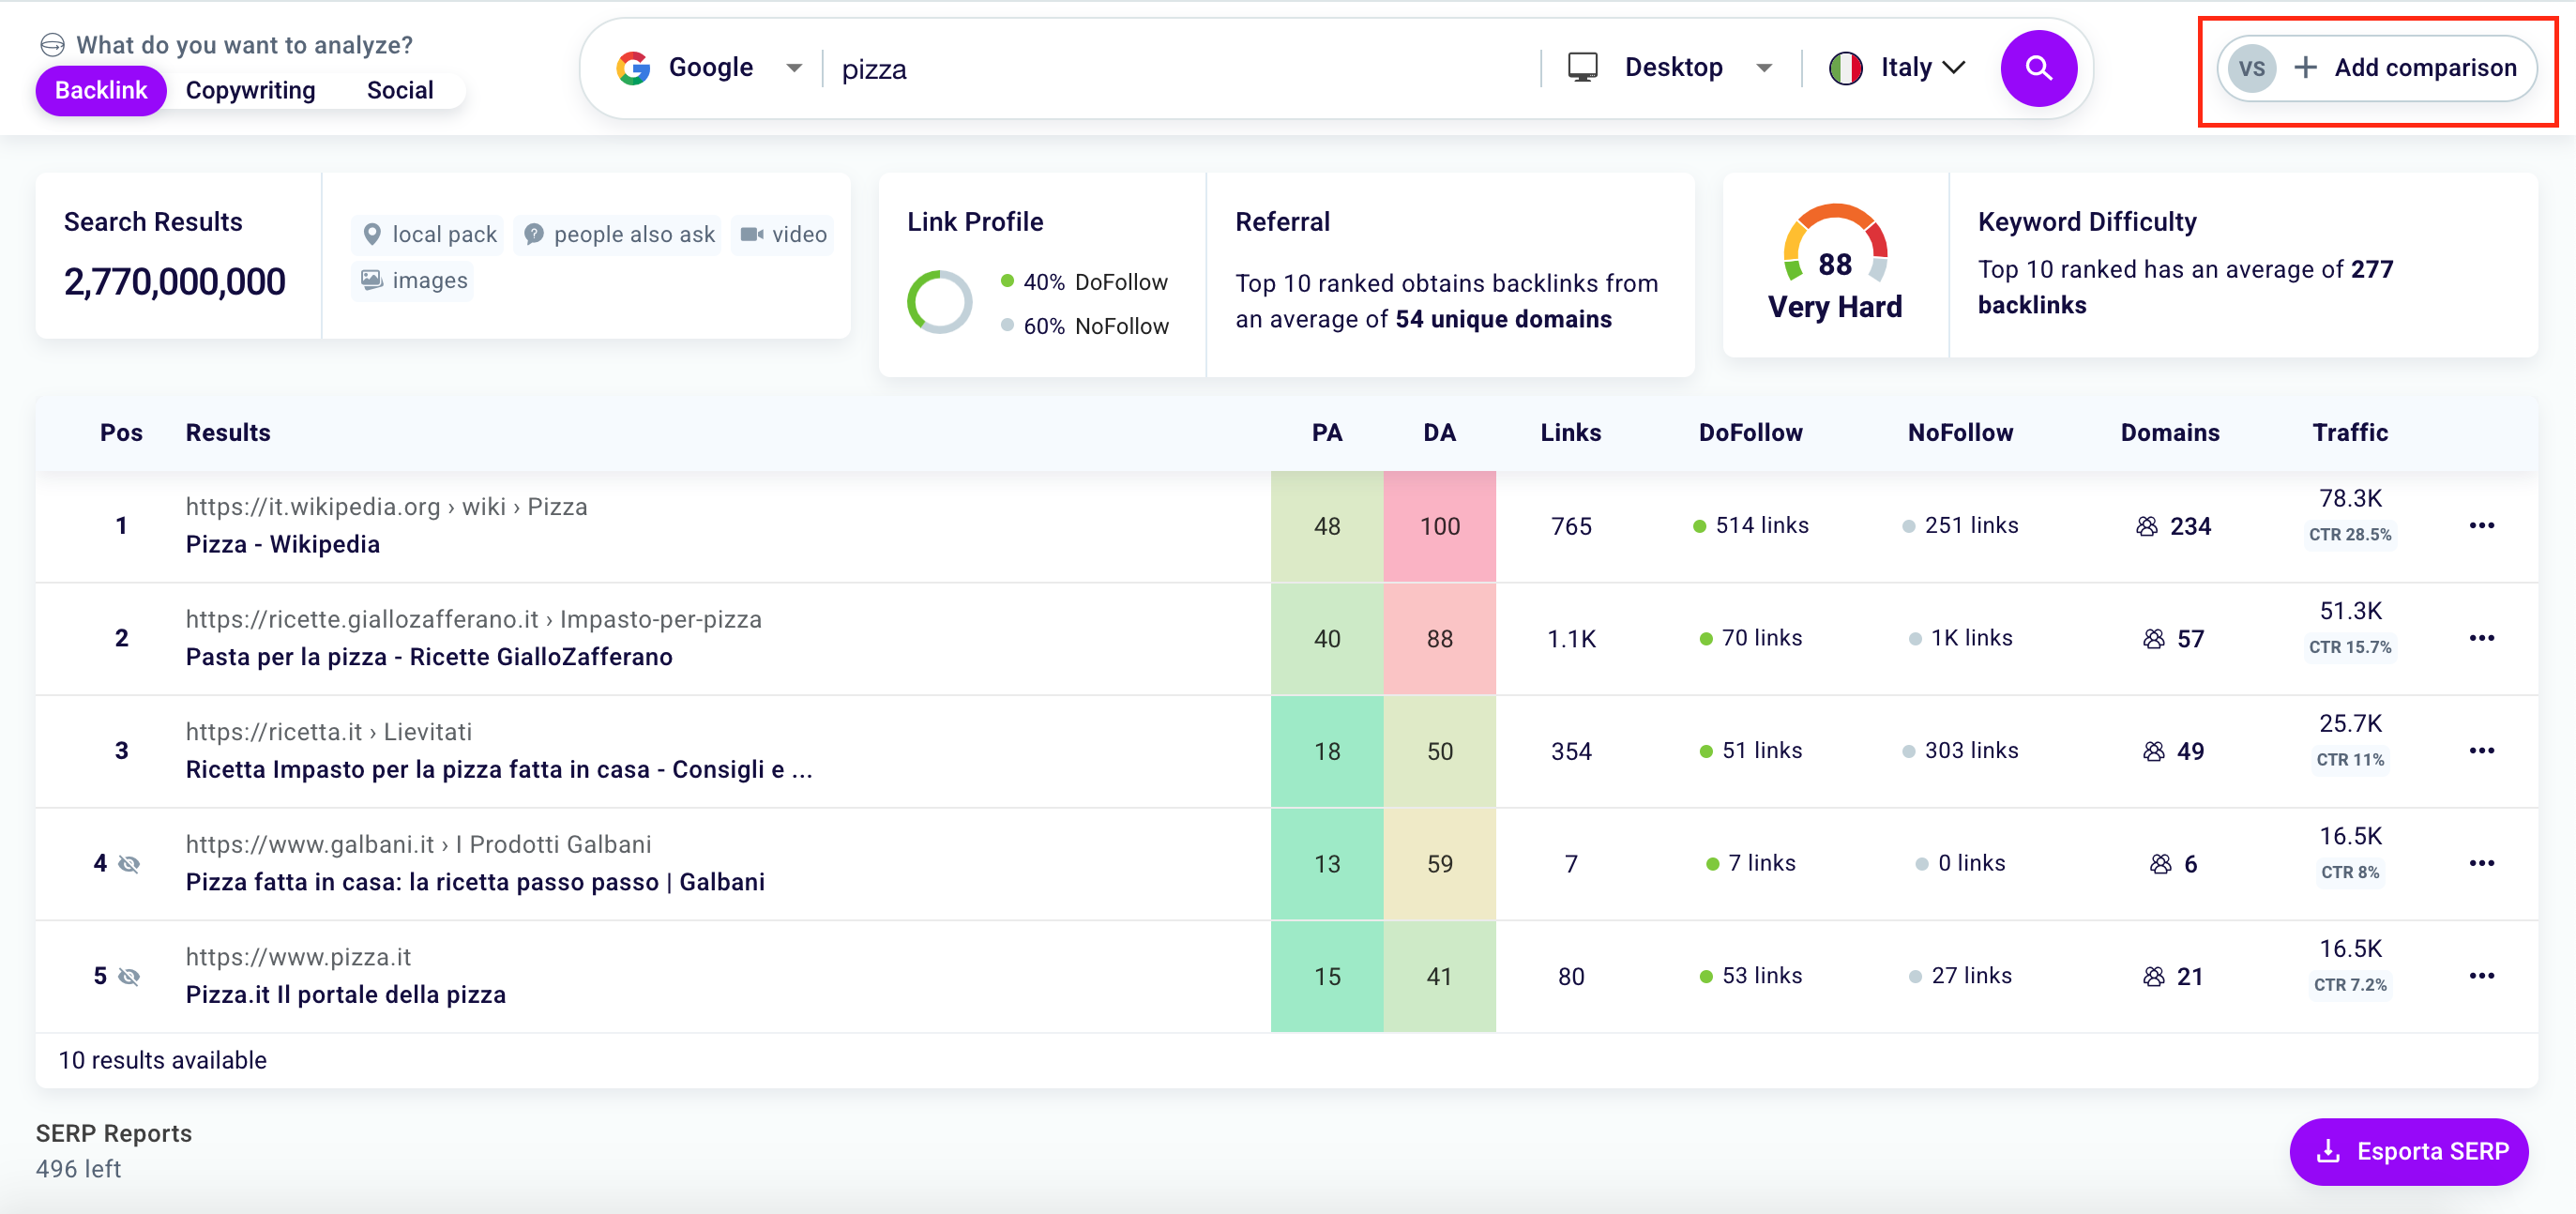
To add a comparison to your SERP analysis simply click the button at the top right “+ Add Comparison” (as shown in the image) and enter your site or that of competitors and compare the results.

How to export SERP metrics?

To export in a .csv file the results of the SERP analyzed with our software, you will only have to click the purple button at the bottom right “Export SERP“.

How to interpret the backlinks section of SERP Checker 360°?

Difficulty

The first thing you’ll see is the difficulty of the chosen keyword. This number gives you an overall estimation of the chances you have to beat the competition and rank first on the SERP. In our case, the difficulty is very low. This means it is a promising search query to compete for. The difficulty is calculated out the data that appears on the tool’s SERP:

Page Authority (PA)

This number indicates how many quality inbound links the single page gets. The more links it has, the higher the Page Authority, the more reliable is the page. 

If the authority is low and competing with that page will be easy, the SERP Checker will highlight it in green. Otherwise, the tool will highlight it in red.

Domain Authority (DA)

It works like the Page Authority, but on the entire website’s scale.

Links and CTR

The first is the number of inbound links to that page on other websites. The second is the percentage of people that actually click on those links. If this number is low, it can mean that people don’t find it interesting or useful to click on that link, and it is something that can hurt the ranking.

How to interpret the copywriting section of SERP Checker 360°?

Here you’ll see how your competition is doing in the content creator’s department. It’s like using Copy Metrics on steroids because you’ll be able to check in a glance all the metrics you’ll get with this tool, but for all your competitors for the same keyword. 

Text metrics

copywriting serp checker

The first thing you’ll see is the text metrics. How many words comprise the article, the reading time and reading ease, and the author’s info.

How are they relevant to SEO?

Words number

It is common knowledge that an SEO-oriented article must be more than 400-words long, so search engines don’t consider it spam. This because Google and the others aim to provide their users with useful content. And let’s be honest, it isn’t easy to deliver relevant information with so few words. 

Reading time and ease

Useful content is one that is easy to read. So, while we should try to make our blog post long enough, we also must keep it not too long either. Nobody has the time – or the attention – to read long articles. Let alone long ones that are difficult to read. 

Author

While authorship is not a ranking factor, Google considers it is a quality indicator.

In its quality guidelines, Google regards the absence of information about the content’s author as an indicator of low quality. 

Since Big G emphasizes trustworthiness with the notion of YMYL and the E-A-T guidelines, an anonymous and unreliable writer does not bode well for the website she is writing on. 

Most relevant Keywords

copywriting serp checker most relevant keywords

Right below the text stats, you’ll find the most relevant keyword table. It provides you with all the most pertinent keywords highlighted on the heatmap ordered on a list and sorted by relevance. It also shows you the distribution of each keyword through the various text elements. The more a keyword is present on URL, title, headings, and meta description, the more Copy Metrics will consider it as an essential topic of the blog post. 

Headings

copywriting serp checker links

You’ll have an ordered list of the headings used in order of appearance on the headings table. If the article is well written, the table will give you an overview of the topic’s structure and sub-topics. 

You can also see what keywords the author used and which ones are the most relevant to her.

Links

copywriting serp checker links

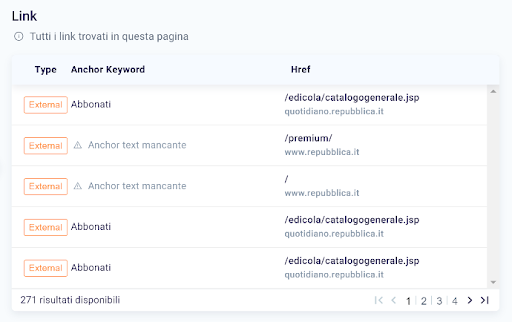
Link building is one of the most critical activities in off-site SEO. To link your article to other parts of your website and other relevant and authoritative ones increases your content’s value. As a result, Google will reward it with a good ranking. You will have a complete list of internal and external links within the blog post in the Links table. 

It is useful information when you use Copy Metrics to spy on the competition. You can use the table to see how many relevant links you should add to your blog post to make it more “linked” than your competitor’s.

Images

copywriting serp checker images

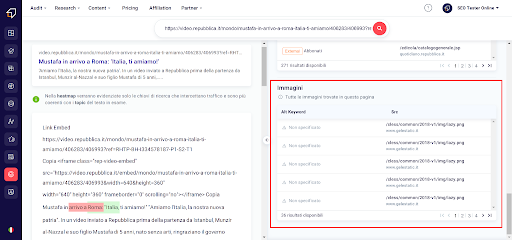
Images are crucial in SEO; you should know that. They enrich your textual content, make navigation more pleasurable, and provide you with an extra clicking point on the SERP. Some people can land on your website from an image search, provided that your pictures feature an alt-text. 

On the images table, you can see in a blink of an eye which images in the article have an alt-text and which have not. In this case, you’re lucky. No one here seems to use alt-text. Don’t you know what an alt-text is? Good news: we wrote a guide about how to optimize your images for SEO.

How to interpret the social section of SERP Checker 360°?

You can see how your competitors are doing on Social Networks on this screen. 

As you should know, search engines like Google don’t consider social networks as a ranking factor. Nevertheless, they have an impact on SEO as they increase your content’s visibility. 

social serp checker

The SERP Checker’s Social screen shows you all social signals (the number of shares, comments, and reactions) for each result within the SERP. These are all the factors that indicate how present is a page on social platforms and how the public perceives it. 

Also the Social SERP checker shows you the social shares’ traffic.

We hope this knowledge base has been helpful to you. If you have any questions or concerns, please leave a comment or contact us at support@seotesteronline.com.

SEO Checker Guide

The SEO Checker is the SEO Tester Online tool that allows you to analyze the SEO of a single web page quickly and easily.

To enter our scan tool you can click here or click the respective tool icon in the left side menu.

You will land on this page.

From here you can start a new scan.

Start by writing the URL of the web page you want to examine in conjunction with the word “website.com” (1). Choose whether to analyze a single page (2), and then continue with the use of the SEO Checker or, click “Analyze all pages” (3) to check the SEO parameters of an entire website with our SEO Spider. To view a short slideshow explaining how to use the tool, click “Help Center” (4).

Click “Analyze” to start scanning the typed web resource!

Once you click “Analyze” you will land on this page and you will have to wait about 20 seconds to obtain and view all the SEO data connected to the page.

How to interpret the SEO Checker?

Once the upload is complete, the dashboard will look like this.

At the top left you will see the name of the examined page (1) and the corresponding favicon (logo).

Also on the left is a graph in which to observe your SEO score (2). There are 4 levels: Excellent, Good, Mediocre, Serious. Each level corresponds to a color. Also within this box you can observe the number of critical problems that our algorithms have encountered and by clicking on “Discover all the problems” you can see which are specific.

At the center is the preview of your web page (3) generated by Google Page Speed ​​Insights; on the right there is a pentagon (4) which shows the degree of page optimization for the 5 areas analyzed by our tool: Base, Social, Content, Performance Mobile and Performance Desktop. Below the pentagon, the number of well-optimized elements (in green and indicated with the word “Ok“), the number of elements to pay attention to (in yellow and indicated with the word “Warnings“), the number of non-optimized elements ( in red and indicated with the words “Errors“).

Finally, at the top right there is a green button that reads “Download the Report” (5) by clicking on which you can download a PDF that contains the report of the analysis activity performed by our tool. But we will talk about this later.

Scrolling will bring you to this screen, which is nothing more than a preview of a larger section of the instrument, the Performance section.

Here are illustrated the Core Web Vitals, that is a set of parameters related to the speed, stability and response time that the layout of a website has.

At the top right there is a switch (1) with which to interact to observe the performance metrics of the URL examined from mobile or desktop.

Below the 3 Core Web Vitals (Loading, Interactivity and Visual Stability) you will find a line graph (2,3,4) that shows the optimization degree of the analyzed web page for that particular parameter; degree that fluctuates from Good to Poor.

We remind you that the data refer to the last 28 days of use by users.

Want to look into performance issues? Click on the link “View mobile performance problems” (5) and observe and resolve the SEO criticalities of your page.

At the bottom of the screen you will find the data generated by the analysis made by Google on the visits and experience of your users in the last few days (6).

The last component of the SEO Checker dashboard instead shows, in a single screen, the SEO metrics related to the texts on your page.

On the left, the keywords used most frequently (1) within the analyzed resource. For each word, the number of times it has been used is indicated (for example, in the illustrated case, the word “apple” has been used 4 times) and the relevance, that is the importance in SEO of that keyword, which it ranges from 0% (word not relevant at all) to 100% (word extremely relevant).

In the center, a cloud chart with the most important words shown on the page (2), the reading time (3) and the total number of words (4) used within the web resource under consideration.

Finally, on the right, the headings (5) appear sorted by importance (first H1, then H2, and so on). Click “Show all” (6) if you want to see all the headings on the scanned page.

Click instead “View content problems” (7) to observe and solve the SEO problems of the texts on your page.

Returning to the initial part of the dashboard, click the select at the top center “Analyze a single page” and choose whether to continue using our SEO Checker or start using the SEO Spider by clicking “Analyze all pages“.

If this is not possible, activate a free 7 day trial from here and start identifying the problems of your site, solve them and reach the first position!

Also at the top you can see the presence of a menu which contains, in addition to the Overview (1), the page in which we are at the moment, 4 categories of analysis: Basic, Content, Performance and Social.

The Basic category (2) contains the exams relating to the code on which the analyzed site is based related to the search preview (snippet), the HTML structure, crawlability, security and language.

In the Content category (3) you will find the SEO exams relating to the texts of the scanned resource such as the title attribute on the a tag or the code / text relationship.

The Performance category (4) contains exams relating to the speed, stability and response time of a website layout.

The Social category (5) contains the exams related to Open Graph, Twitter Card and social plugin. Factors that indirectly affect the positioning of a website.

Clicking Basic will bring up this screen.

At the top left the name of the category (1), below which you will find the title of the subcategory (2). You can switch from one sub-category to another by scrolling down or with the help of the side menu on the right (3).

Below each subcategory there are multiple exams.

Each exam consists of a maximum of 6 elements:

  • The name (1), in this case “Google Snippet
  • The SEO score (2), in this case “54.7 / 100” which varies from 0 (minimum score) to 100 (maximum score). The lower a score the more work you will have to work to optimize that parameter
  • Feedback (3), in this case “Pay attention! You still have to optimize this snippet ”, which translates the SEO score into a nutshell.
  • The preview (4) which shows, when present, the element under consideration
  • The section “How it works” (5) in which we explain what the check consists of and how our algorithm works
  • The section “How to optimize it” (6) in which we illustrate in a few words how to arrange an element to make it optimal in the eyes of search engines.

In some exams, you may find the “Show more” button. Click it if you want to get more information on a specific check.

In the “Content” category you may find, in some exams, a similar structure, within the “How to optimize it” section.

Click “More information” (1) to learn more about the resolution of a criticality. Look at the number of elements in which problems have been found (in this case link) in the section below (2) and focus on the last part to identify the specific components to be optimized (3)

Regarding the “Performance” section, we remind you that you can switch from the mobile to the desktop part at any time, using the button highlighted in the image.

The “Performance” section has a dashboard (1) in the upper part which shows the degree of optimization of the analyzed page, with respect to the parameters mentioned above: speed, stability and response time of the layout.

Then in the center you will be able to observe the metrics in real time (2) relating to the Core Web Vitals. On the right, however, there is the mobile or desktop preview of your web page (3) generated by Google Page Speed ​​Insights.

As you can see from the screen inside “Performance”, the exams have a structure that differs in part from that of the checks in other sections.

Below the score is in fact reported an additional data (1), related in this case to the First Contentful Paint, which helps to better understand the judgment expressed by our software.

Above the section “How it works” there is a link, “Learn More” (2), by clicking on which, you can find out more about the examined parameter.

Finally, under “How it works” our tool shows you how many elements to pay attention to (3) and which components to adjust (4).

How to download a report?

Downloading and sharing an analytics report is very simple. Just go back to the “Overview” page and click the green button “Download Report” at the top right.

This screen will open for you.

Here you can choose between 2 different types of reports. The “Standard Report” (1) containing the SEO Tester Online design, or, the “Custom Report” (2) in which to insert your information and your logo.

If you are unable to select the second option, because it is not included in your subscription, we recommend that you visit our prices page.

You can return to the “Overview” section at any time by clicking “Back” (3). To confirm the action and, if you have chosen “Custom Report”, to set up your document, click “Continue” (4). Otherwise click “Download”.

Insert your logo by clicking the “Upload” button (1). We remind you that you cannot insert files that exceed 5 Mb, our system may report an error.

Enter the information you want to show in the report (1) in the boxes below that you will then send to your client or collaborators. You can enter different types of information such as the company name, email, telephone number, etc… We remind you that each text cannot exceed 50 characters.

Click “Continue” to continue.

Choose which categories (1) to insert and which not to use the switch (2).

Click on the button to deselect or select it. Then, click “Continue”.

What elements to show? Which ones aren’t? Decide based on your needs and the target audience of the report and enable or disable what you want to illustrate in the exams, as seen in the previous case.

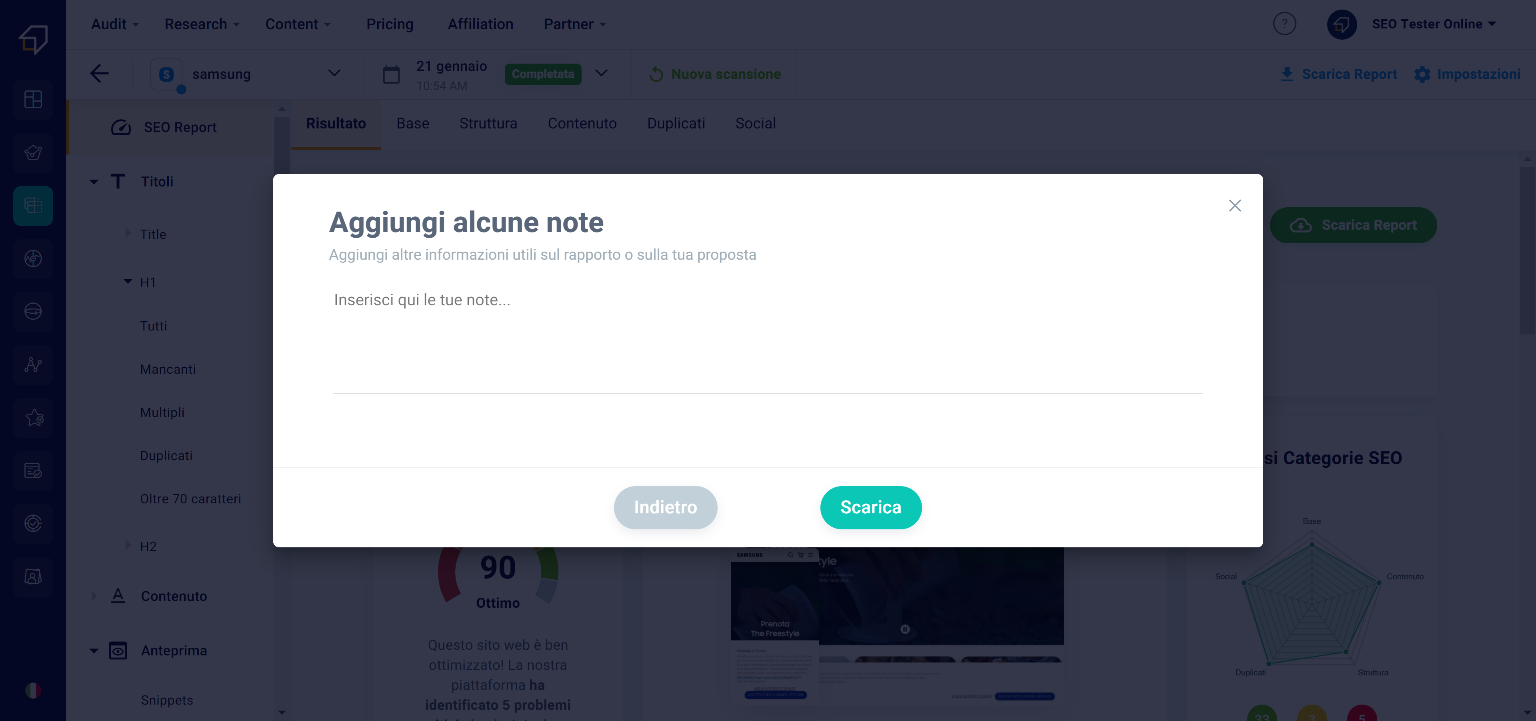
Finally, add notes on the report to your liking to highlight certain aspects or comment in more detail on some analyzes and considerations. Type your note at the same time as “Insert your notes here” (1).

Go back to the previous screens by clicking “Back” (2) or complete your customization and click “Download” (3) to download your PDF.

SEO Editor Guide

The SEO editor is the ideal text editor for SEO copywriters and bloggers.

It includes all the main functions of any word processor, plus tons of features that help you write SEO-oriented content and check how optimized it is while still writing.

In this way, you can save time and avoid the risk of rewriting your blog posts because they were not enough SEO-friendly.

Now it’s time to start writing! Click on the New article button to enter the wizard.

SEO Editor

Wizard: choose the right keywords

The first thing to do is to choose the keywords you want to position with. You may have already done keyword research with our Keyword Research Tool. If not, we strongly advise you to do so. Enter the primary keyword you chose or choose one among the suggestions.  Then, click Next.

SEO Editor - select keywordsSEO Editor - select keywords

Here, you can add the secondary keywords among those you’ve found and also chose new ones among the keyword ideas the wizard gives you.

SEO Editor - Add secondary Keywords

Once you’ve finished, click on Go to Editor. Don’t worry if you feel your keyword list is not complete. You can always add new ones on the go.

Editor: start writing

Behold! Before you, there is the SEO Editor. As you can see, it’s a complete word processor, with everything you need to write and a lot more.

  • There’s a small keyword search engine to look up for (and add) new keyword ideas on the left.
  • On the right, there’s the dashboard with the optimization metrics. It also tells you which aspect of your article needs a little more work.
  • In the middle is where you write, with everything you need to edit your blog post on the top toolbar.


SEO Editor - Editor

Step one: add title and headings

The first thing to do is to give structure to your article.

Add the SEO title on the title bar at the top of the editing area. It says, “Enter the title of your article here.” Remember that it should include your main keyword.

SEO Editor - title

Then, start adding your heading titles. Write them down, then select each one of them and give it the proper heading tag. Remember that there should be only one H1 (that may be an extended version of your SEO Title) and as many H2, H3 tags as you want, provided that they follow a hierarchical structure.

SEO Editor - headings

To transform a text into a heading title, highlight it, click on the paragraph symbol (¶) on the toolbar to select the formatting style you want.

Step Two: Add content

Write paragraphs

  • Now we must put some content under our titles. To add paragraphs, you have to write and write well.
  • Add some interesting, useful, and well-organized text.
  • Highlight the most relevant phrases and keywords with italics and bold.
  • Avoid keyword stuffing.

SEO Editor - content

You know, the usual. Anyway, keep an eye on the right. The SEO Editor gives you hints to make your article better. We’ll dive into that in a minute. For now, notice that, under Content, the SEO Editor is telling you, among other things, to add images and links.

Add Images

You also need to add some pictures that are relevant to what you’re writing about. Let’s assume you’ve already read our guidelines on adding images and uploaded them on your website. Now you have to add them to your article. To do so, choose the Select image button on your toolbar, as shown below.

SEO Editor - insert image

Then, enter the image’s URL and a coherent alt text.

SEO Editor - insert image

Add link

To add a link, highlight the text portion you want to use. Click on the link button on the toolbar, then choose Insert link.

SEO Editor - insert link SEO Editor - insert link

Metrics dashboard

Seo editor - dashboard

You may have noticed that, on the right, the dashboard was changing while you were writing. We went from zero to a sounding 84 score. Not Bad!

On the one hand, the score is calculated on the reading ease, the reading time, and the number of words. On the other hand, it results from a check on the different components an SEO-oriented text should comprise.

It means that the SEO Editor will consider if the title, content, headings, and other things are in place and well-optimized. We mentioned links and images before, but there’re many other warnings you can get, from a keyword stuffing alert to one that tells you should highlight some words in bold.

Step Three: Add and remove keywords

While you’re writing, it may happen (read: “it happens all the time”) that you may drift a bit from your subject, or you may want to add an extra sub-topic to your article.

Does it mean you have to start again from zero?
Don’t worry; you have to add a new primary or some secondary keywords. Go on Edit, then click on “Modify optimization.” A new wizard window will open, so you can add as many keywords as you want


SEO Editor - modify optimization 

If you are looking for new keyword ideas, use the search bar on the left. You’ll get keyword suggestions you add to your optimization by clicking on the one you chose.

SEO Editor - add keywords

At this point, you can choose to add it as a primary keyword or as a secondary one.

SEO Editor - modify optimization

Snippet editor and HTML code editor

Aside from the article, you can also edit the article’s snippet and social cards.

Switch to the snippet editor on the top-right corner.

SEO Editor - snippet editor

Here you can edit the URL’s SEO title, the meta description for what concerns the snippet. On social cards, you can edit the preview text and image. When you’ve finished, you can copy the snippets on your page’s HTML code.

SEO Editor - snippet editor


Speaking of which, you can add extra customization to your article by editing its HTML code.

Go back to article visualization. On your toolbar, click on the <> button to trigger the code editor.

SEO Editor - html editor

Save and download the article

Once you’ve finished, or if you just want to take a break, you can save your article to work on it later or download it.

To save it, click on the Save article button on the menu.

Just choose the filename, and you’ll find your saved article on the SEO Editor main page the next time you’ll visit it.

SEO Editor - Save and export

You can also download in .doc or pdf format. Just go to File, then select Export as.

SEO Editor - Save and export

Copy Metrics Guide

Copy Metrics is the tool that will allow you to analyze the SEO of any text within a web page. With this tool, in fact, you will be able to find out its level and for which keywords it has been optimized.

Furthermore, you will be able to analyze the articles of your competitors, identify their strengths and weaknesses, but above all create more performing content to overcome them in the SERP.

Let’s move from theory to practice.

How to enter the content to be analyzed?

In order to take advantage of the full potential of Copy Metrics, you will first need to log into your SEO Tester Online account, or create a new one.

After the Login phase, you will land on the Dashboard, which we analyze in detail in our Guide to the Dashboard.

To access Copy Metrics, you will need to click on the tool icon in the side menu.

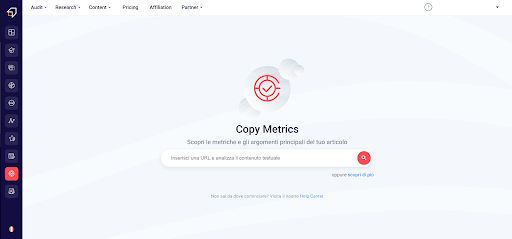
After that, you will need to enter the URL of the content you want to scan. So, paste a destination address (for example, the link to a competitor’s article) in the search bar.

Finally, click on the “Search” button.

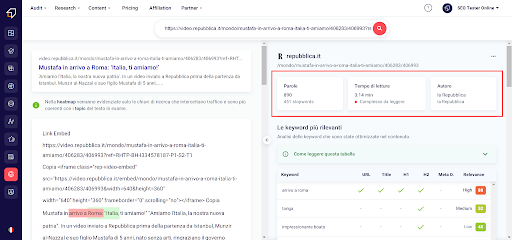
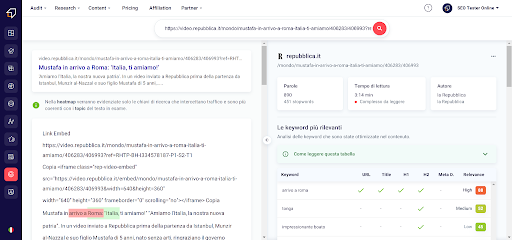
After a few moments, a screen divided in half will appear: on the left side you can analyze the distribution of keywords within the text through a heat map, while on the right you will see the details of the analysis.

Let’s find out more closely!

Text metrics

The first information that the tool provides us concerns the metrics of the text, i.e. how many words make up the article, the time and ease of reading and information on the author / author.

Why are they relevant to SEO? We explain it below!

Number of words

Google tends to reward content that is complete and that provides its users with useful and relevant information.

This is why in many cases (although not always) writing an article with at least 400 words may be enough to cover a topic in a satisfactory way.

Time and ease of reading

Content must be not only useful, but also easy to read.

Therefore, we recommend that you deal with the topics in a comprehensive, non-dispersive and above all clear way.

Remember that users have neither the time nor the desire to read complex or boring content.

Author

Although authorship may not be a direct ranking factor, search engines consider the author of a content as an indicator of the quality of the content itself.

In fact, in the quality guidelines, it appears that the absence of information on the author or author of the content is considered as an indicator of low reliability.

Since Google, with the introduction of the concept of YMYL and EAT guidelines, places the emphasis on reliability, it does not look favorably on an anonymous pen for the site on which it is writing.

Most relevant keywords

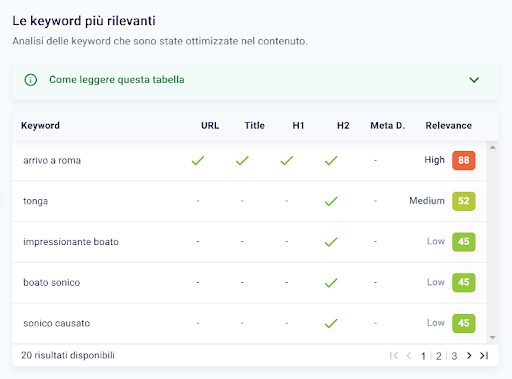
Right below the text stats, you’ll find the keyword table. This provides you with all the most relevant keywords and sorts them by relevance.

It also shows the distribution of each keyword in the various relevant SEO elements such as url, title, headers and meta description.

Keyword ideas

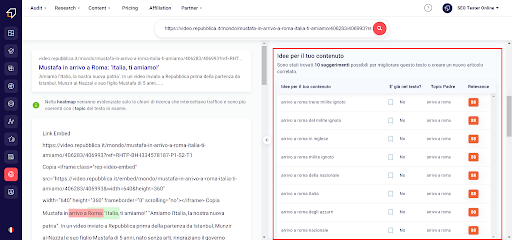
The Ideas table for your content is a real treat for those looking to write comprehensive, more search engine-oriented articles.

In this list, in fact, the tool shows all the related keywords found for the content topic.

Furthermore, you can find out which keywords are used and which are not within the content of your competitors.

In the second column of each suggestion, in fact, you can check whether a keyword is already present or not in the analyzed text.

In fact, if there is a white bookmark with a “No”, then the author did not use it. Otherwise, you will find a green bookmark with a “Yes”.

Finally, to see how relevant that keyword is to the topic of the article, you can look at the Relevance column.

Titles and Subtitles

In the Titles and Subtitles table, you will have a list of the headings used in order of appearance. If the article is well written, the table will provide an overview of the topic structure and subtopics.

In addition, you will be able to see which key topics are used and which are the most relevant.

Links

Link building is one of the most important activities in off-site SEO.

Inserting links to other parts of the site and to other relevant and authoritative sites in your article increases the value of your content, which could be rewarded by better ranking search engines.

The Links table contains the complete list of internal and external links present within the text analyzed by Copy Metics.

This feature is functional when using Copy Metrics to spy on the competition. In fact, just look at the table to see how many and which relevant links you could add to your article.

Images

In SEO, images are fundamental, because they enrich the texts, make browsing more enjoyable and give the possibility, provided they are well optimized, to position their visual contents also on the Google Images search engine.

In the image table you can see in the blink of an eye which ones have alt text and which ones don’t.

If you don’t know what this is, luckily we’ve written a guide on how to optimize your images for SEO that you can check out.

Keyword Rank Tracker Guide

Every SEO professional needs to know how their websites perform in terms of ranking for their target keywords, but also to keep track of the work done by their competitors.

You can do this manually by typing queries into search engines, but this procedure is very time-consuming and can be inaccurate.

Fortunately, the Keyword Rank Tracker helps you do just that by allowing you to track the ranking of any website within the search engine results pages for any keyword.

Let’s find out in more detail!

How to create monitoring project?

If you want to find out how to create or modify an SEO project to monitor you can consult our SEO Project Knowledge Base.

How to access the Keyword Rank Tracker?

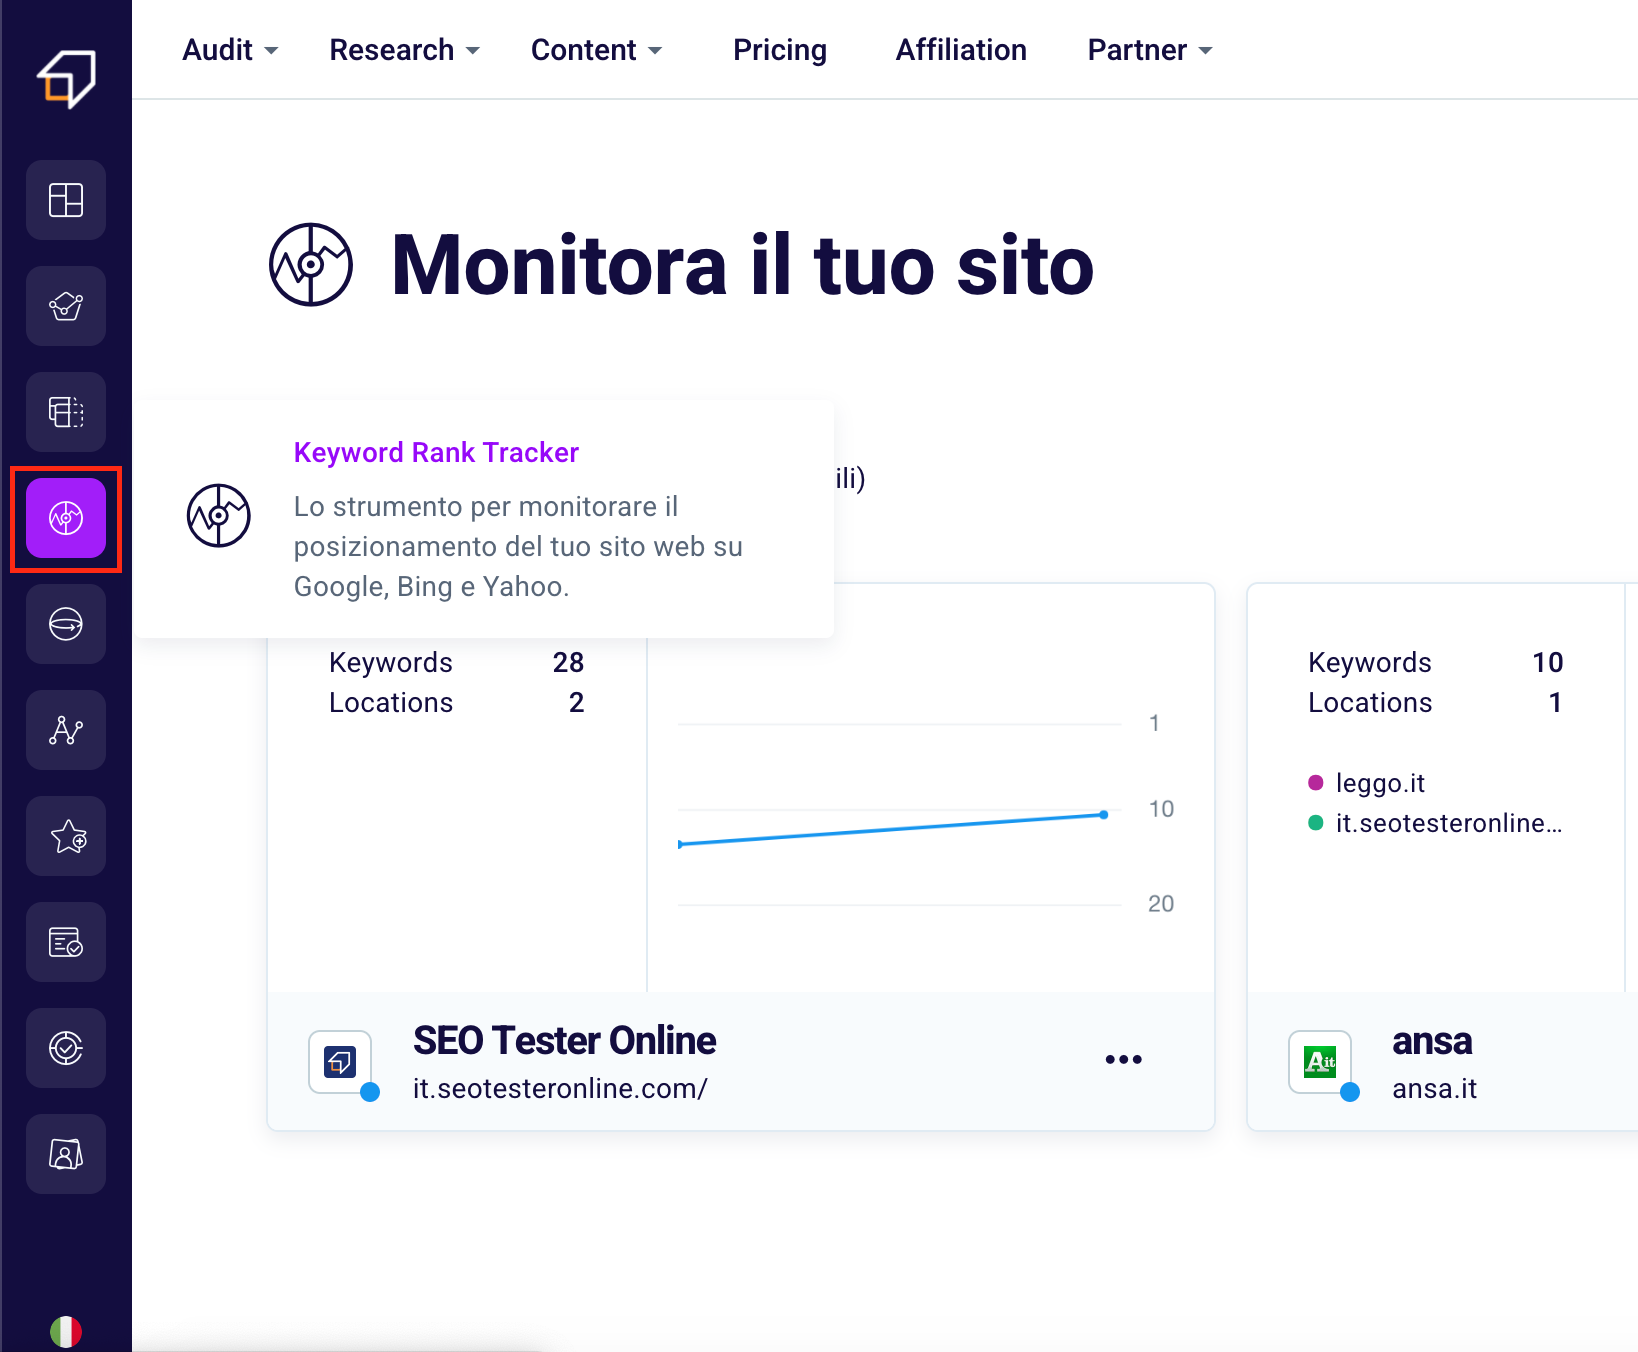
To access our Keyword Rank Tracker, simply click on the respective icon in the side menu on the left or access by clicking here.

How to interpret the Keyword Rank Tracker dashboard?

On the left side you can see “Your projects” (1). As you will notice, in this case the wording “2/15 available” ticks as “2” projects have been created out of the 15 “available” in the plan under consideration.

If you want to expand your limits and track the SEO results of more projects contact us at support@seotesteronline.com or click on “Boost Rank Tracker” and go to our Plans and Subscriptions page.

If you want to monitor a new site click on “+ Create Monitoring” (2). To check how many keywords you are tracking instead, focus on the screen on the right (4).

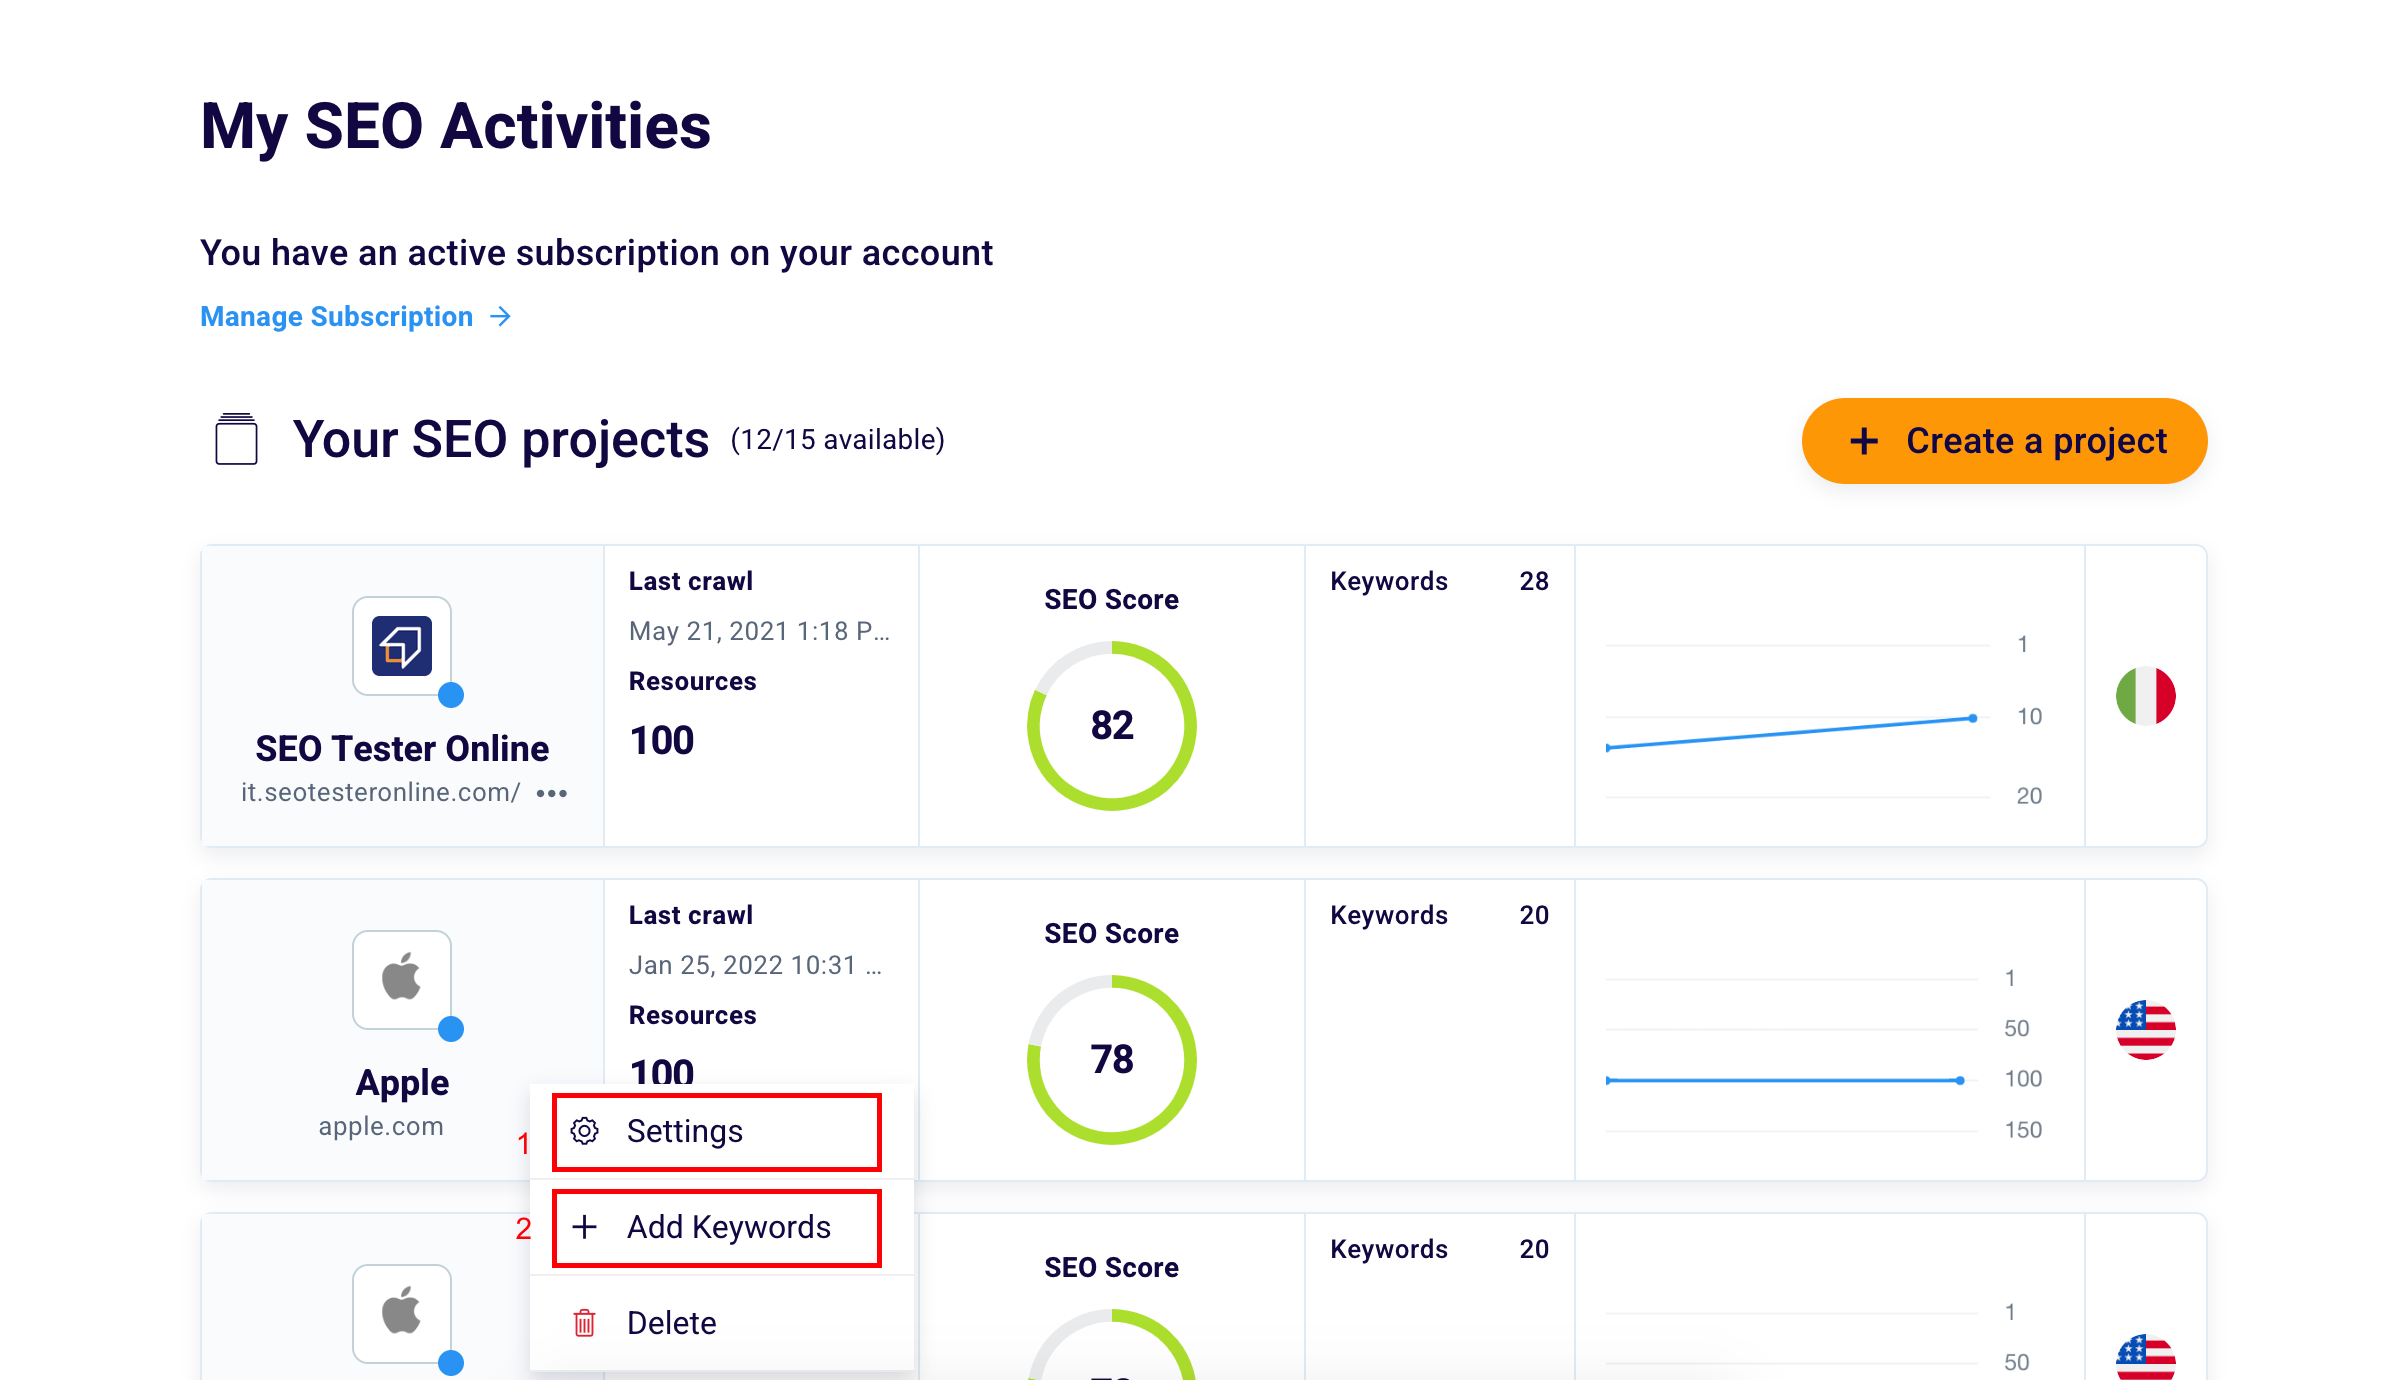
If you want to change the scanning and monitoring rules of your project, just click on “Settings” (1), if you want, for the project under consideration, implement new keywords to monitor, click “+ Add keyword” (2). To cancel the project, just click “Cancel” (3).

The steps for editing your project and adding keywords are the same as in our guide to creating Knowledge Base projects.

How to monitor the results of your keywords?

To track your SEO impact you must first decide which of the created projects you want to track.

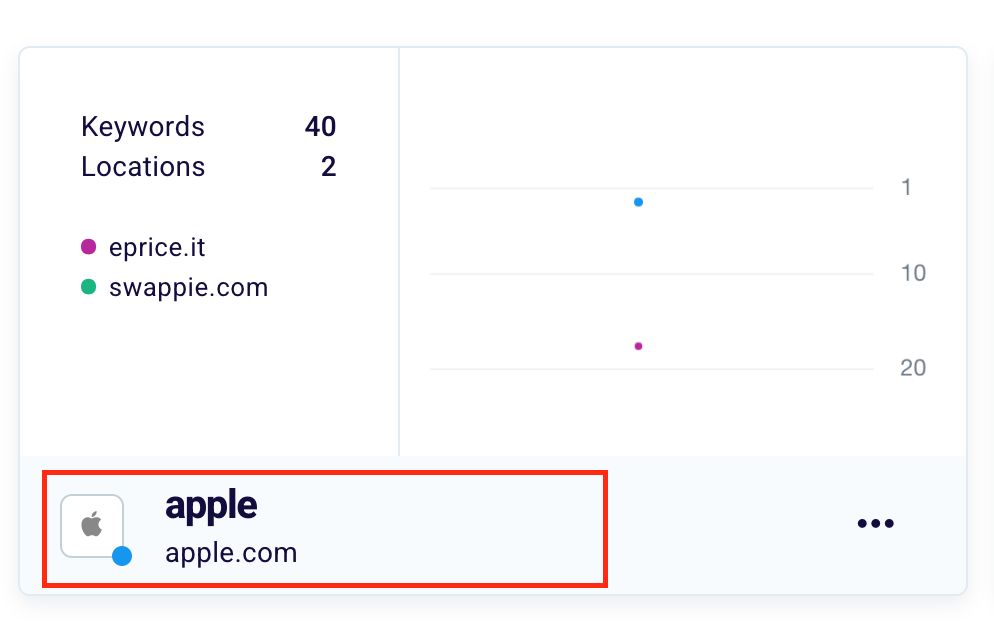
Once you have chosen the project, click on the icon to the left of the URL.

You will be directed to a page like this.

How to add keywords to be optimized?

To implement new keywords to monitor you can click “+ Add keyword” at any time.

How to copy keywords?

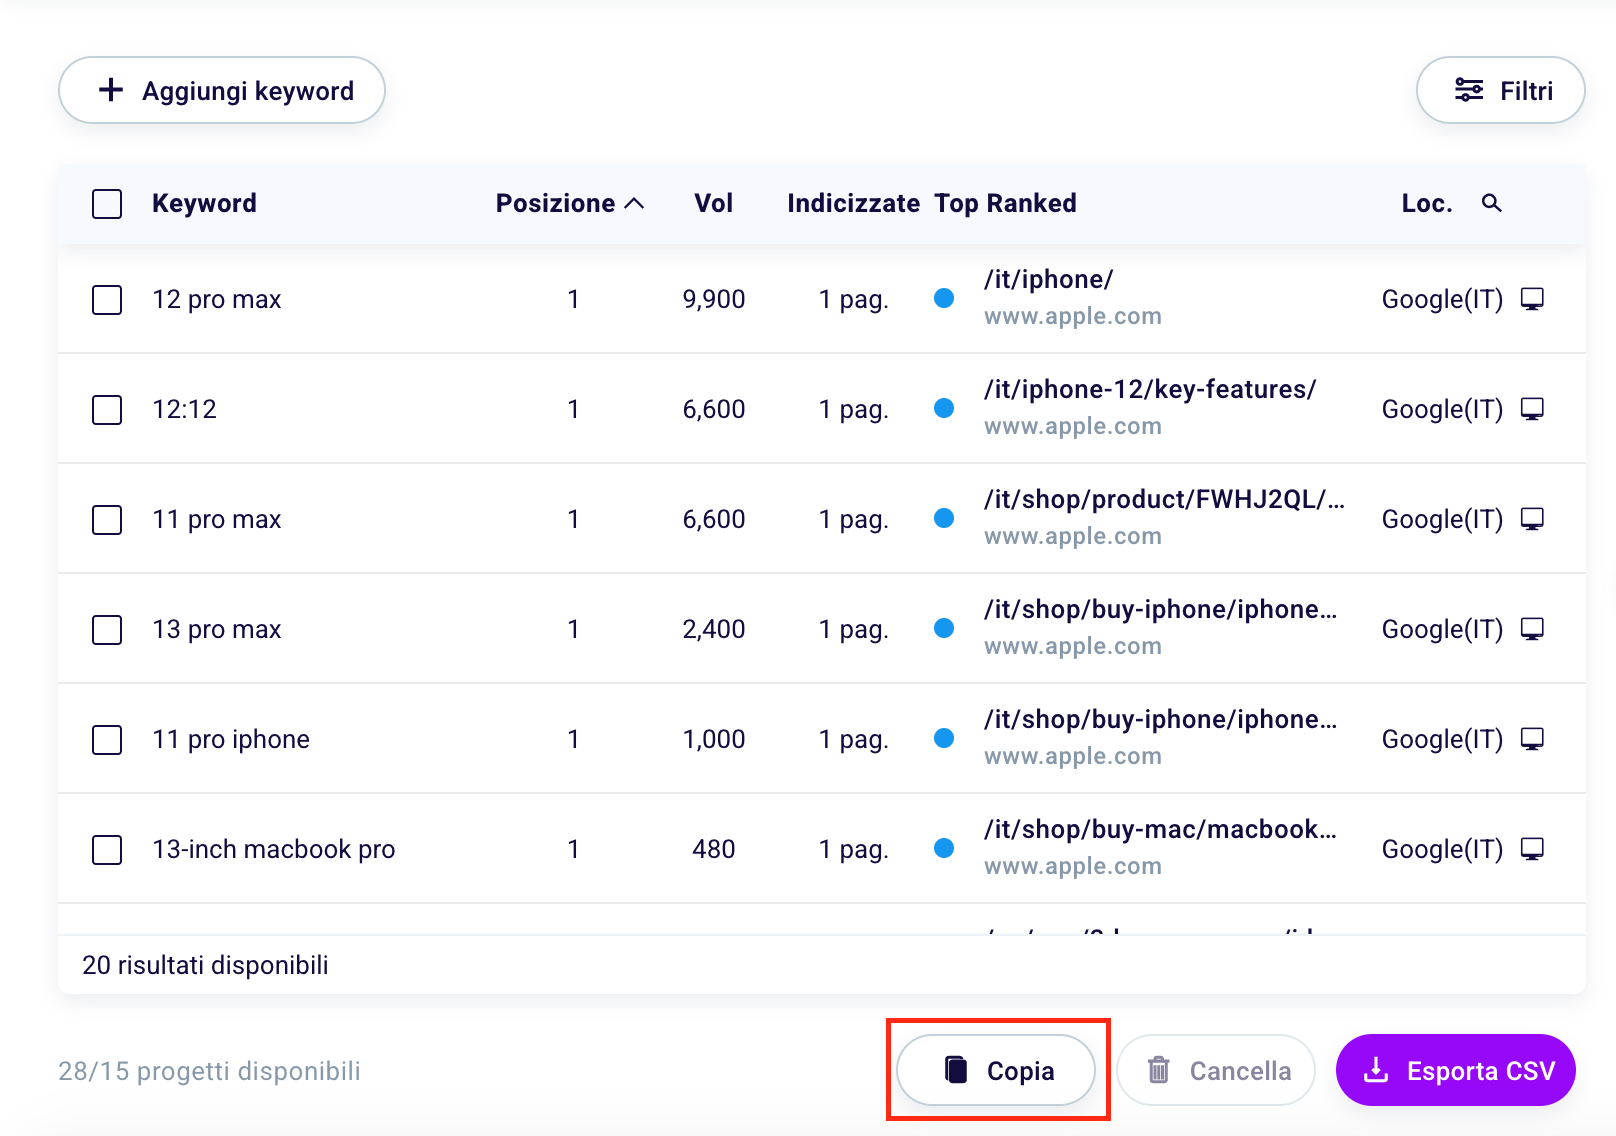
To copy your keywords into a .doc or elsewhere just click “Copy”.

How to delete keywords?

To remove some keywords from monitoring, just select them, we remind you that you can see the number of selected words (1) at the bottom left and finally click the “Delete” button (2).

How to export keywords?

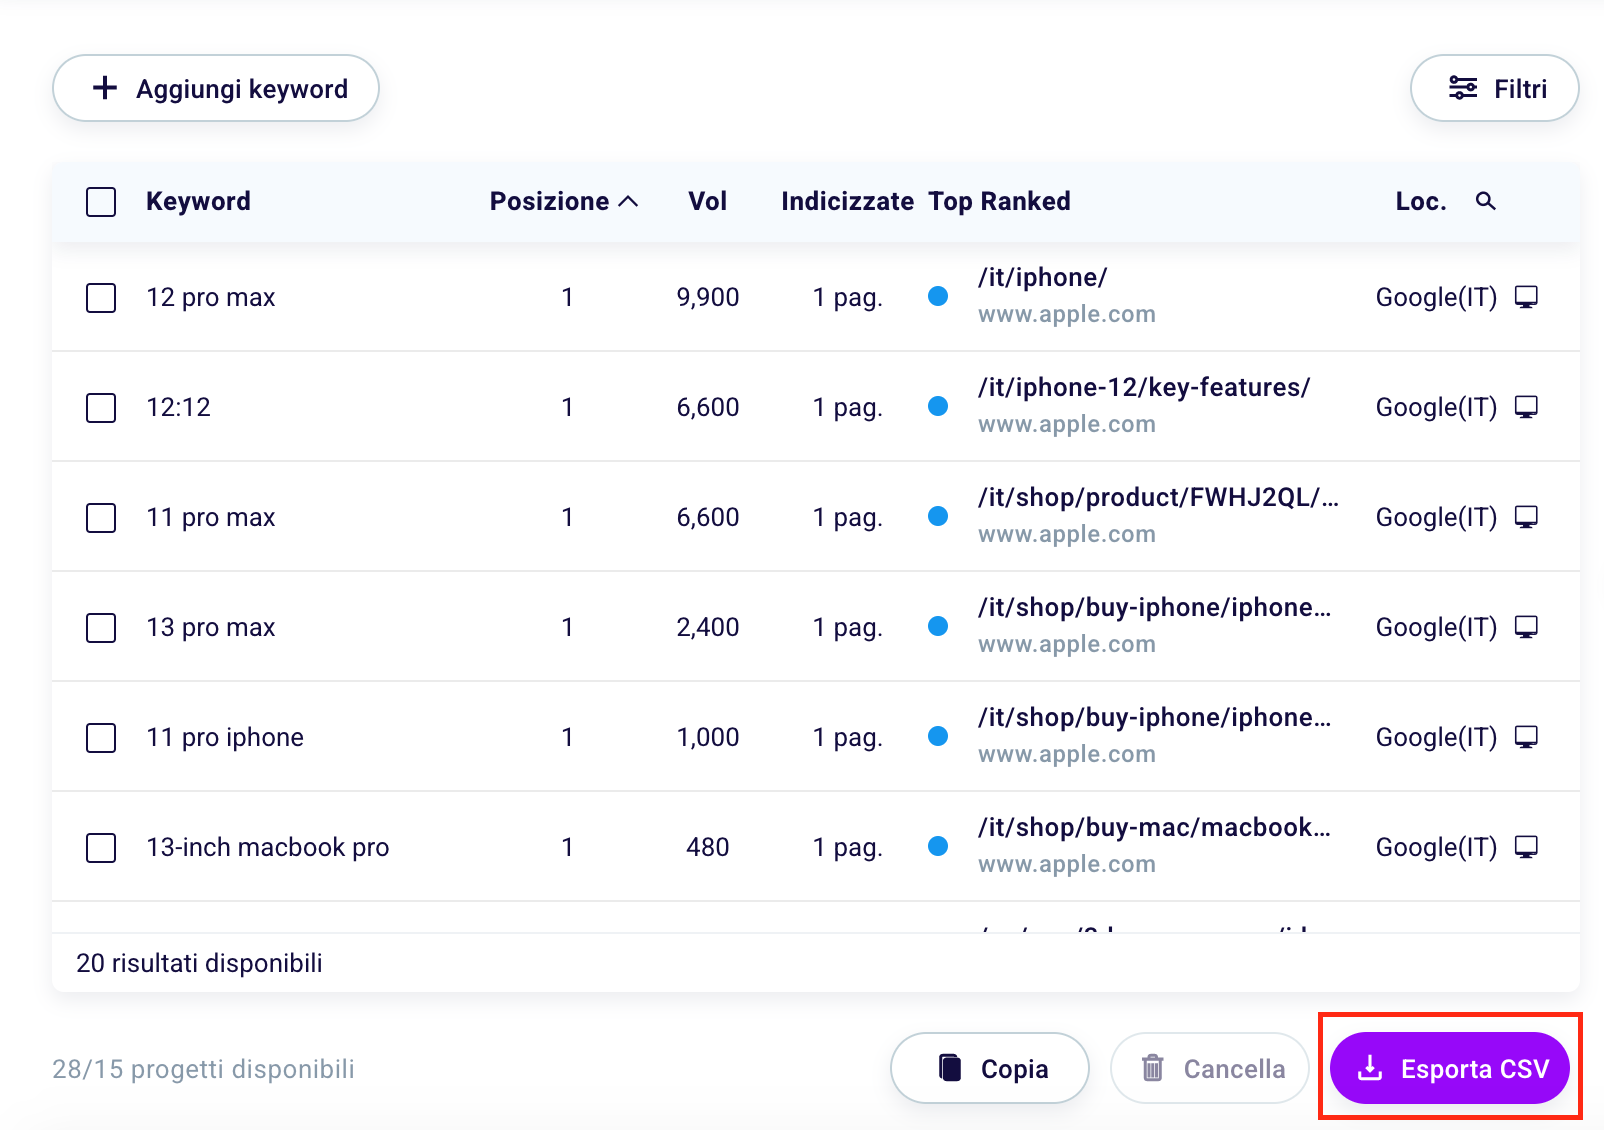
To export the keywords of an SEO project in .csv format, simply click the white button at the bottom of the “Export CSV” table.

How to exploit the potential of the Keyword Rank Tracker?

Let’s first inspect the top tab on the Keyword Rank Tracker main screen.

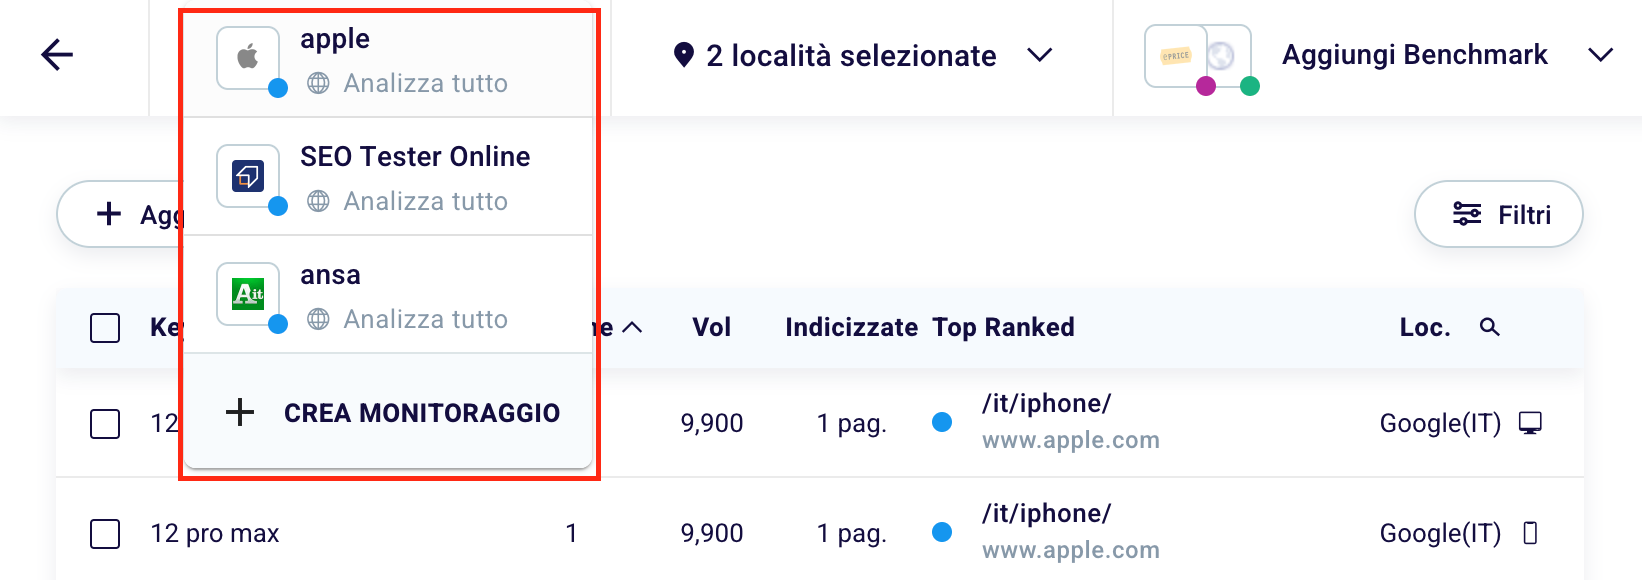
By clicking on the select to the right of the project name (1), you can at any time switch from one project to another of those already created.

Click the icon of the project you want to monitor or click on “+ Create Monitoring” to start a new tracking project.

If at the design stage you have selected several countries in which to monitor your results, click the select “selected locations” (2).

Type in “Search location” (1) words present in the locations selected during the design phase. Choose one or more locations. The box with a tick (2) identifies the configurations chosen, the box without a tick (3) instead identifies the configurations that you have chosen not to show in the table. If you want to set new countries or devices, or remove the chosen ones, just click “Change locations” (4). “20” are, in this case, the number of words monitored for this specific configuration.

If you want to compare the SEO performance of the site you are managing with those of your competitors, just click on “Add Benchmark” (3).

Here you can select (1) or deselect (2) your competitors, add new ones or remove existing ones (3).

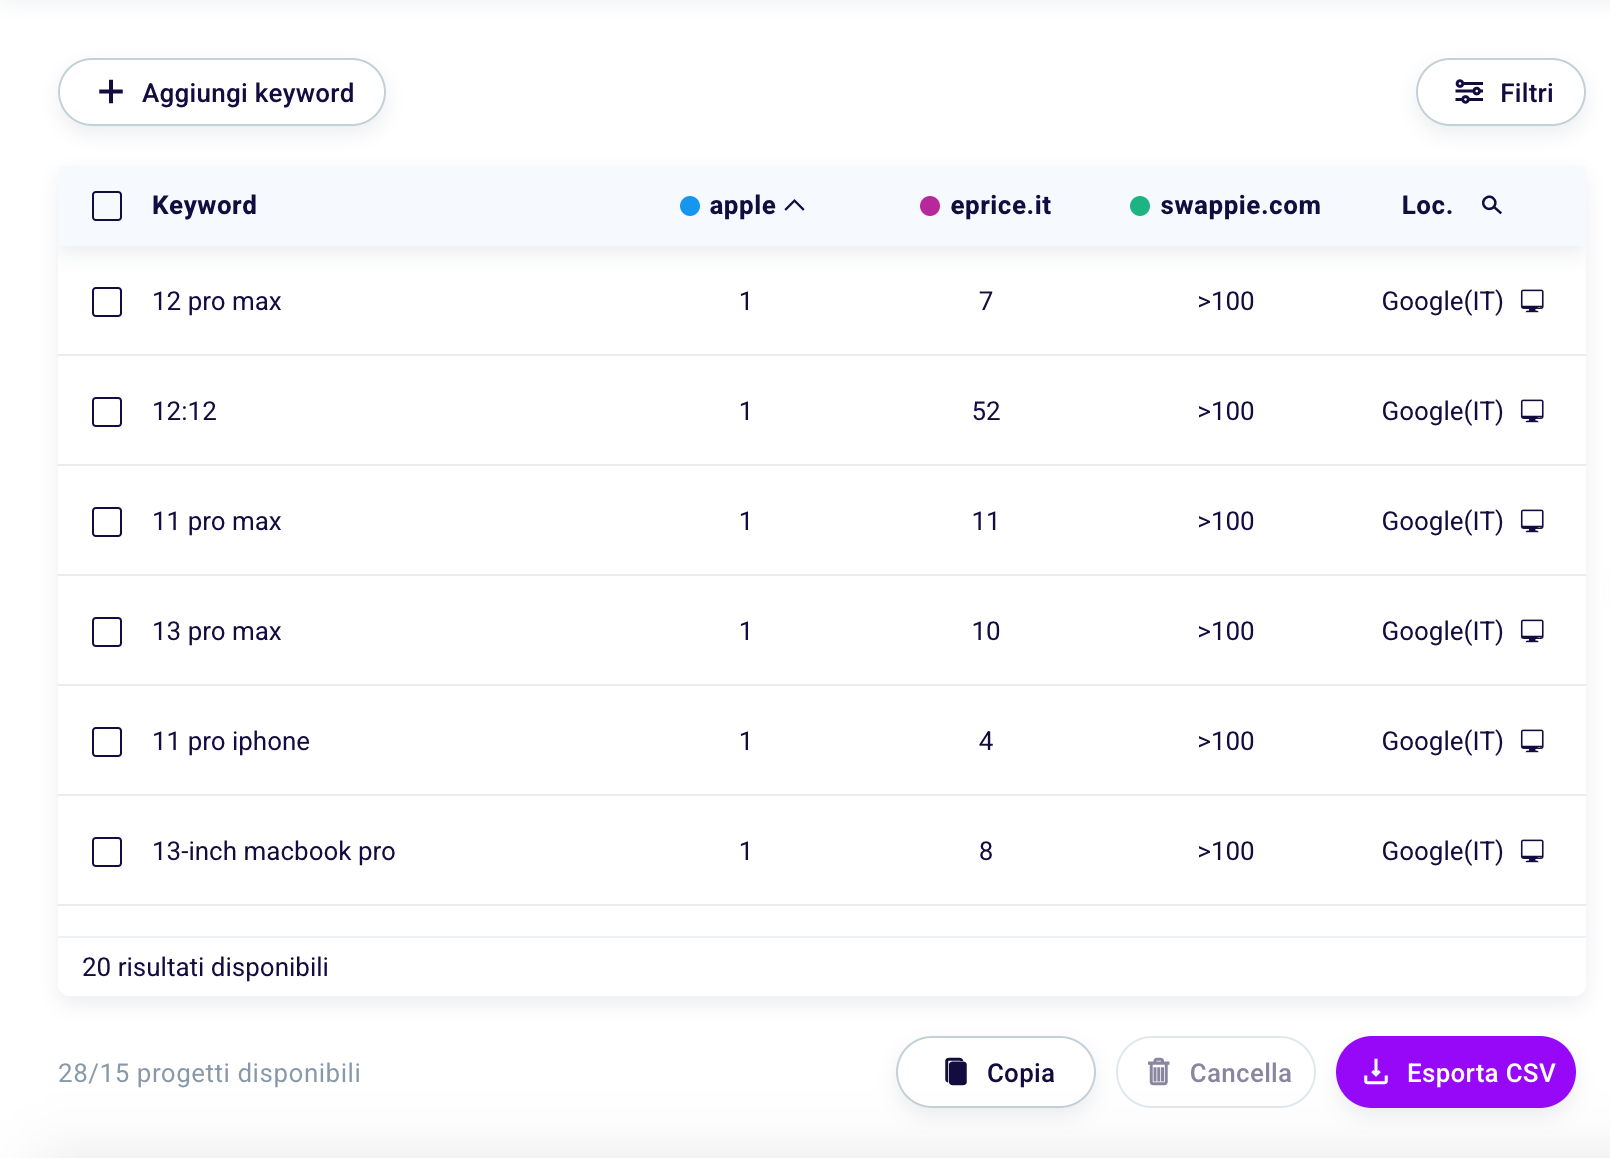
If you select more competitors, the table will be structured as follows.

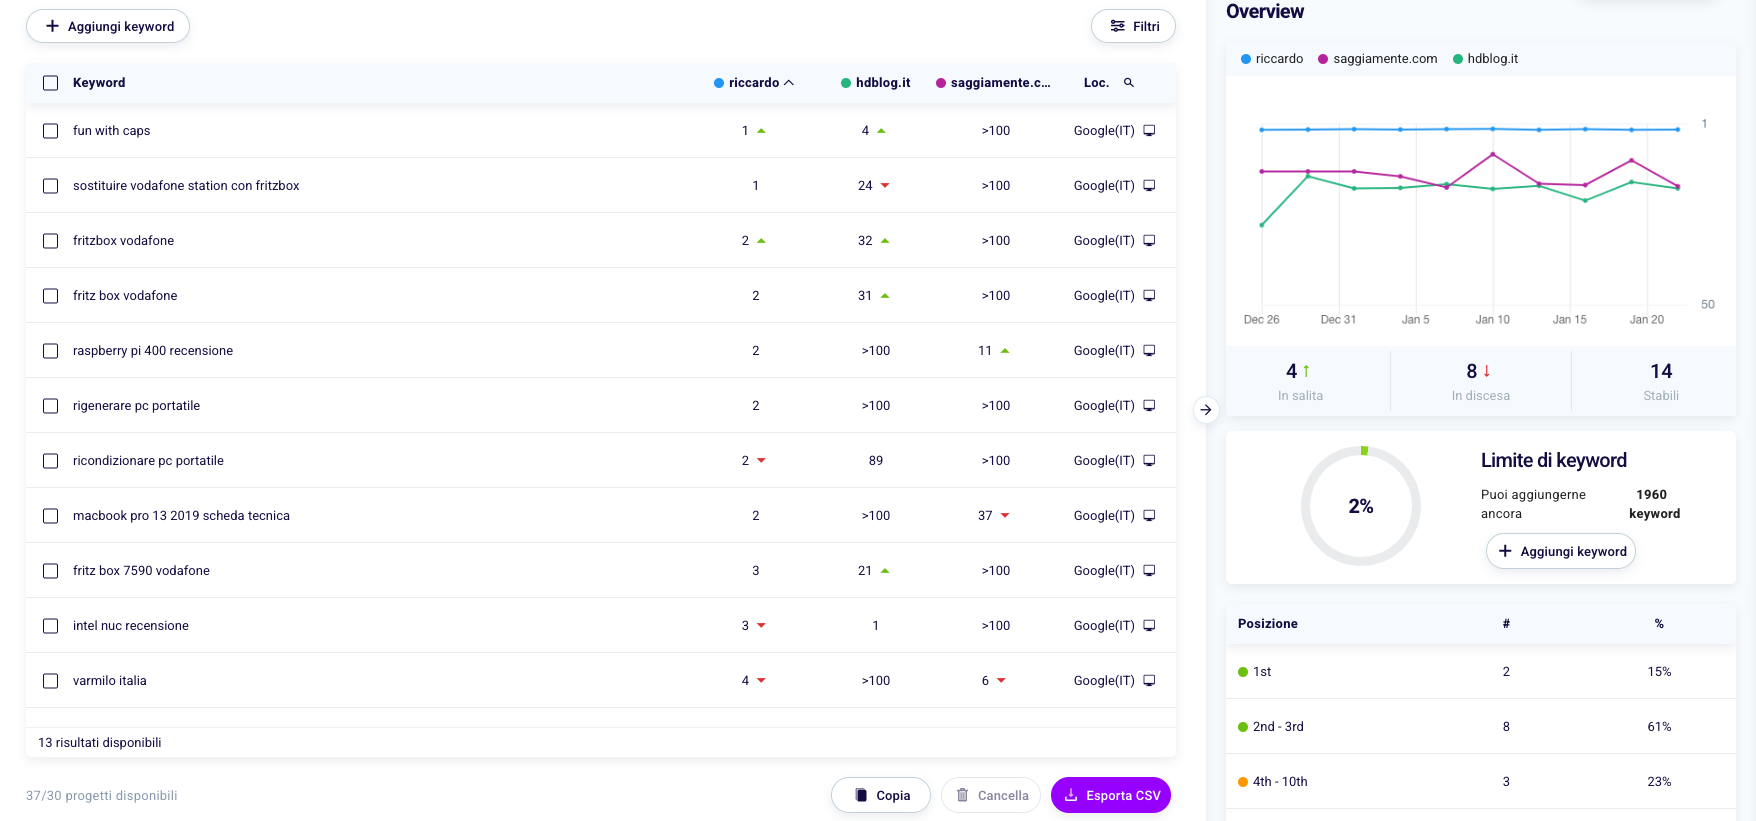
The number below the site URL means the position of that site for a particular keyword.

In this case, in the table you can see variations in positions, uphill (with the up arrow, green) or downhill (with the down arrow, red)

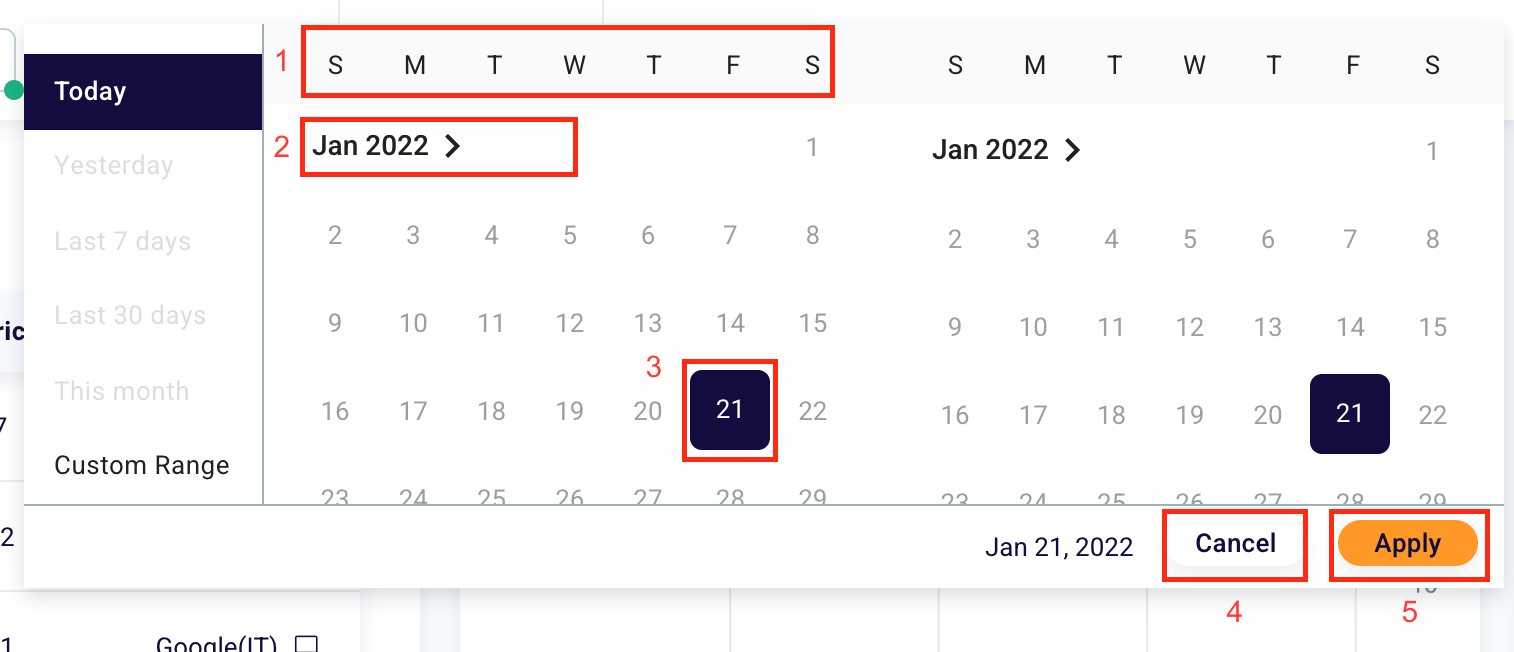
To determine the interval within which you want to study the positioning variations, click “Today” (4).

You will see a calendar appear in which to choose between different days of the week (1) and different months (2), the start date of the tracking (3) and its end time. To return to the default settings click “Cancel” (4), or if you want to confirm the selected period, click the orange “Apply” button (5).

On the left of the software you can view all the information relating to the chosen keywords.

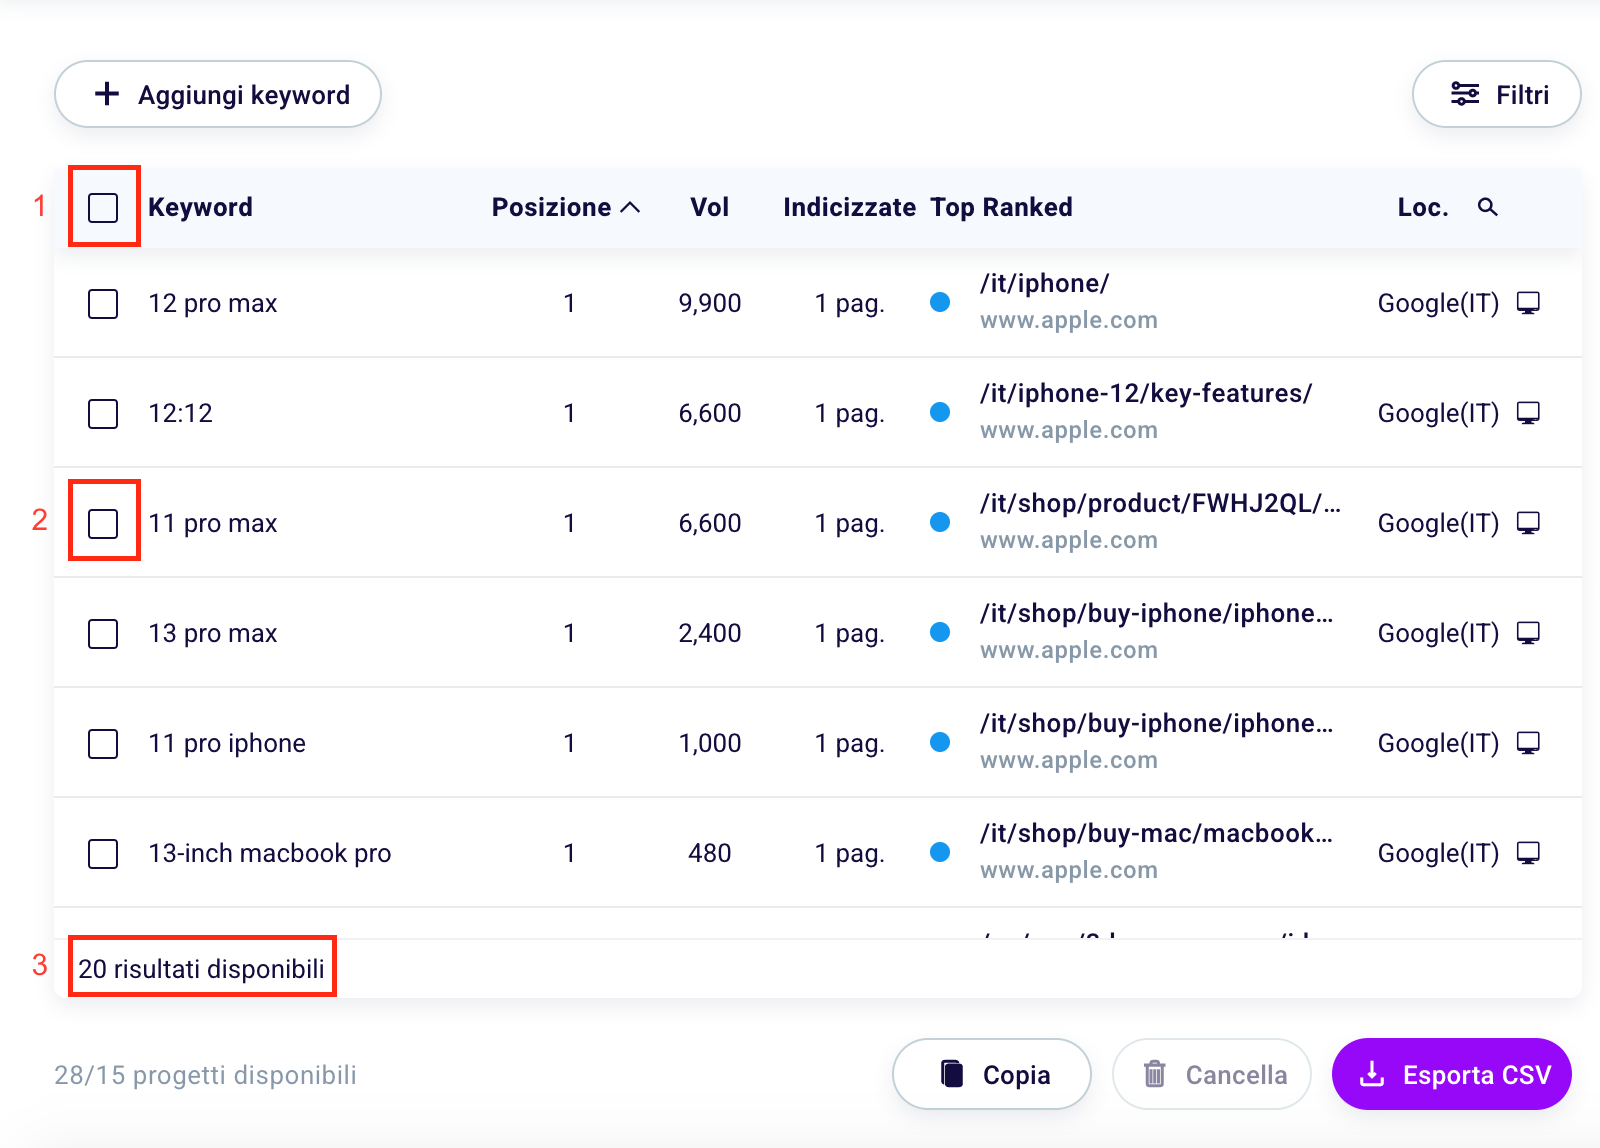
To select all keywords click the box next to “Keyword” (1), if you want to choose a single specific word, click on the field next to that word (2) to select it. At the bottom of the table you can view the “available keyword results”.

How to interpret the Keyword Rank Tracker table?

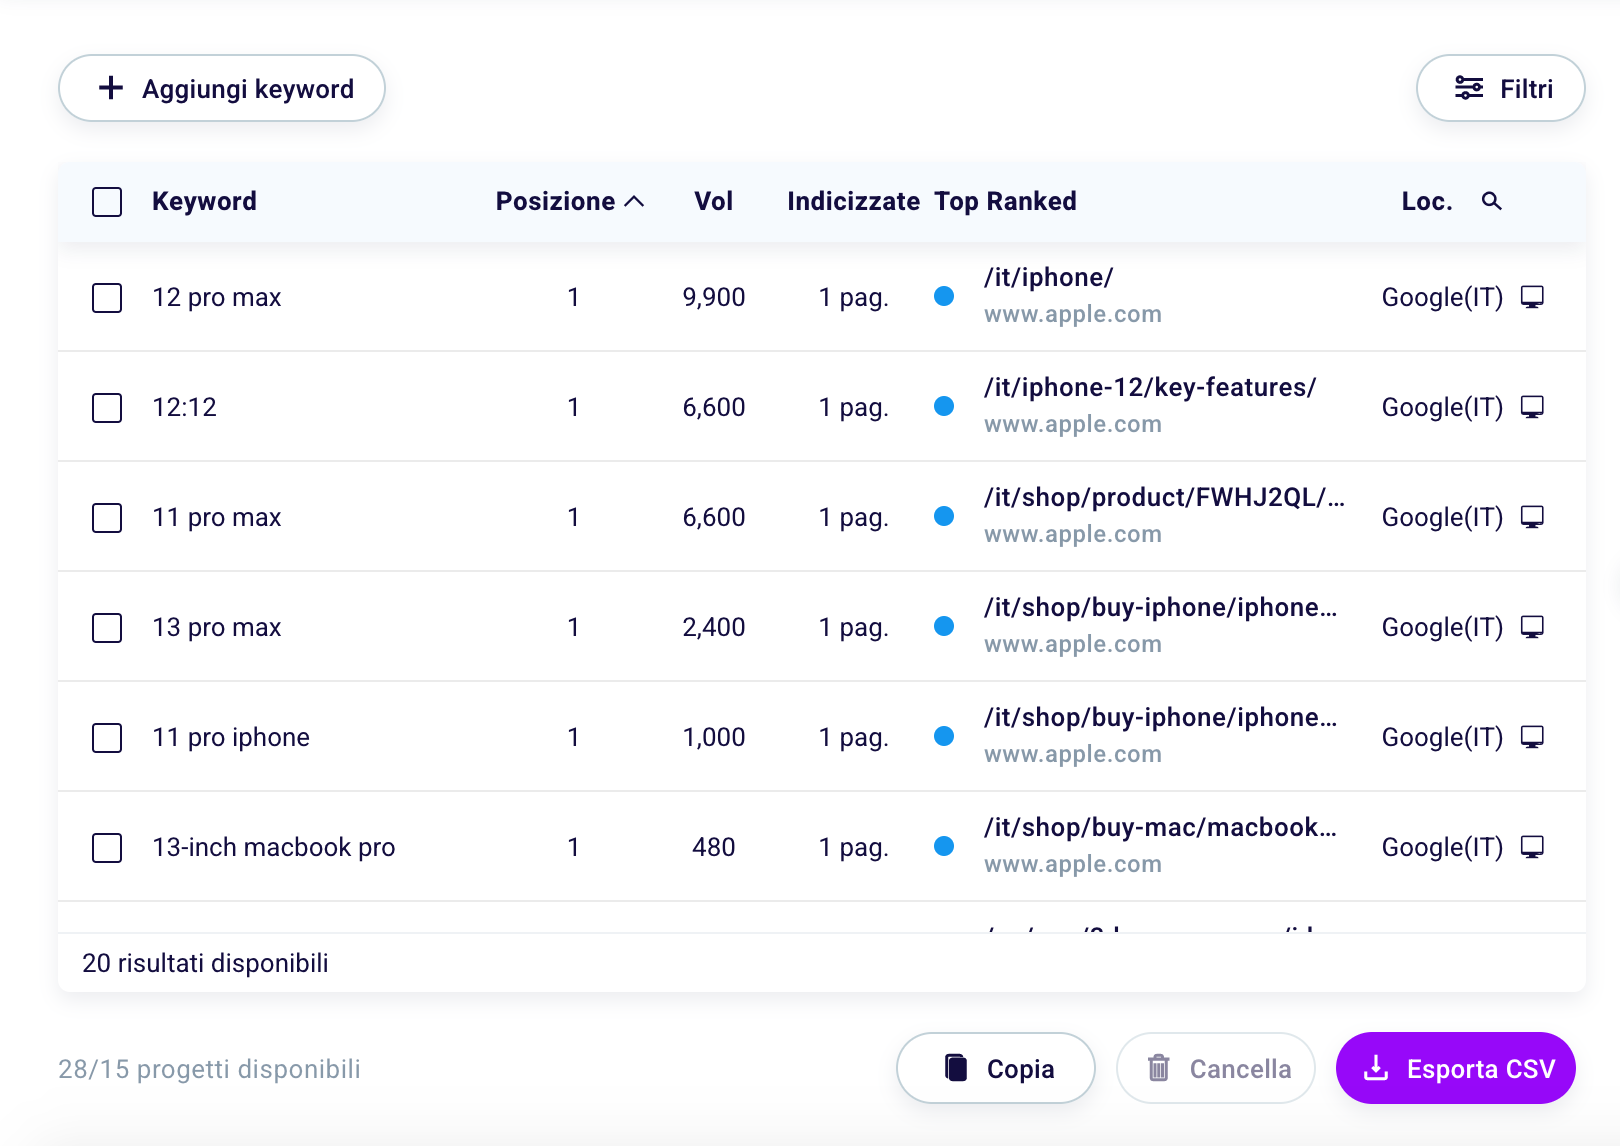
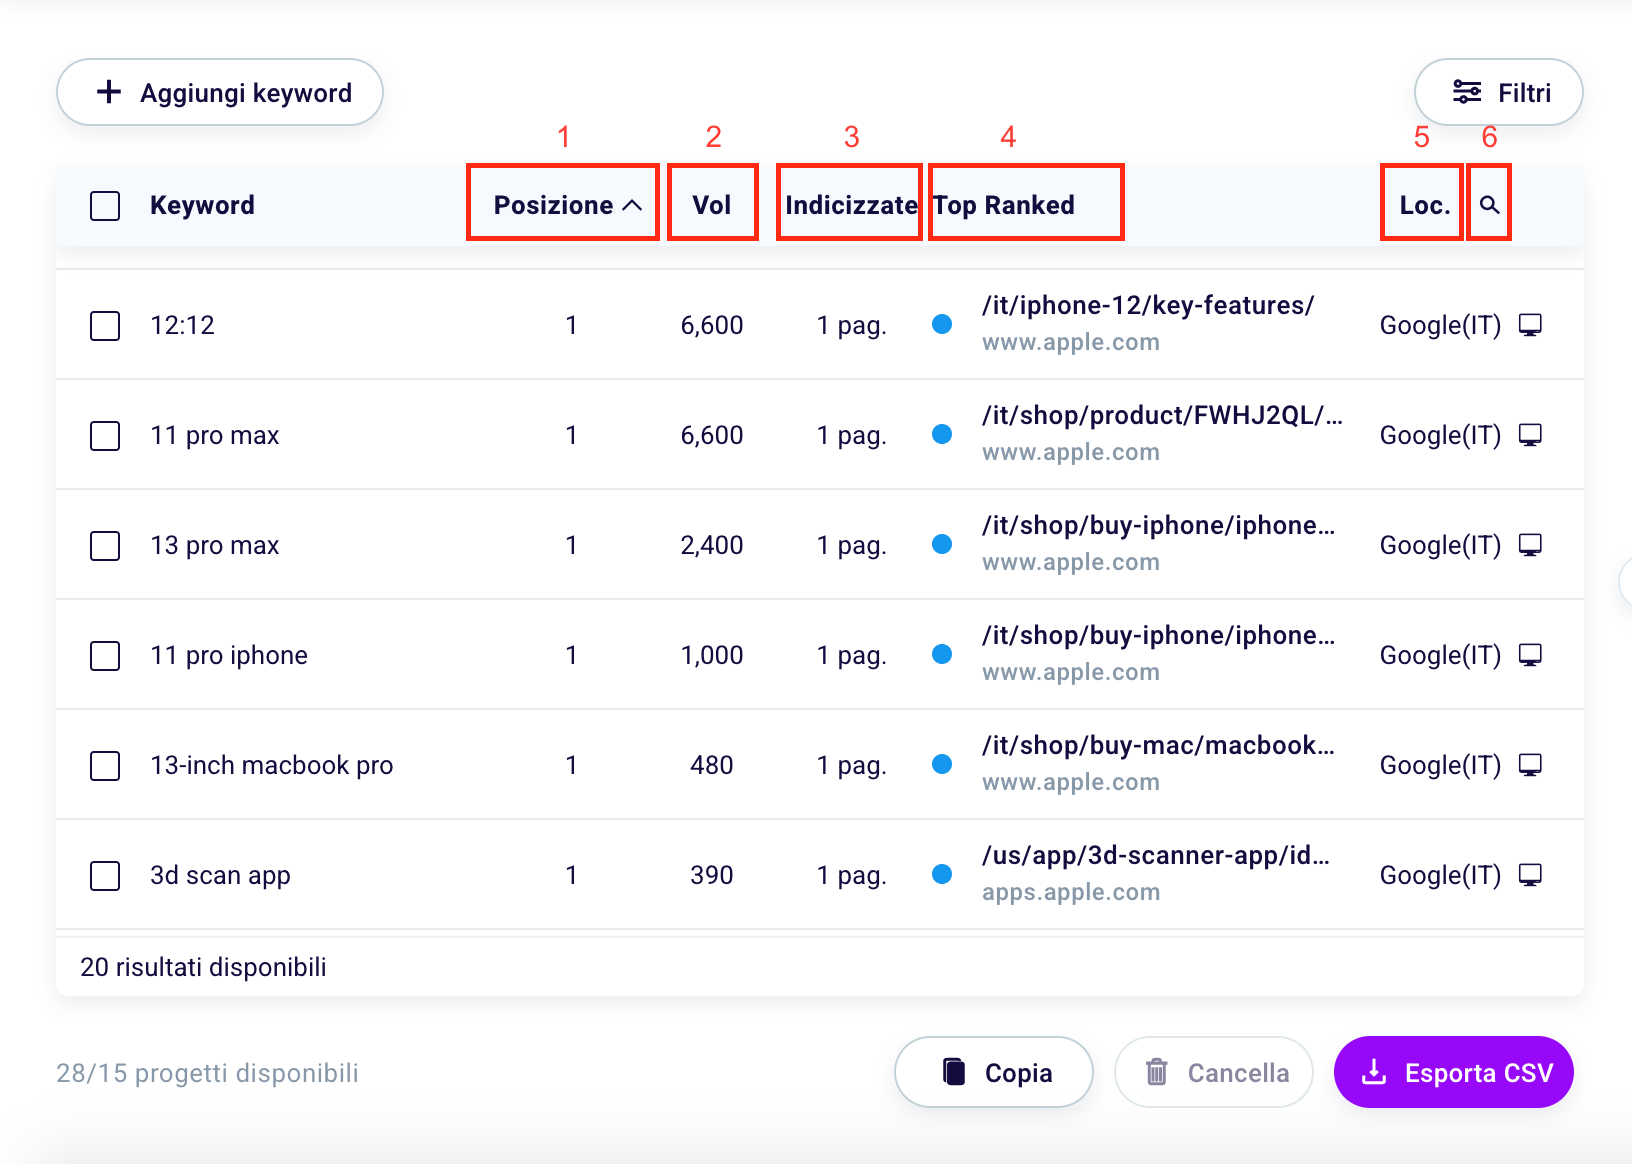
Within the table on the left of the tool you can view 5 data for each keyword.

You can know the “Position” (1) in SERP that a specific keyword of a given content has obtained; the “Search volume” (2) of that keyword, that is, the average number of monthly searches over 12 months in a given country; a useful metric to estimate the potential traffic for a certain keyword.

“Indexed” (3) indicates the number of web pages on your website indexed with that specific keyword. “Top Ranked” (4) is instead the page among those indexed (which unlike the case in question can be even more than one) that has obtained the best position on the search engine results.

“Loc.” (5) instead stands for Location, and indicates the configuration, given by the set of search engine, country and device of the keyword taken into consideration.

With the “Search” function (6) you can find specific information for specific keywords.

How to set up Keyword Rank Tracker filters?

If you are monitoring many keywords within a project, it may be useful to filter them, in order to view those of interest to you at a given moment.

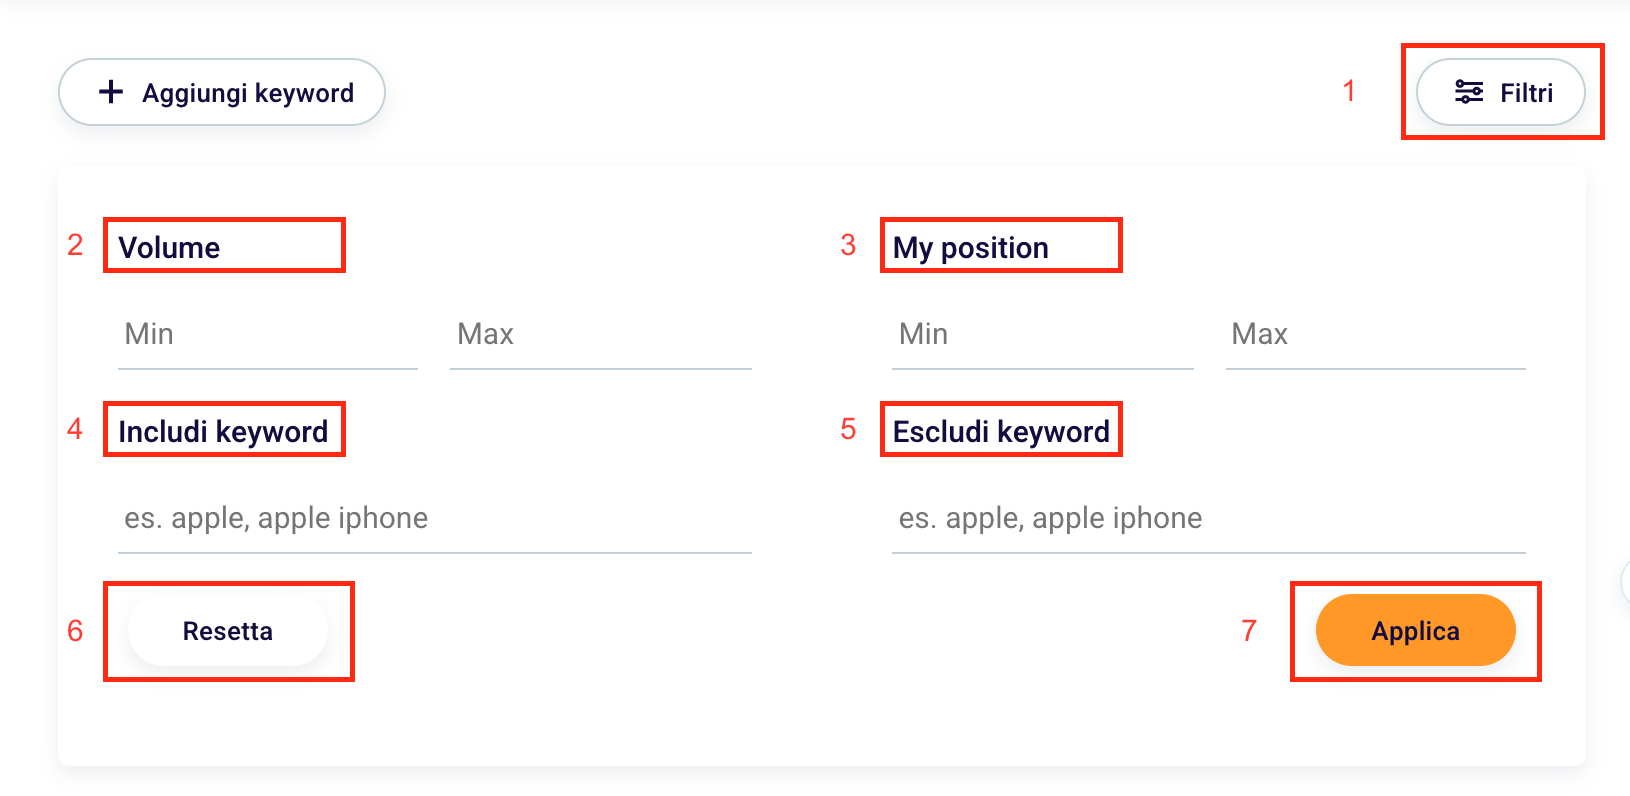
To do this, simply click on “Filters” (1) at the top right and set “Volume” (2) minimum and maximum, “My Position” (3), that is the minimum or maximum position of a specific page for a specific word key. You can filter results that contain certain words with “Include keywords” (4) or that don’t contain those words with “Exclude keywords” (5).

Once your work has been completed, you can decide whether to confirm the search changes by clicking the orange “Apply” button (7) or to return to the previous settings with “Reset” (6).

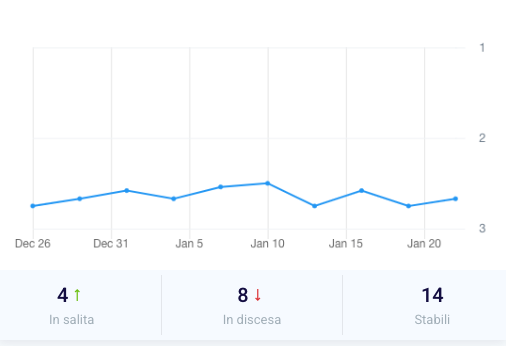
On the left side of the screen you can see this graph with which to monitor the results of your SEO efforts.

The graph changes as the selected keyword changes.

The point inside the graph (1) represents your current and past position. In box (2) you can see the number of pages that have improved their positioning and in (3) instead how many are in lower positions than those recorded at the start of tracking. In the last box (4), on the other hand, the keywords are stable, that is, those that have not changed position.

Also on the right side of the screen, by scrolling you can see this tab.

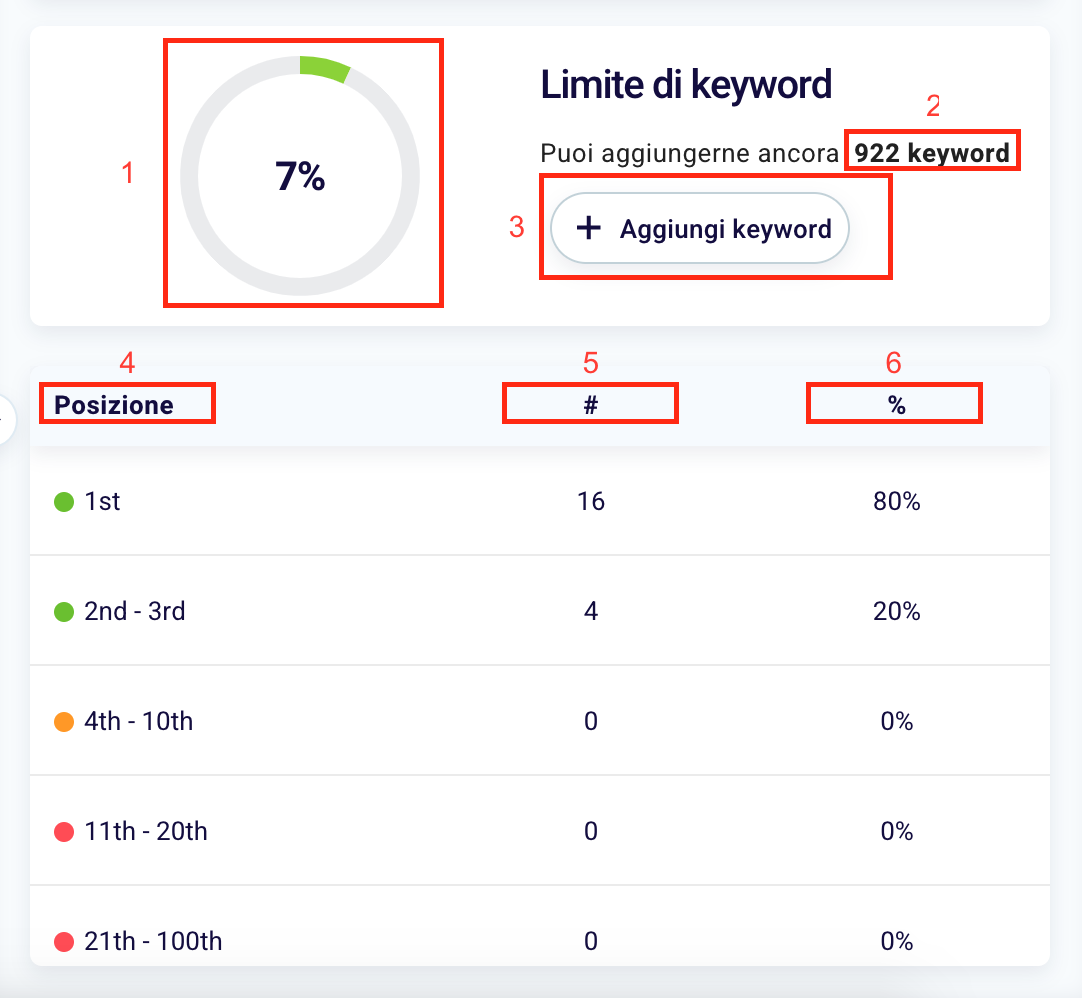
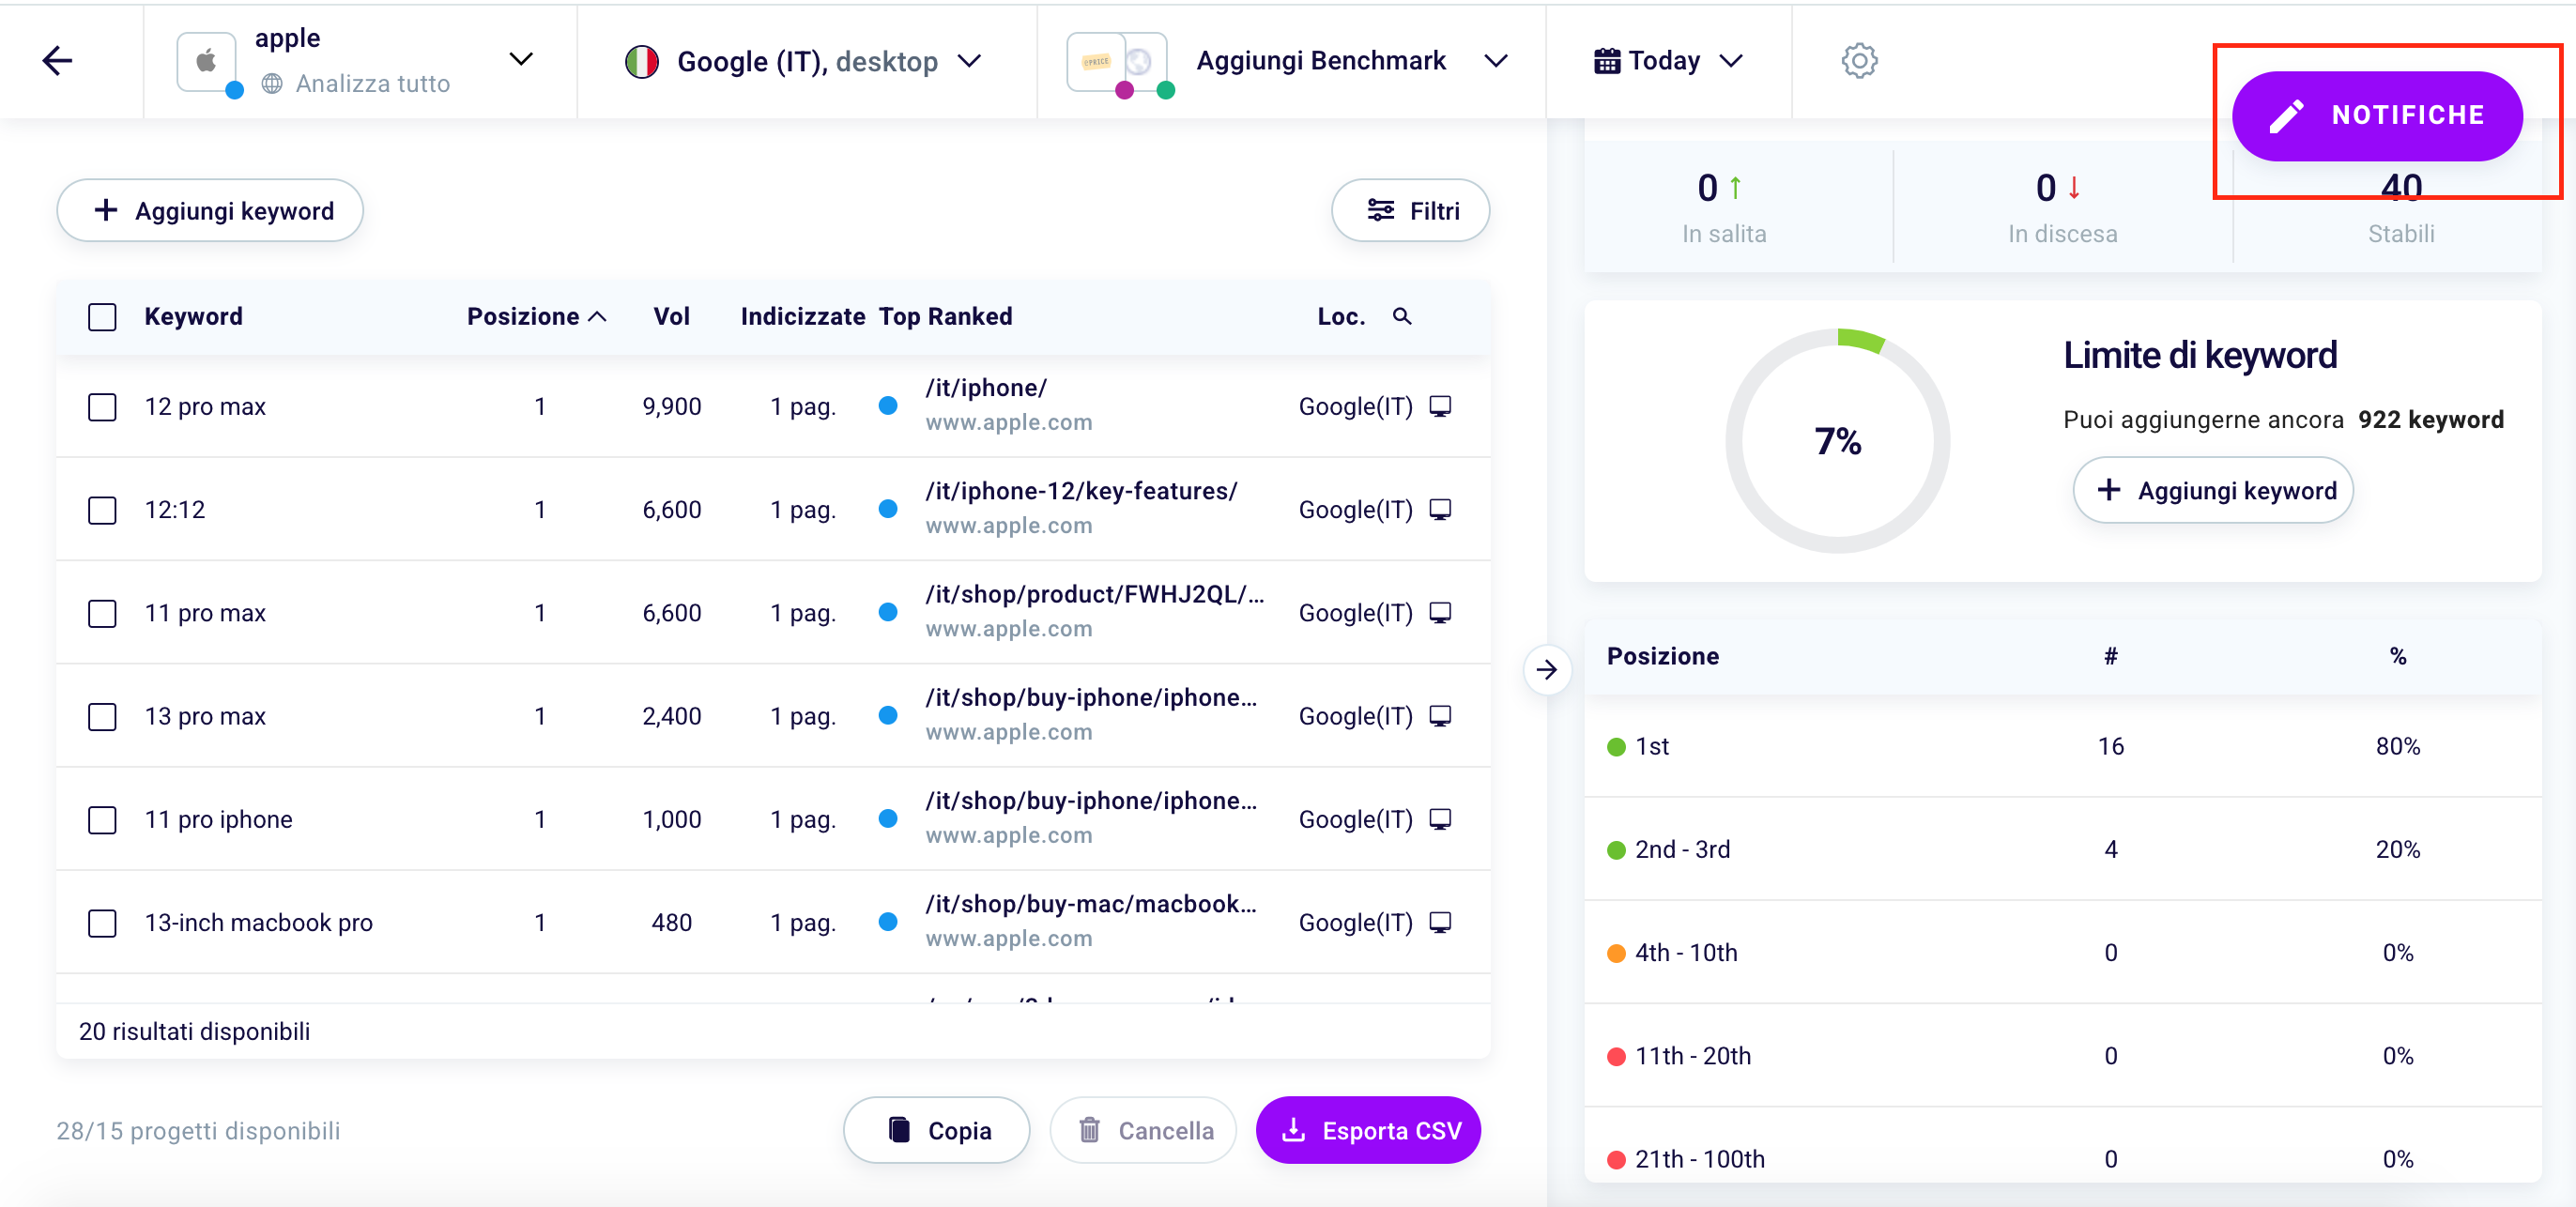
In the circular chart (1) you can see the percentage of keywords traced, 7%, compared to those that you can still trace with your plan or, in this case, “922 keywords” (2). Do you want to track others? Click “Add keyword” (3).

Under the summary table you can view by “Position” (4) the “#” Number of pages that have reached a certain position (5) and the “%” percentage of pages that have reached a specific positioning (6).

How to set up tracking alerts?

With the Keyword Rank Tracker you also have the ability to set periodic alerts so you don’t miss an update on the positioning changes of the websites you are monitoring.

To set yours, click the purple Notifications button in the top right corner.

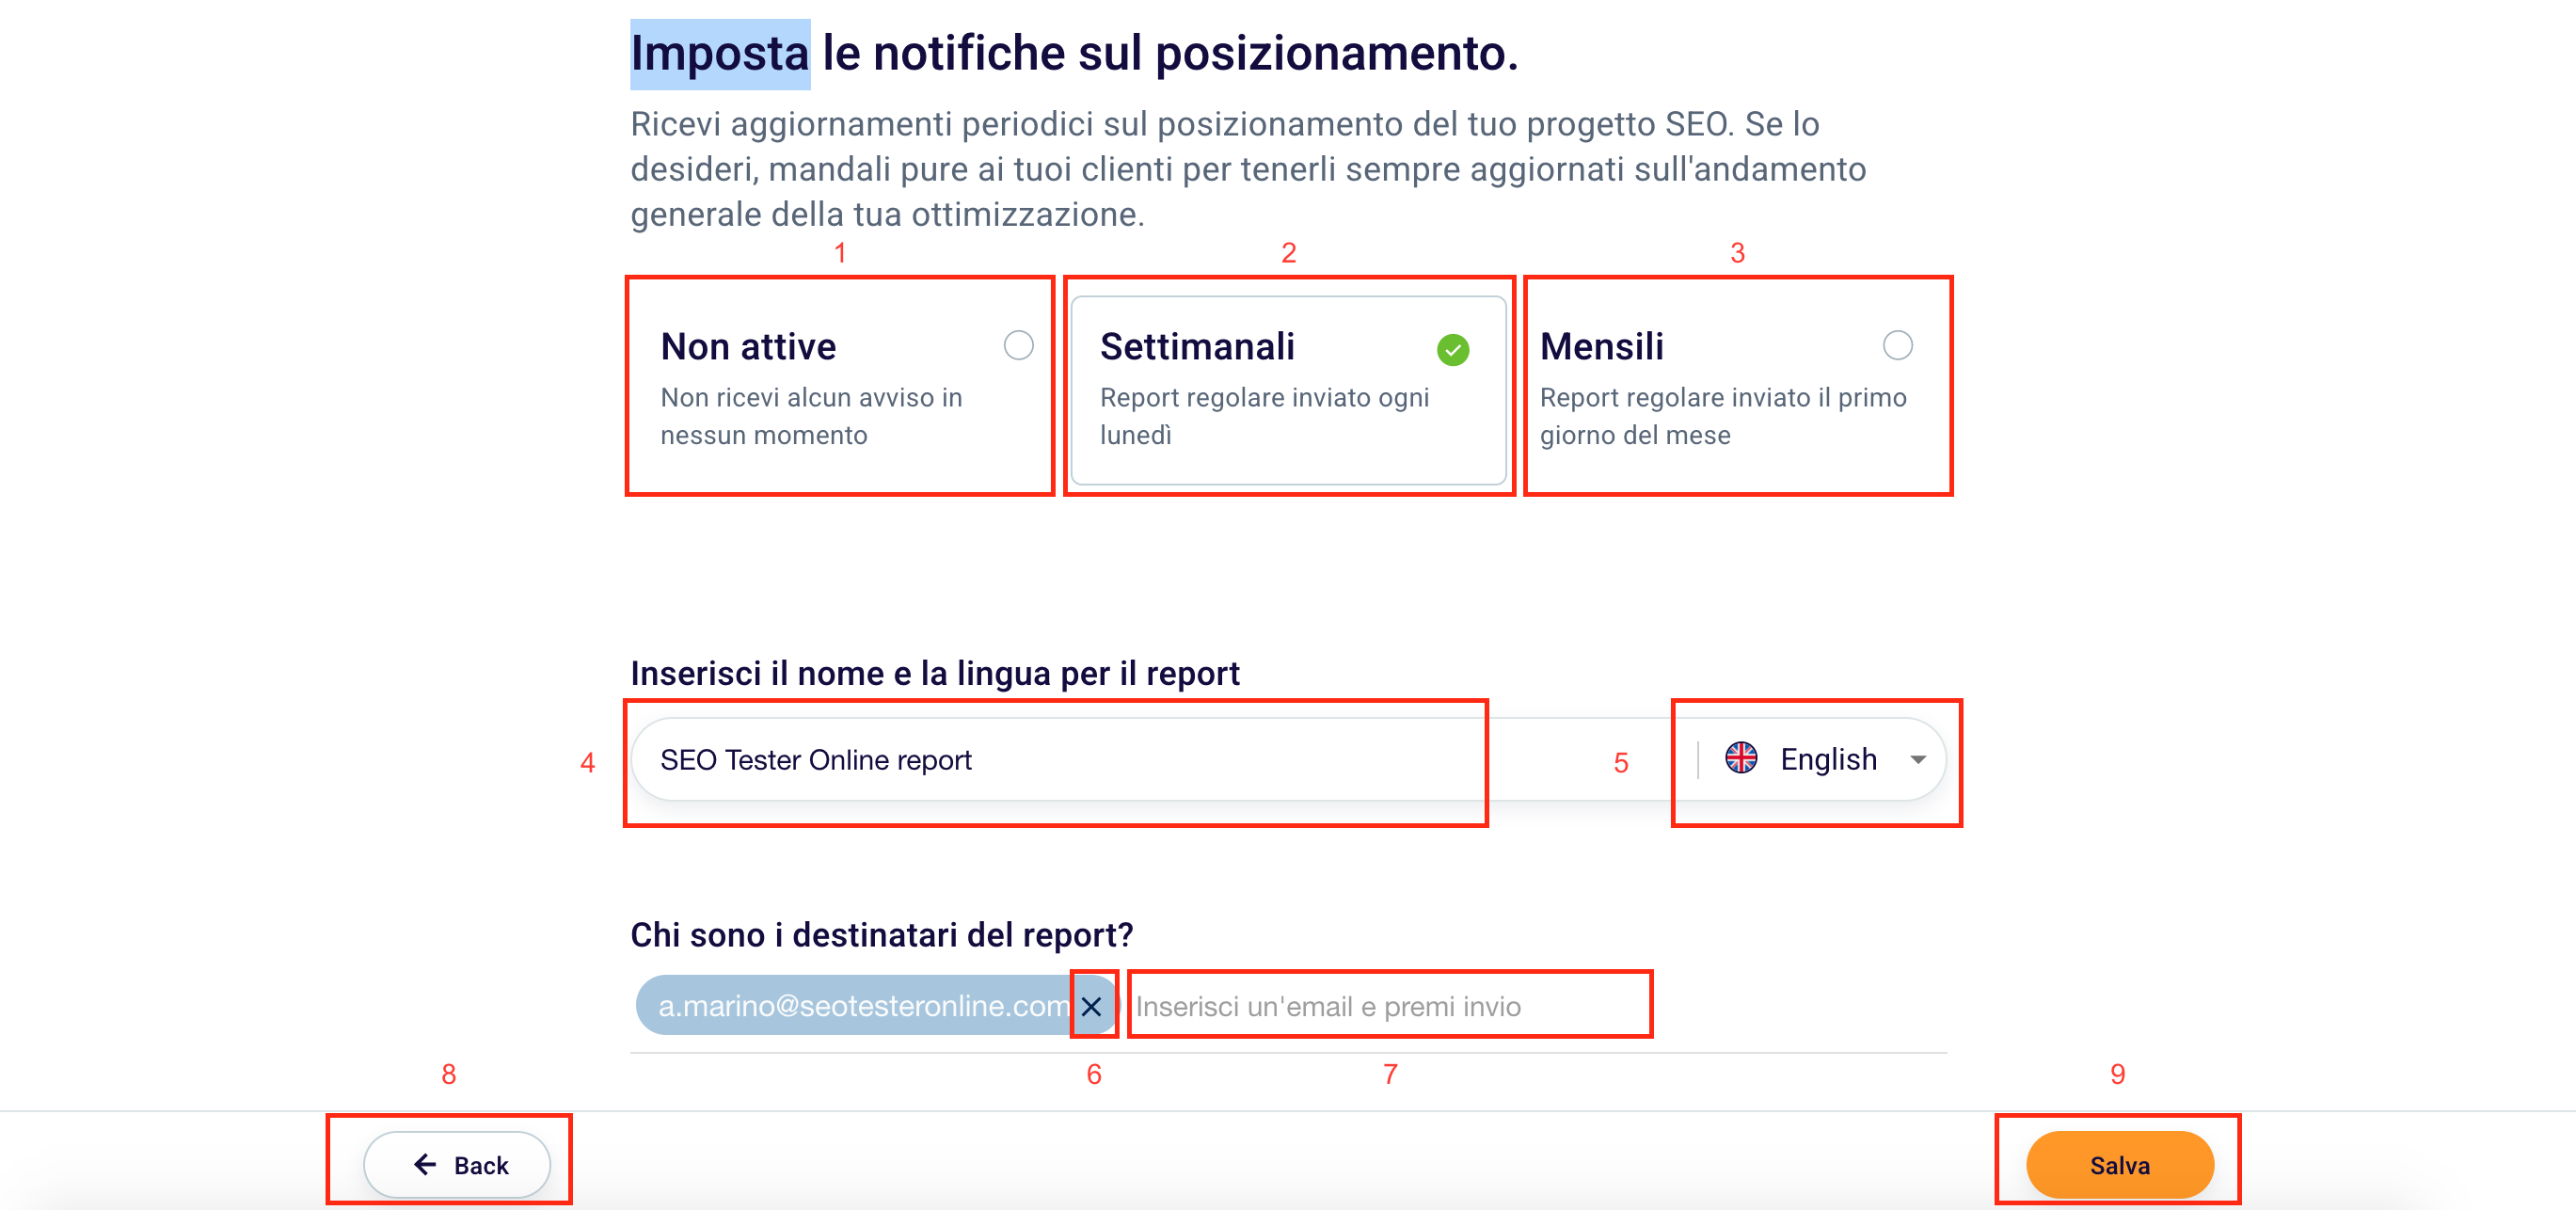
You can set notifications on a Weekly (2), Monthly (3) basis or you can decide not to activate them (3).

You can change the Name (4) and Language (5) of the Report by modifying it in the respective boxes and select, while you can type in the box (7) the email address of the recipient you want to receive your SEO Report and remove, if you want, the current ones by clicking “X “(6).

Go back to the instrument whenever you want with the “Back” key (8) or apply all the changes made by clicking “Save” (9).

Do you want to expand your limits? Is something not clear to you yet? Contact us at support@seotesteronline.com.
SEO Spider Guide

If with the SEO Checker you can analyze in detail the degree of optimization of a single web page, thanks to the SEO Spider it is possible to scan all the pages of a site, because it behaves and analyzes the pages exactly as if was the crawler of a search engine.

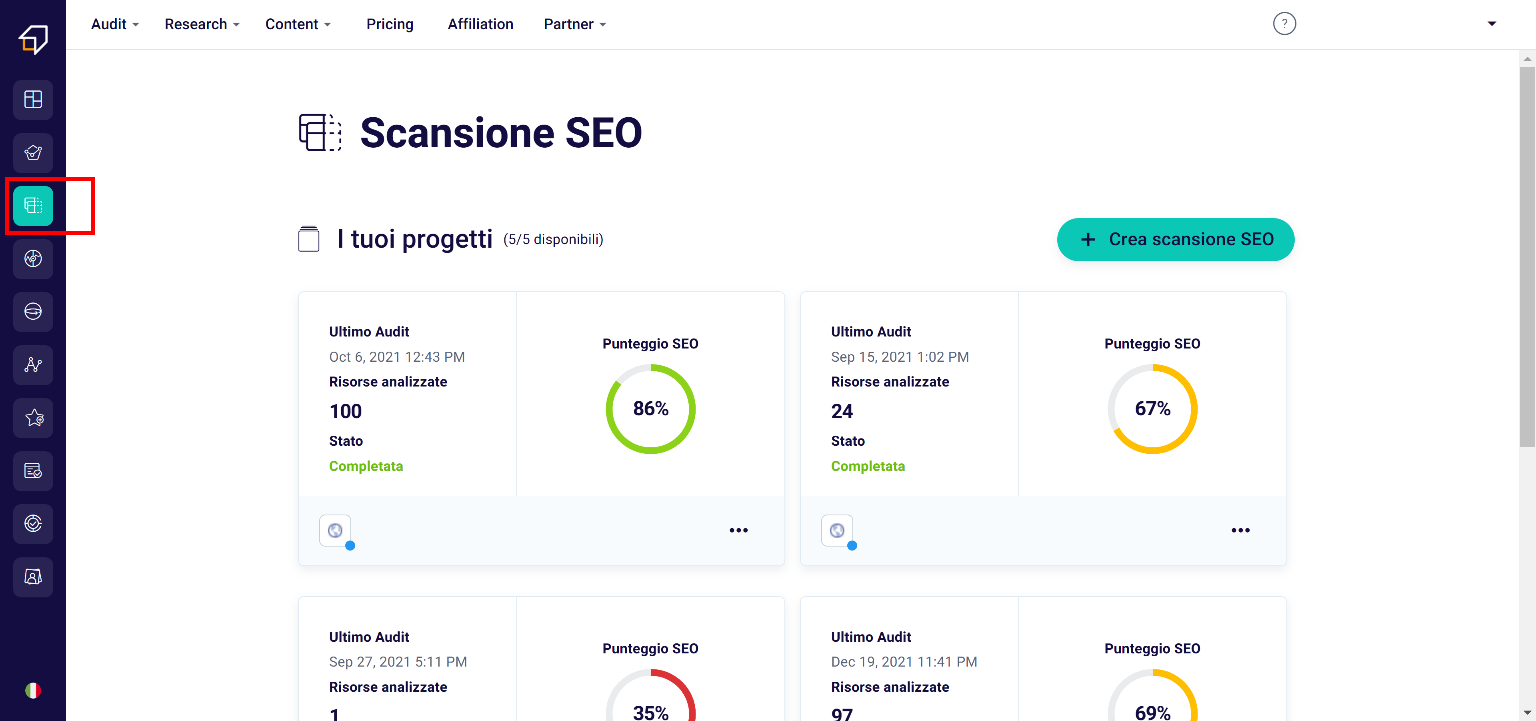
To do this, simply access its dashboard from the menu on the left!

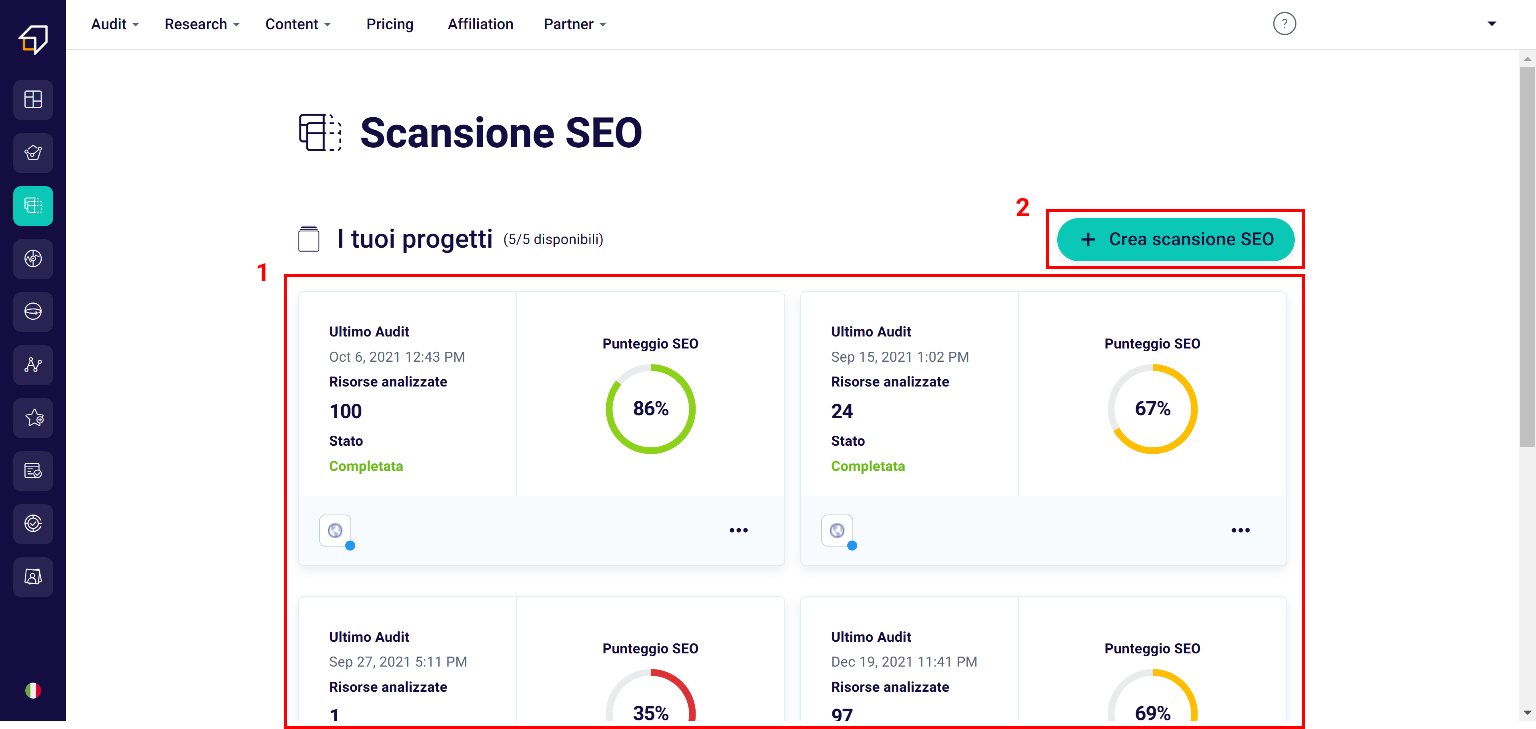
Within the page that appears, in fact, you can decide whether to use one of your existing SEO projects (1), or create a new scan (new SEO project) (2).

We have written a very complete guide on creating SEO projects and if you have not read it yet, we recommend that you do so before proceeding with this reading!

Result

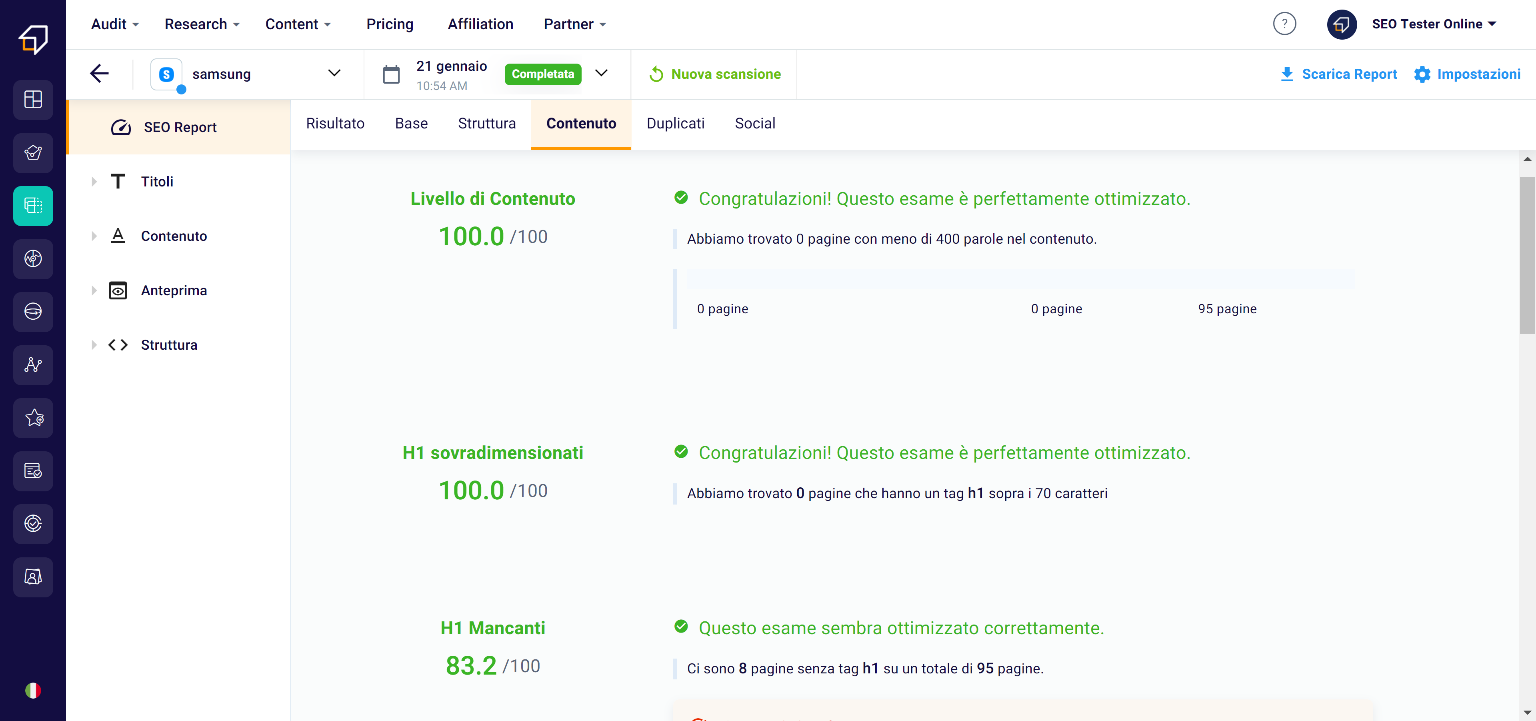
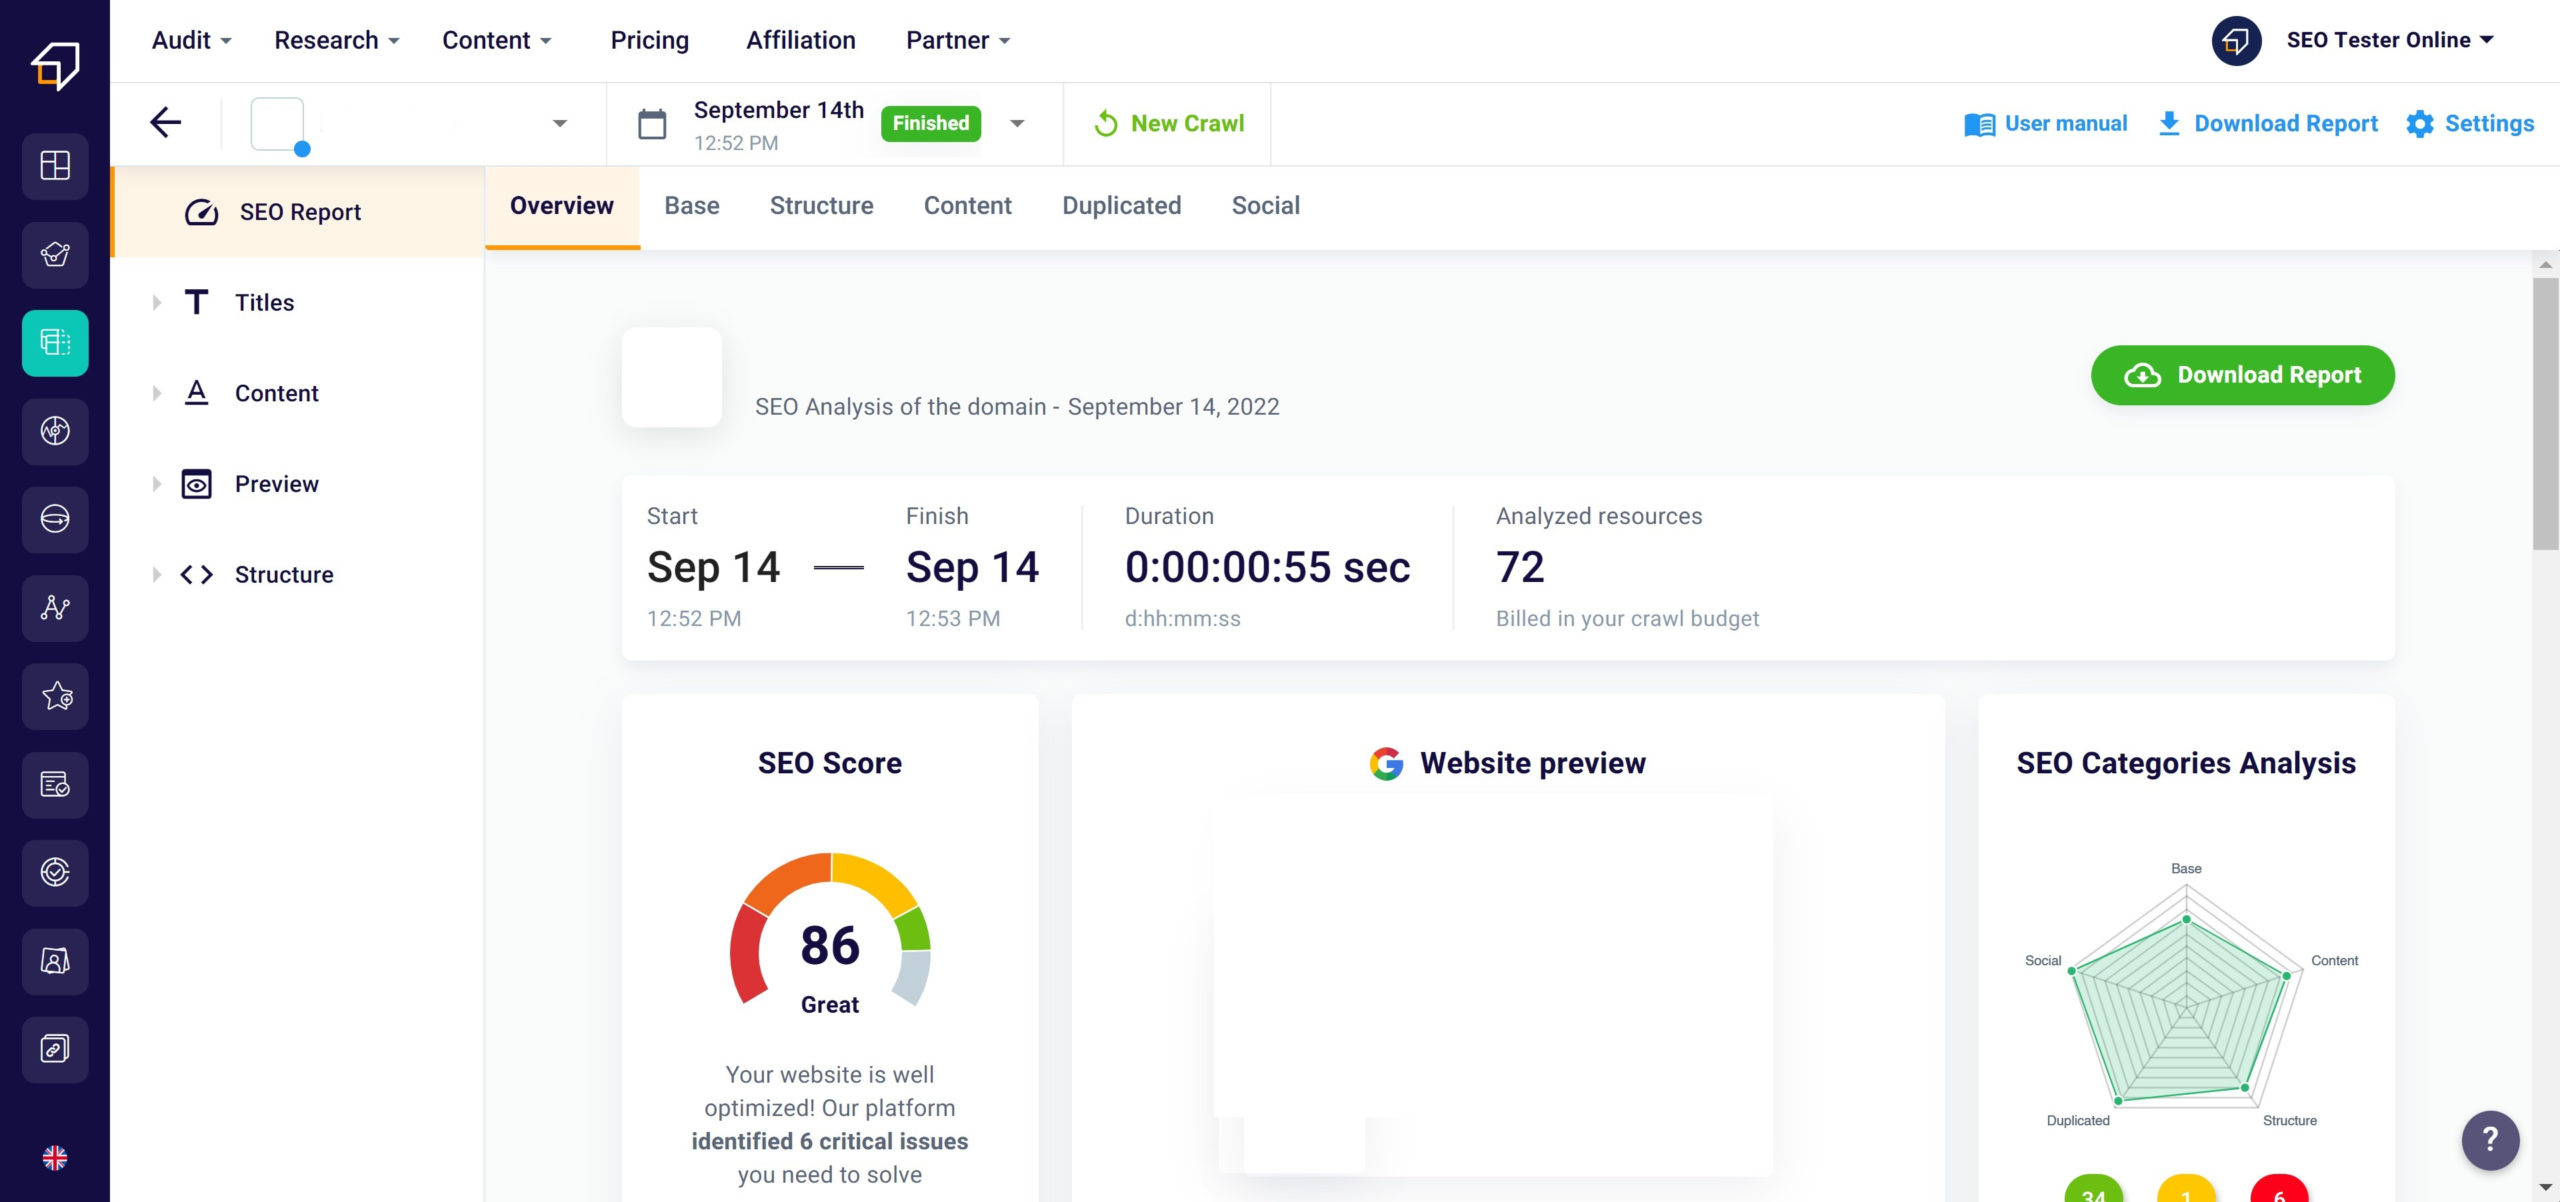
After creating a new Project, or selecting one of the existing ones, in a few seconds you will get the scan result, an overview with which you can evaluate the overall SEO performance score and guess at a glance which aspects should be improved.

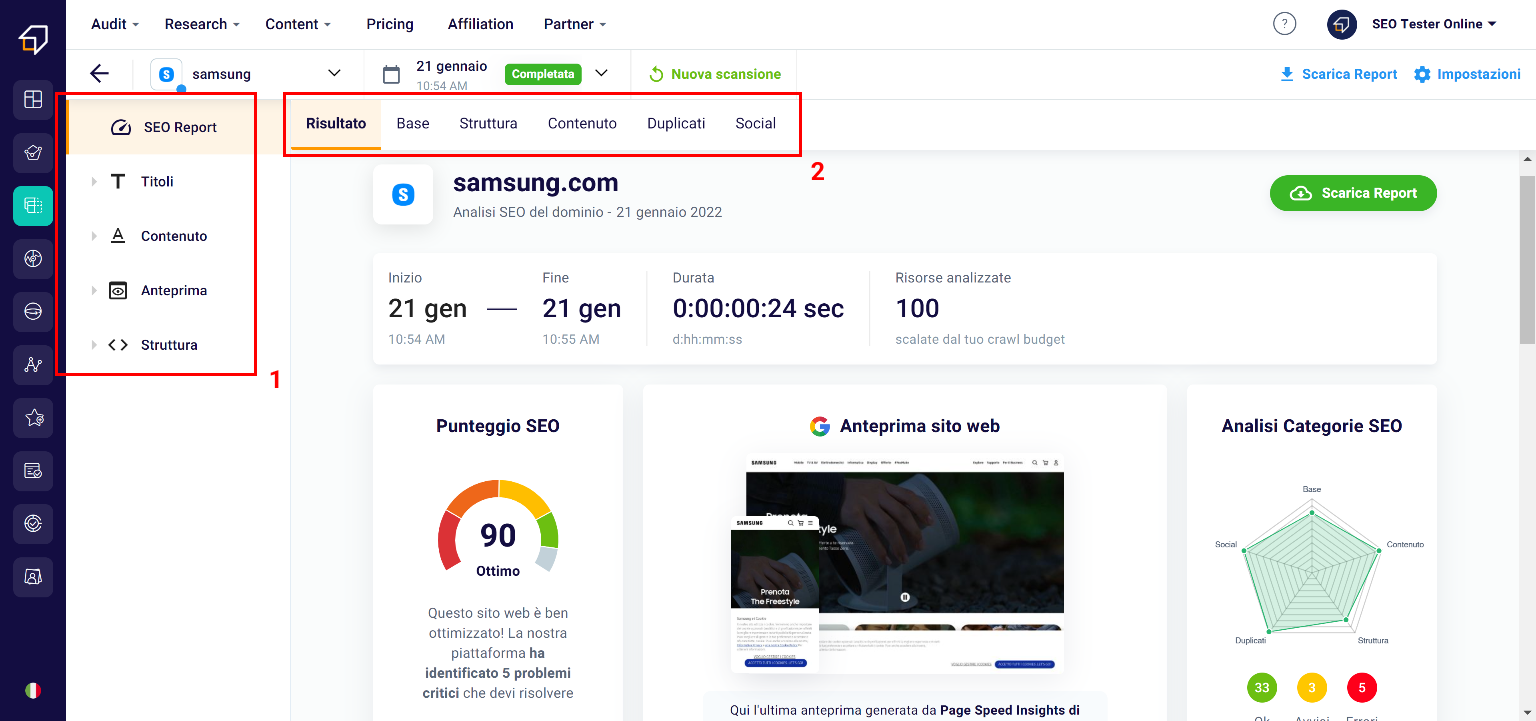
To go deeper into the analysis, you can use two menus:

  • the side one (1) which will allow you to easily navigate between the various elements analyzed;
  • the upper one (2) thanks to which you can study the 5 SEO Categories: Basic, Structure, Content, Duplicates and Social.

Let’s start from the Base!

Base

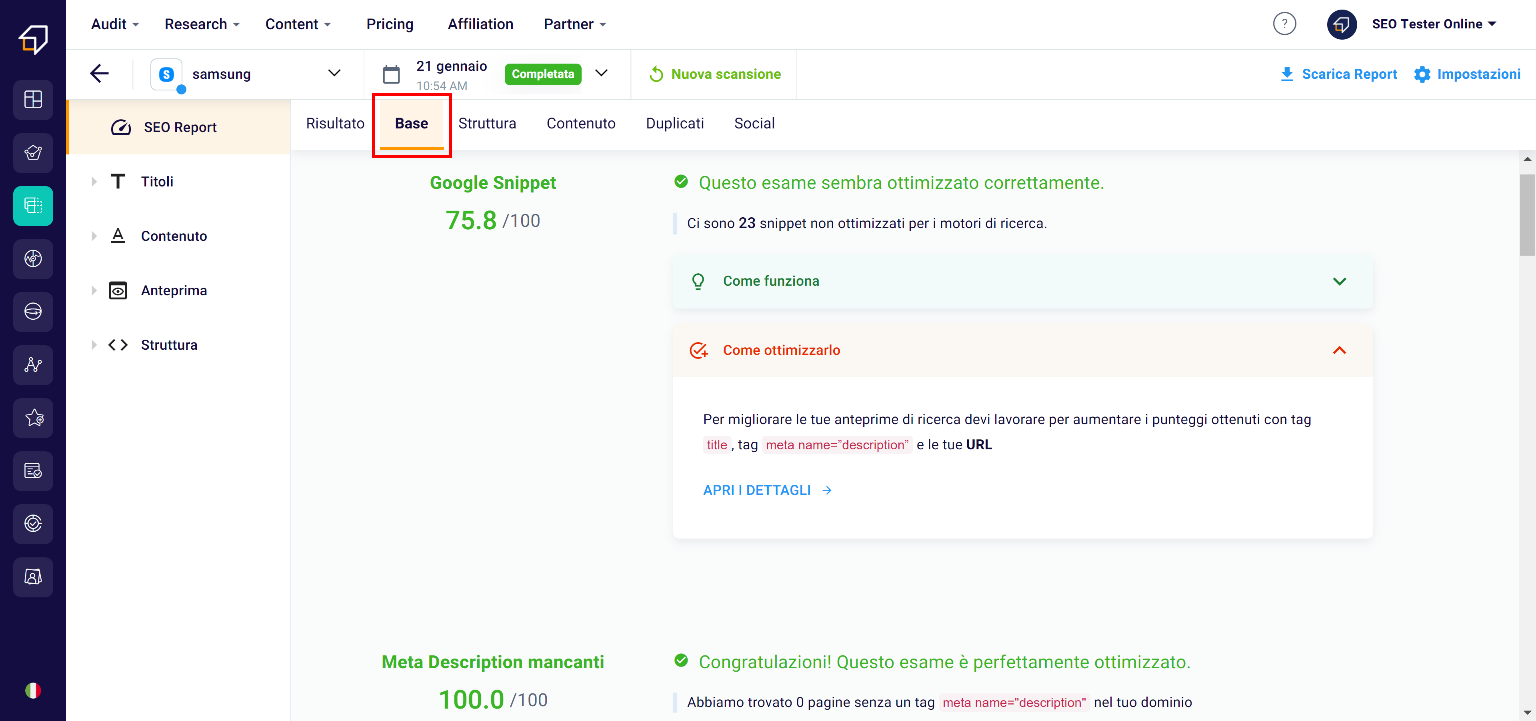
After viewing the generic information in the “Result” section, clicking on “Base” you will be able to view the elements of the code that have been optimized.

In particular, let’s talk about snippets, meta descriptions, titles, canonical tags etc.

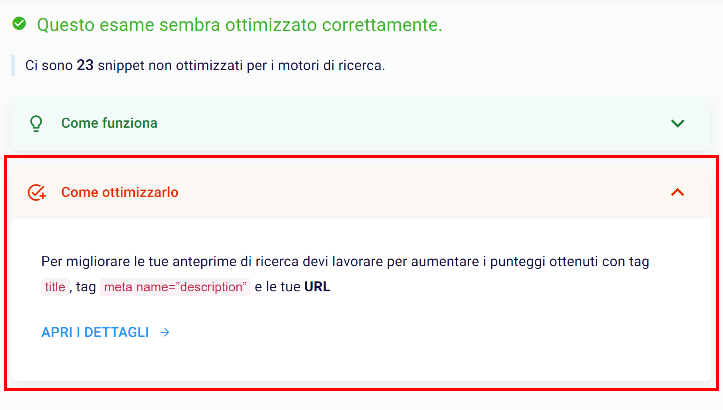
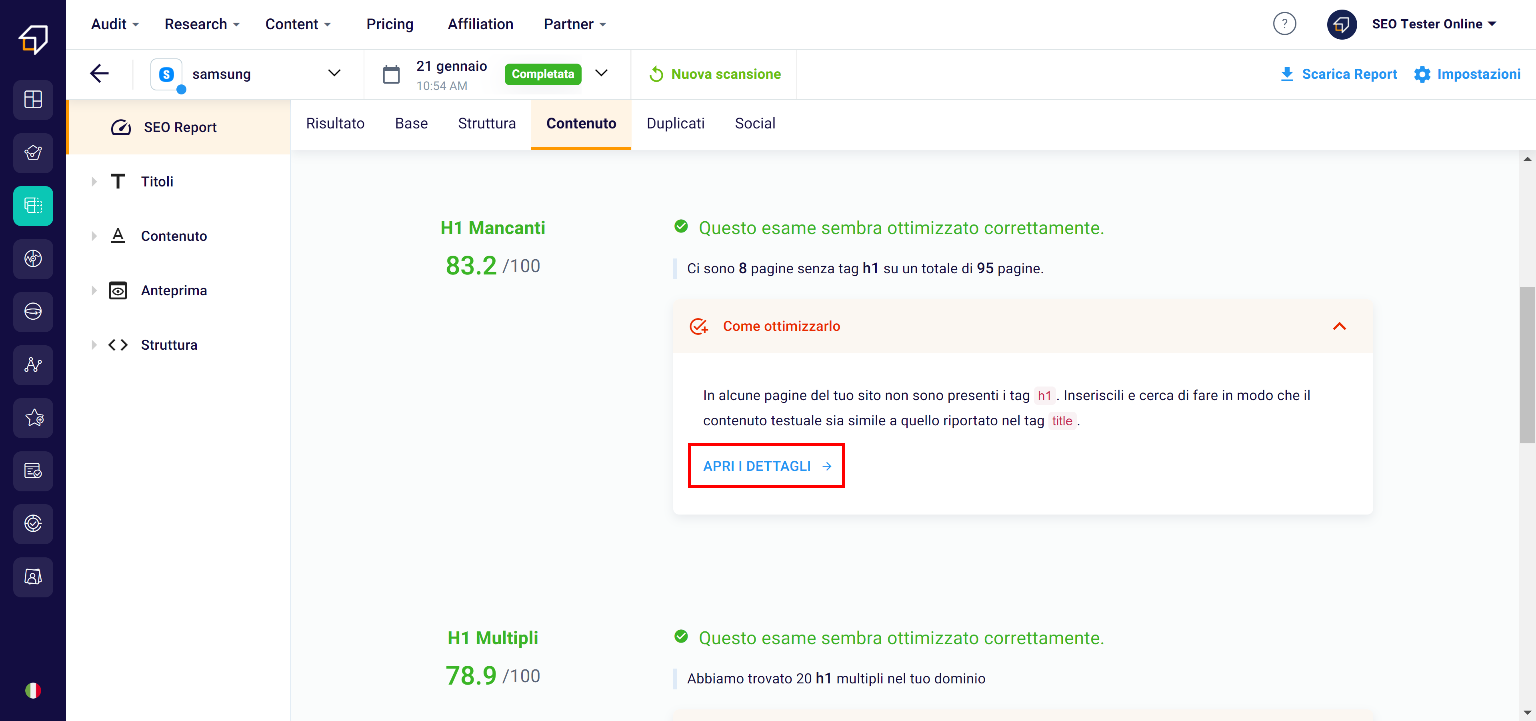
In case of any critical issues, the SEO Spider will suggest the changes through the red section “How to solve it”.

Furthermore, by clicking on “Open details” you can study the anomalies more specifically!

Structure

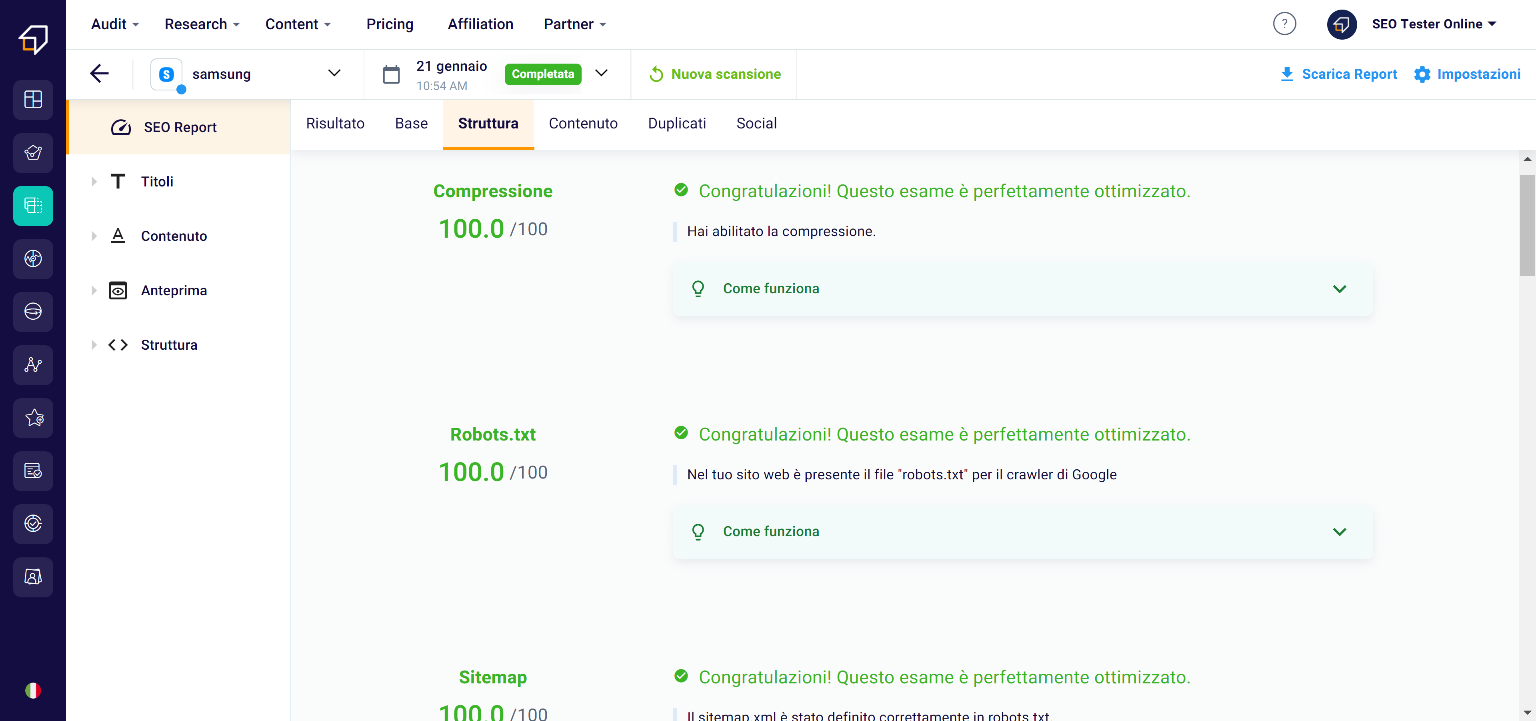
The “Structure” section, on the other hand, will list the results of the analysis of all the elements that make it easier for search engine crawlers to crawl.

Among the various parameters, for example, you can check if the website sitemap has been loaded correctly, if there are pages not found, or if the robots.txt file has been optimized correctly.

Also in this case, if there are any problems, the SEO Spider will suggest the interventions to be made thanks to the section “How to optimize it”.

Content

As you can guess from the title, this area of ​​the tool is dedicated to content.

In fact, here you can check how many pages have the right elements inside them, if the h1 / 2/3 tags are the right size or if they are completely missing etc.

Always remember that in the “How to optimize it” area you can investigate the various critical issues by clicking on “Open details”.

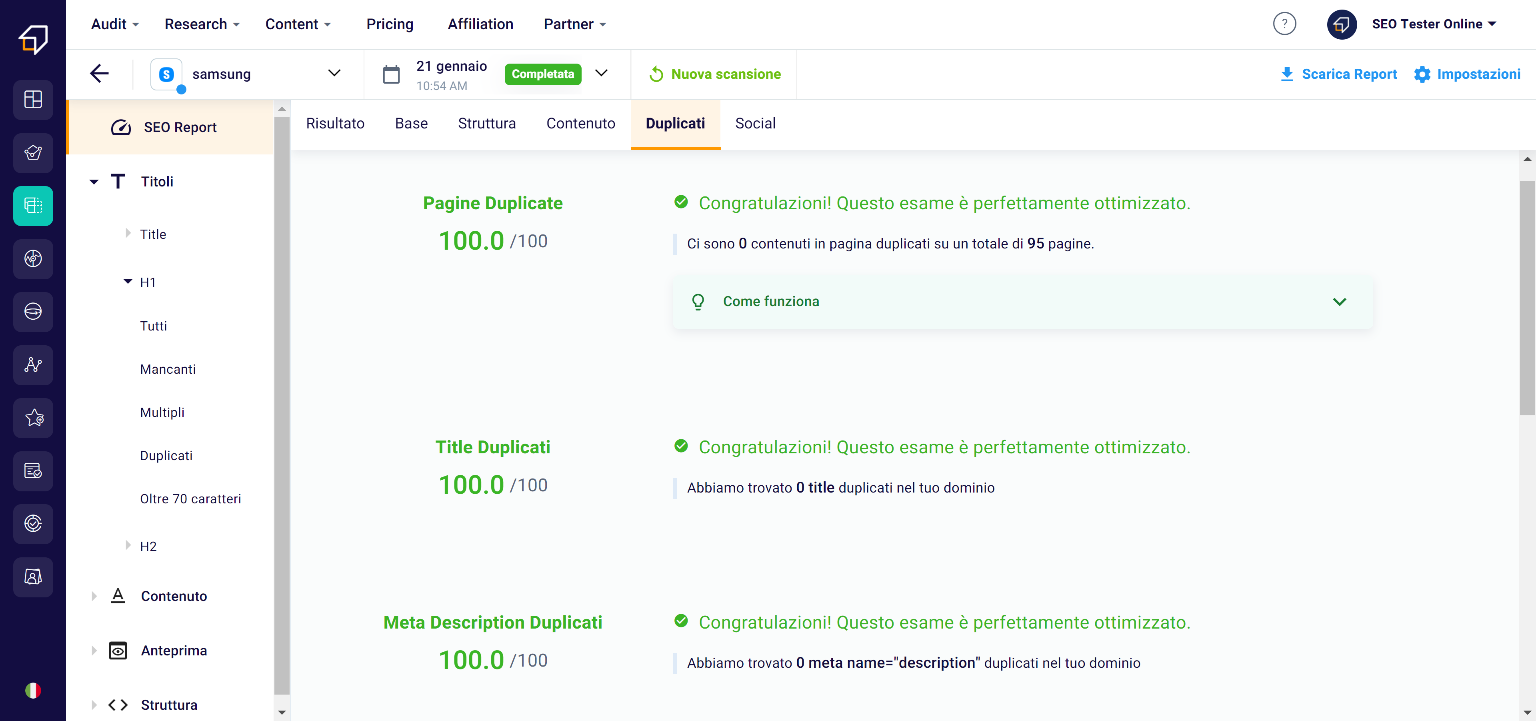
Duplicates

Duplicates on a website should always be avoided. In this section, in fact, you can make sure that there are no unnecessary copies on your site, including meta descriptions, titles or entire pages.

Unfortunately duplicate content could be penalized by search engines, so be very careful and make the most of this section to make sure that all the content on your website is exclusive and valuable.

Social

Thanks to the Social section you will be able to see the pages of your website for which the snippets and social cards have not been correctly set.


Navigation menu

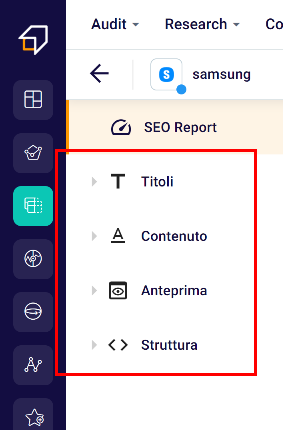
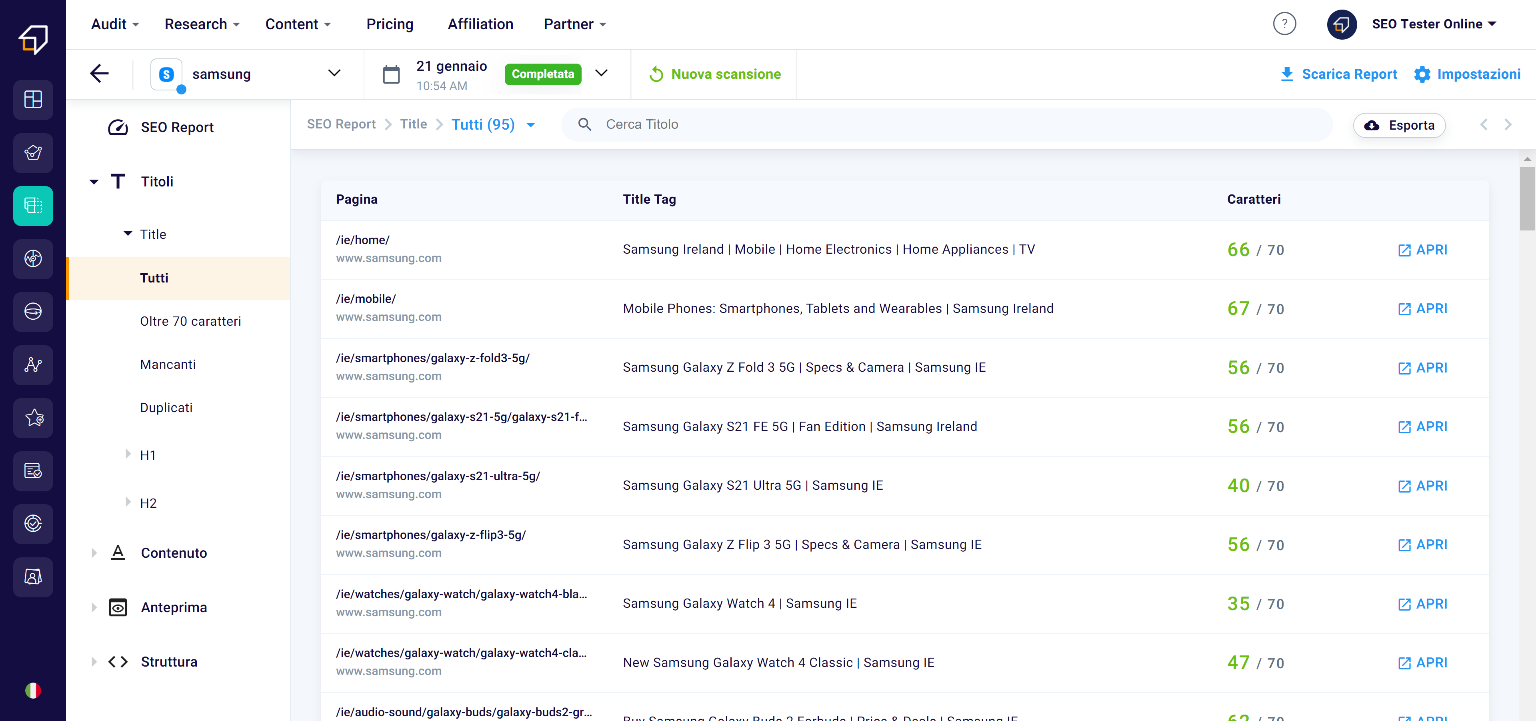
Now let’s move on to the side menu, which will allow you to navigate in a simple and intuitive way between the various elements analyzed by our SEO Spider.

As you can see, it is made up of 4 macro categories:

  • Titles
  • Content
  • Preview
  • Structure

Let’s find out together in more detail!

Title

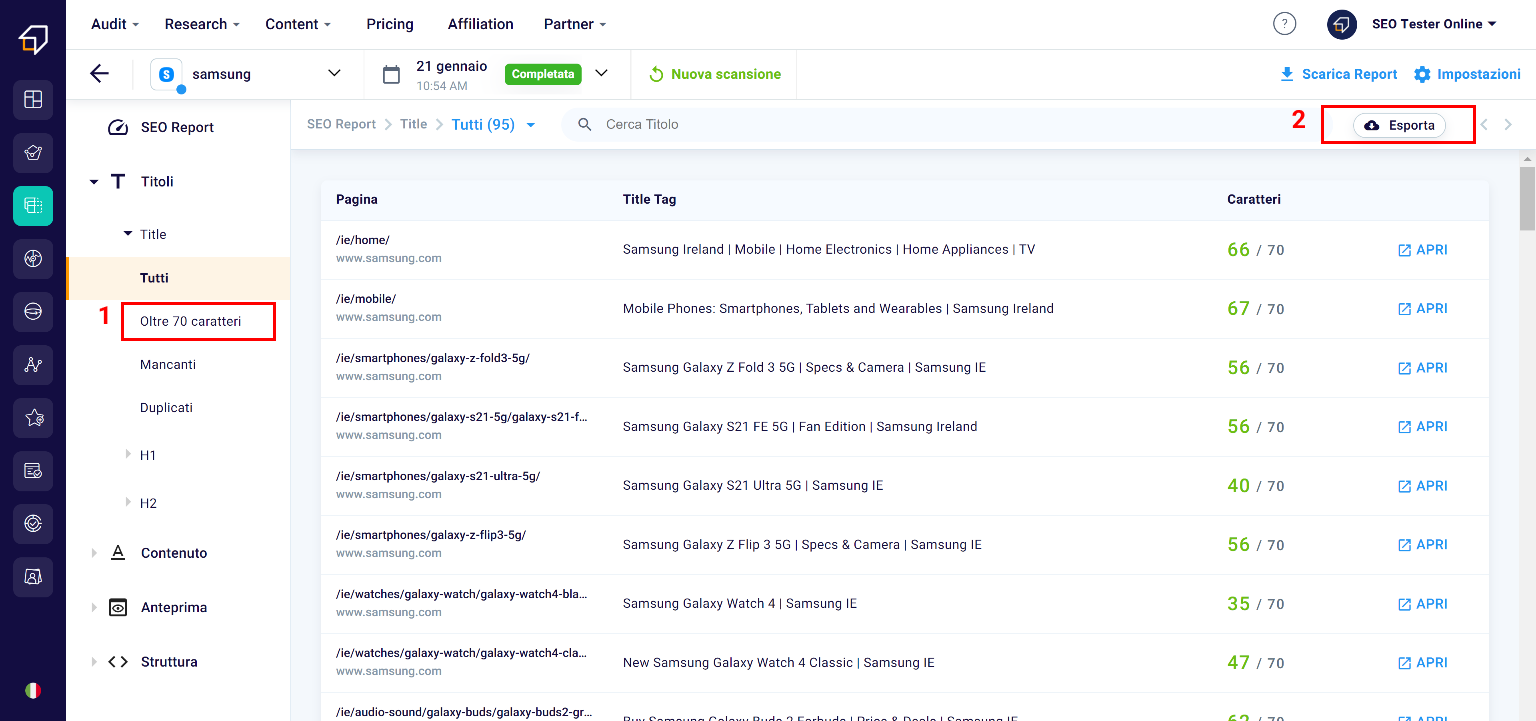
The Title is that portion of text contained in the tag of the same name within the html code of the page and is the title that will appear, among other things, in the preview of the page when we find it on search engines.

In this section you will have the possibility to filter them, for example in order to identify those that exceed the maximum size of 70 characters (1) (beyond which a title is cut) and export them to .xlsx files (2)

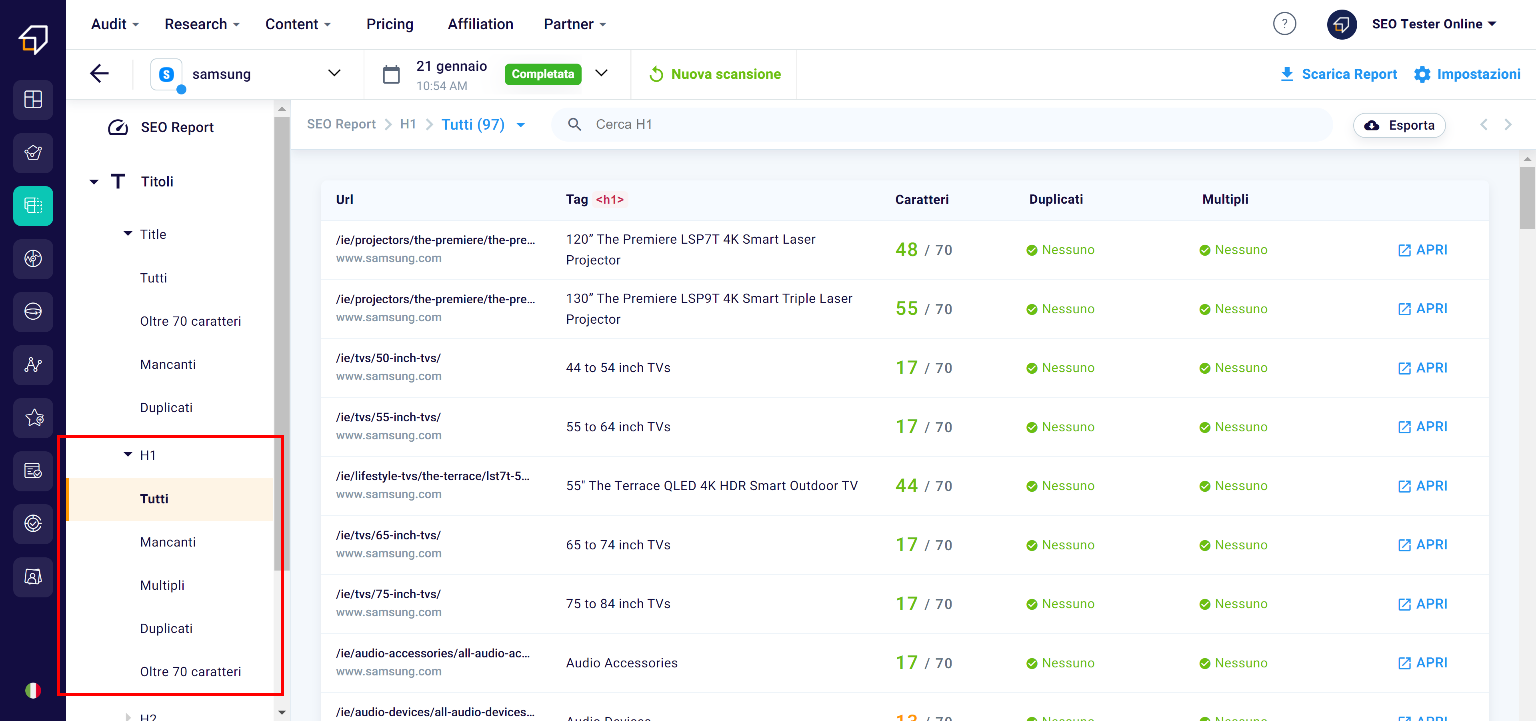
H1 and H2

H1 and H2, on the other hand, are titles of varying importance within the text and are used to give a hierarchy to the paragraphs.

In this case, you will be able to filter the titles by excessive size, missing ones or duplicates.

Plus, only in the case of H1s, you will be able to filter them by multiple titles. This is because normally, in case your page is not divided into sections, the best solution might be to enter only one H1 per page.

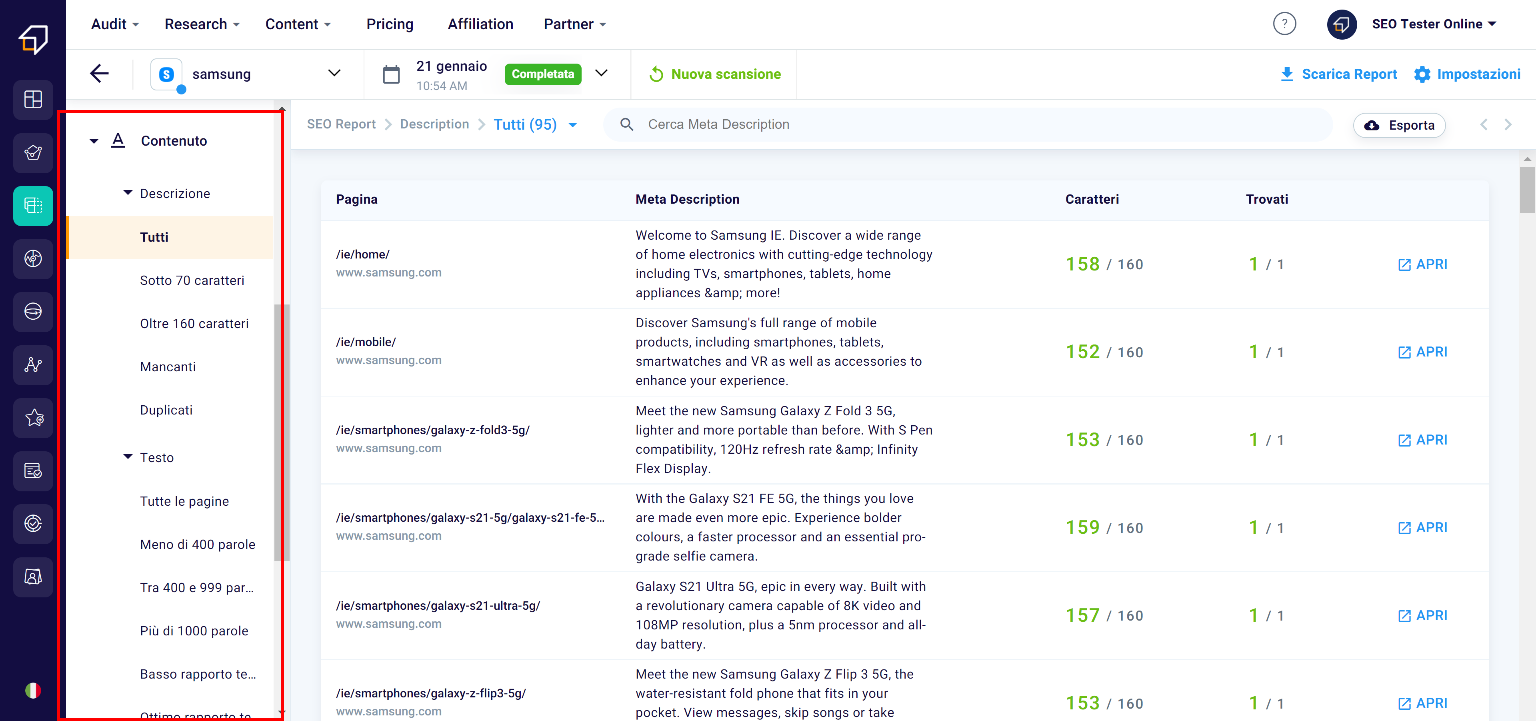
Content

As for the Content, you will be able to navigate between the descriptions (i.e. the descriptive text of the snippet), the titles, the images etc. in order to verify the dimensions and the correct configuration.

Preview

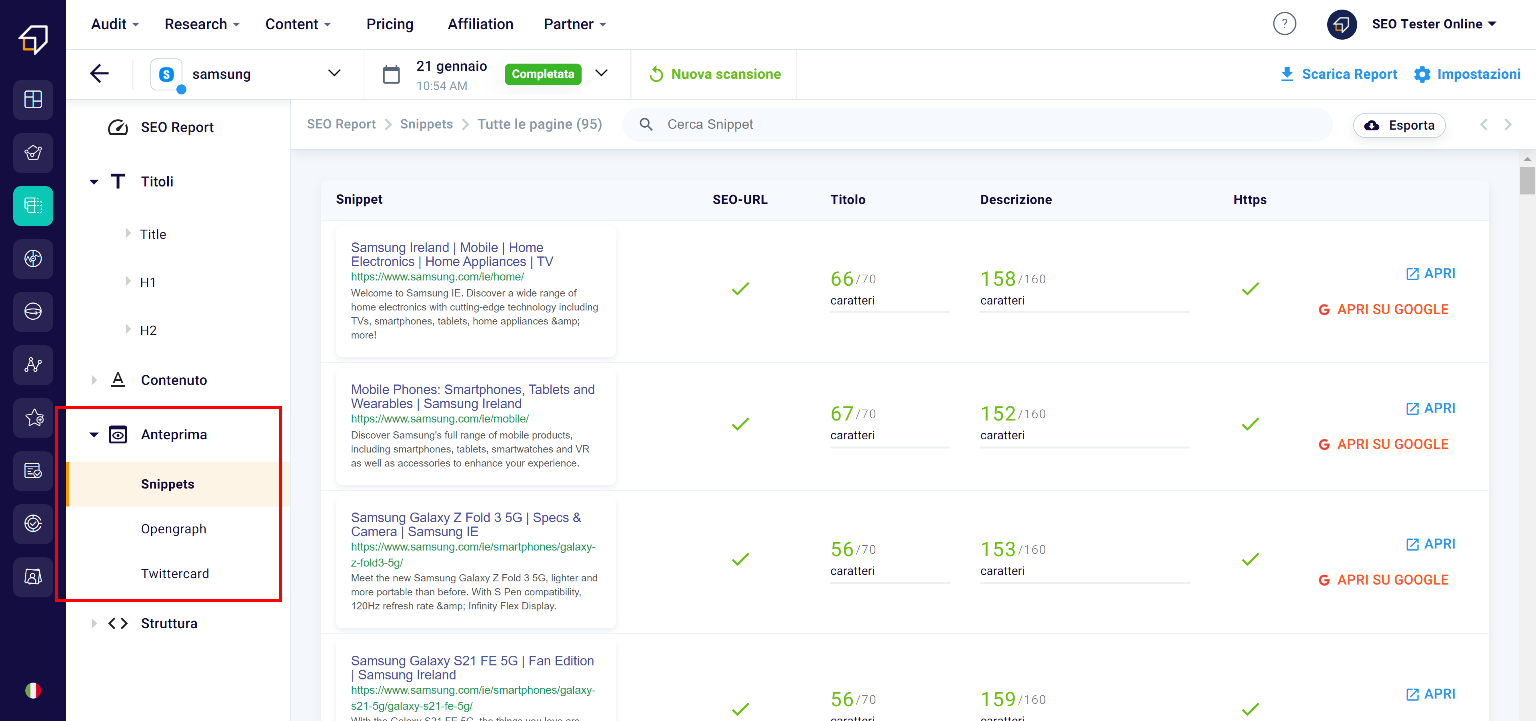
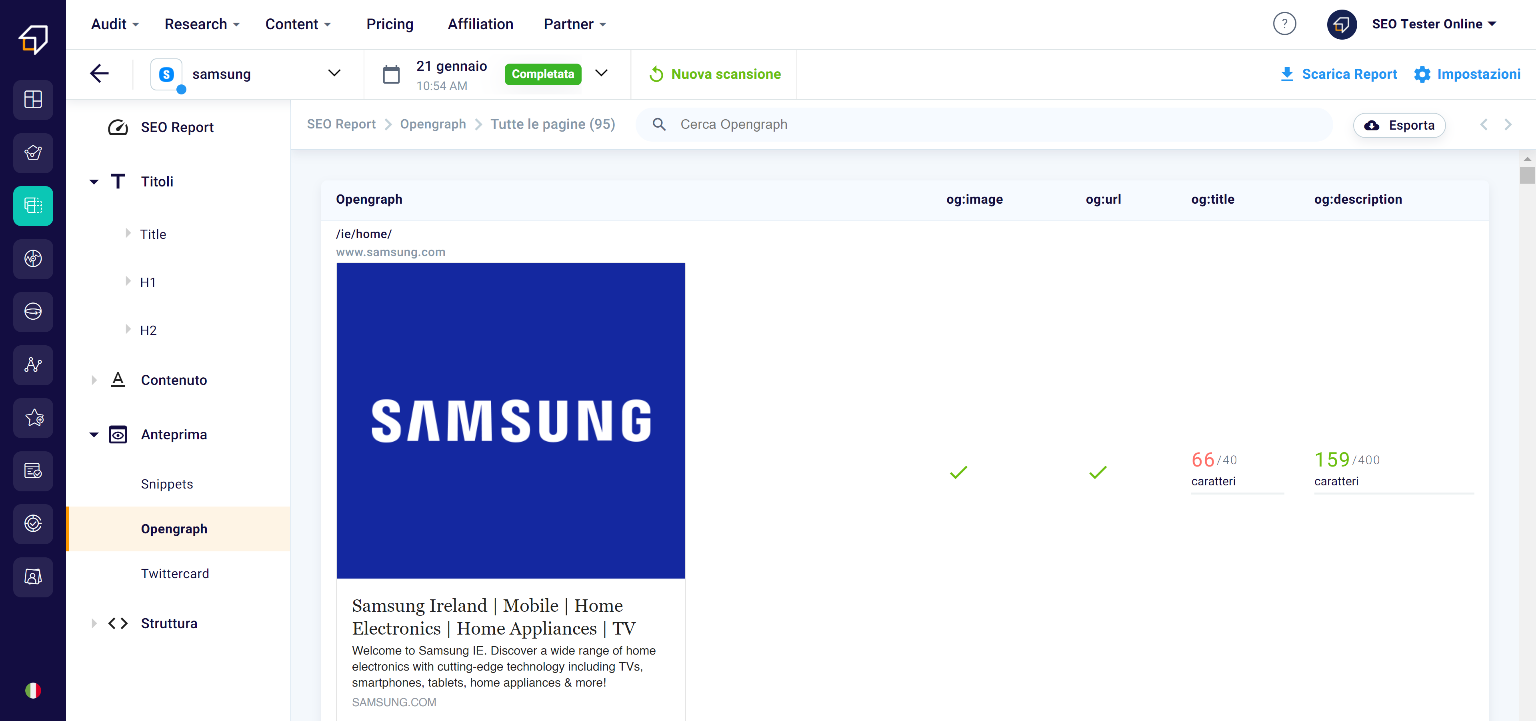
Under the macro-category “Preview” we find the sections “Snippets”, “Opengraph” and “Twitter Card”.

Let’s see them in more detail individually!

Google Snippets

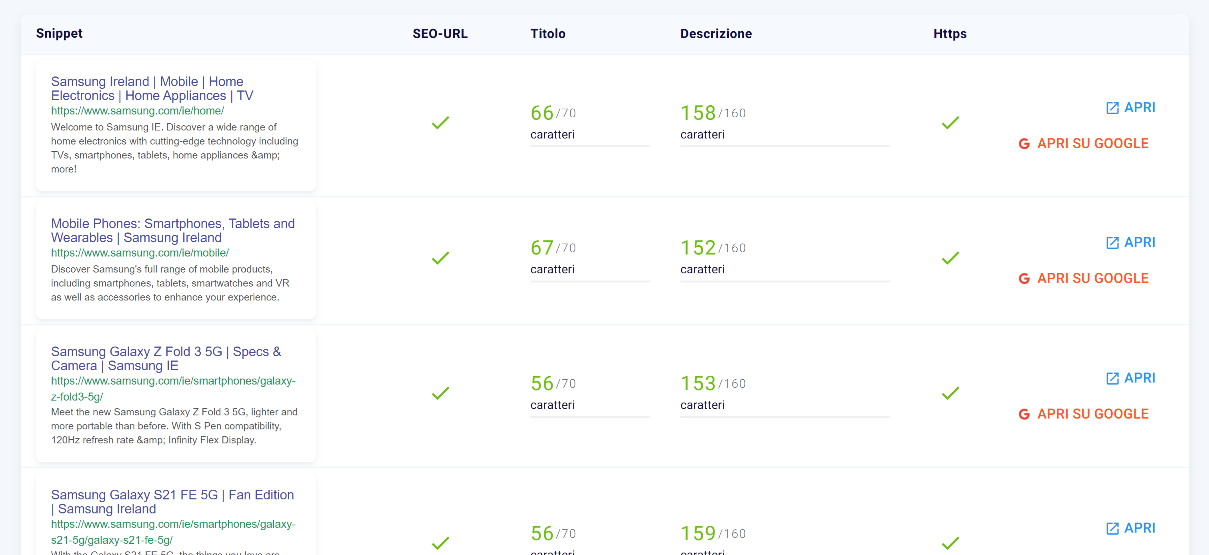
The snippets are the previews of the pages that we find on the Google results page and include the title, the URL and a description.


Generally, search engines reward titles and descriptions with well-defined lengths, which you will be able to keep an eye on thanks to the SEO Spider, and tend to truncate too long texts contained in them for reasons of SERP design.

Opengraph and Twitter Card

The Opengraph and the Twitter Card are the equivalent of the snippets on Facebook and Twitter, or the structured preview of the page that appears when we link it on these social networks.

Now let’s move on to the fourth and last point of this menu: the Structure.

Structure

Structure is crucial from an SEO point of view. The more “easy” a site is to navigate, with simple paths for the crawler and the user, the more it will be rewarded by search engines.

Let’s see in detail the individual elements that make it up.

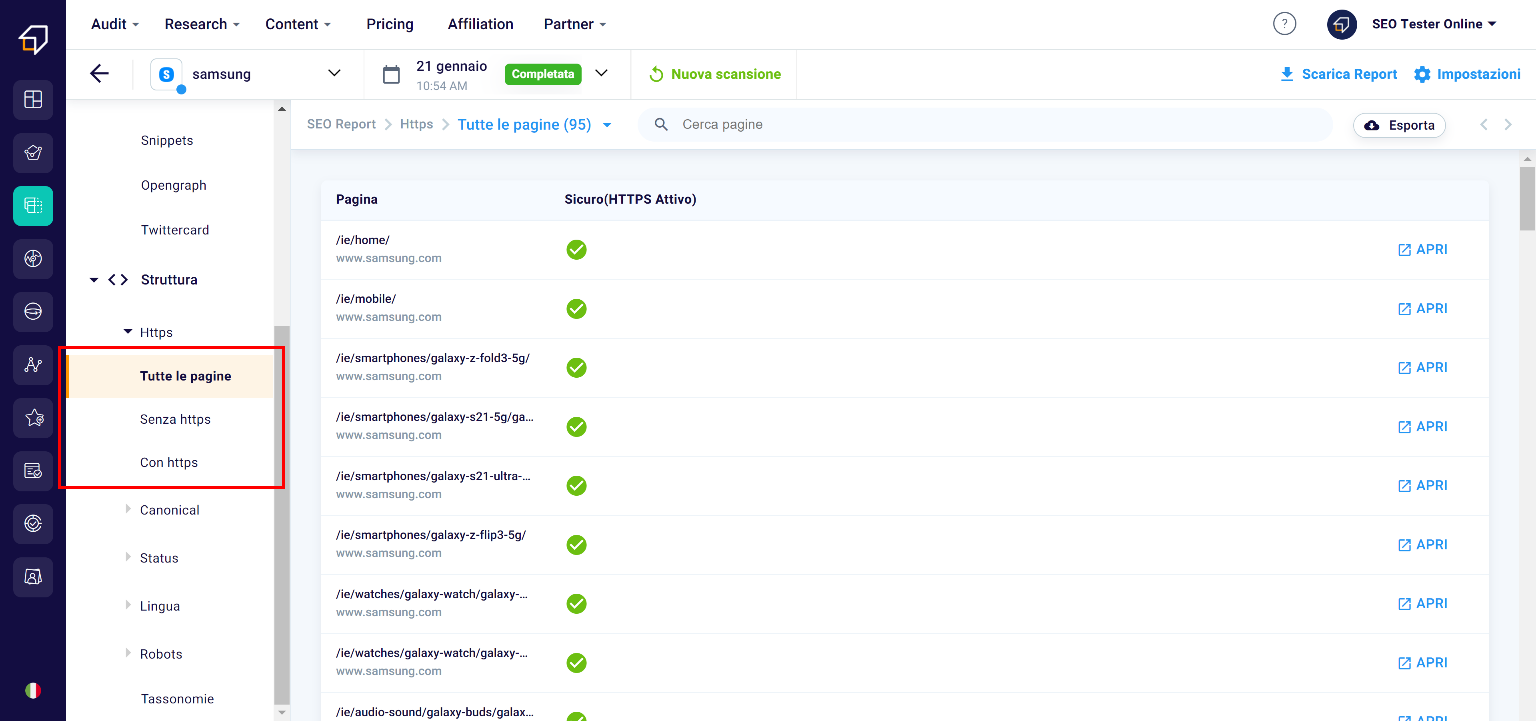
Https

Https is a security protocol whose absence, for some time, may not be frowned upon both by search engines (Chrome tends to classify these sites as “unsafe”), and by users ( especially if the security protocol is missing in a website on which personal data and / or payment data are entered, which could be more easily to the goods and to malicious subjects). To implement it on your site, you can follow this guide from Google.

In this section, you can filter pages according to two criteria – pages with https and without – and export the list. In this way, you can also avoid the presence of so-called “mixed contents” on your site, ie pages and resources with different protocols within the same site, a practice not well received by search engines.

Canonical

The canonical attribute is very useful if our site has multiple pages with the same content (eg the description pages of a pair of shoes in its different color variations).

When we use this attribute on a page, we communicate to the search engine which page is to be considered the holder of the original content and which are simple variants.

In the event that canonical is necessary, but is not used, the crawler could consider all pages as duplicates, detecting the same content within them and ending up penalizing the positioning of the entire site.

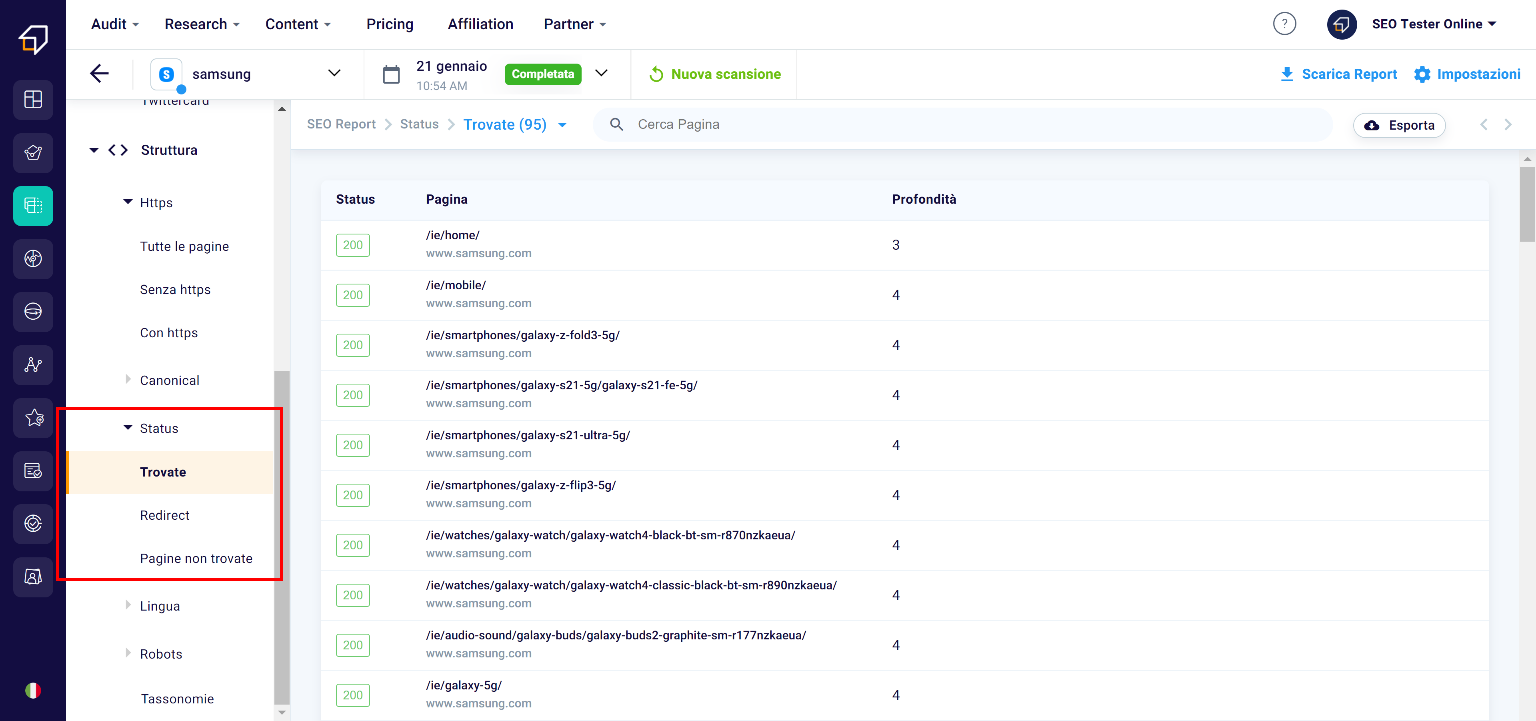
Status

The status is what the client (ie the user) receives from the server when it requests to view a certain web page via the http communication protocol.

These statuses can have different codes depending on the type of response.

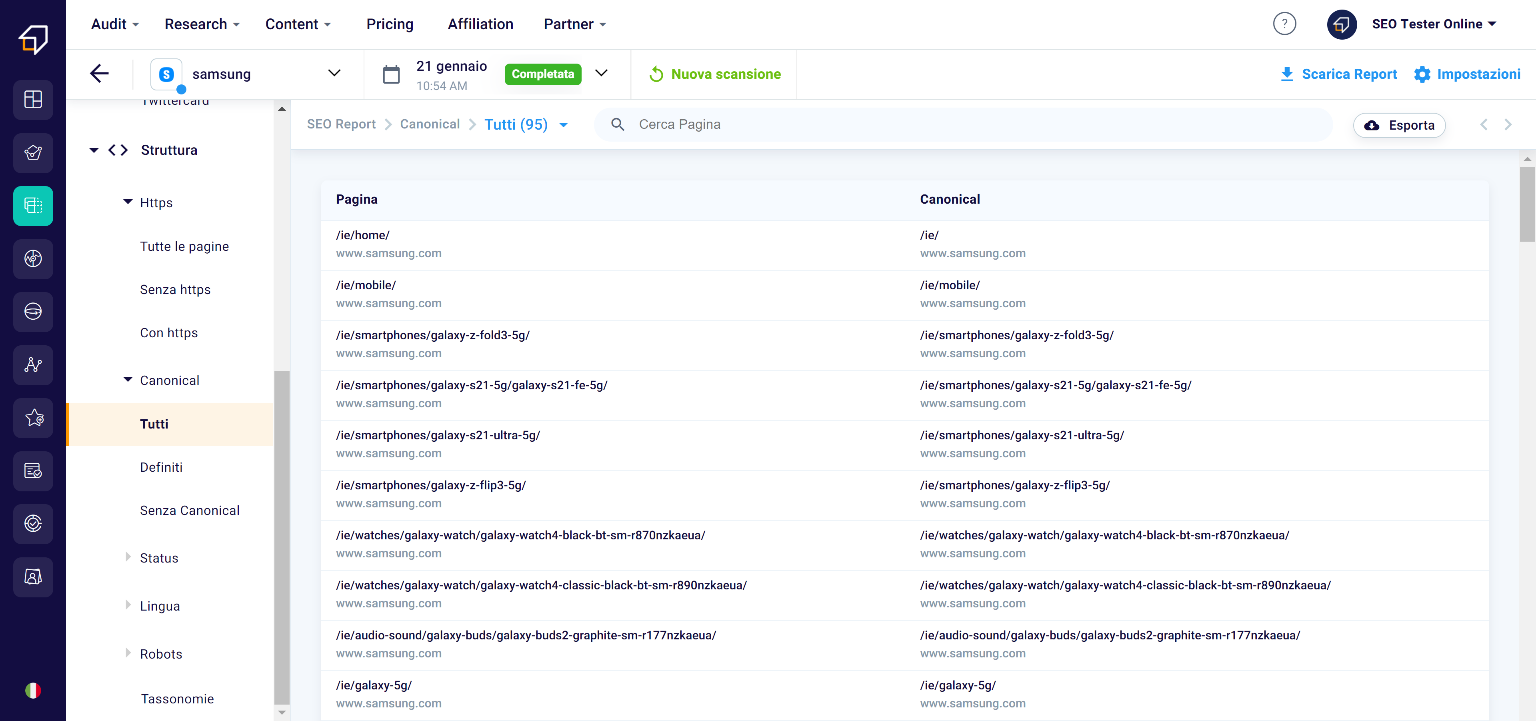
HTTP status codes are divided into 5 “classes”:

  • 100: informative responses;
  • 200: successful answers;
  • 300: redirect information;
  • 400: client error responses;
  • 500: Server error responses.

Within each of these classes, there are different codes that can be returned by the server and each has a specific and unique meaning.

Language

Under Language, thanks to the “filter” function, you can view which pages do not have the hreflang or x-default attributes and export them to file.

When we are in the presence of a multilingual site, it is good practice to insert on each page the link to its equivalents in each language using the <link hreflang> attribute.

The x-default attribute, on the other hand, indicates which “version” the search engine must consider as default and show when the site visitor comes from a region whose language is not present on the site.

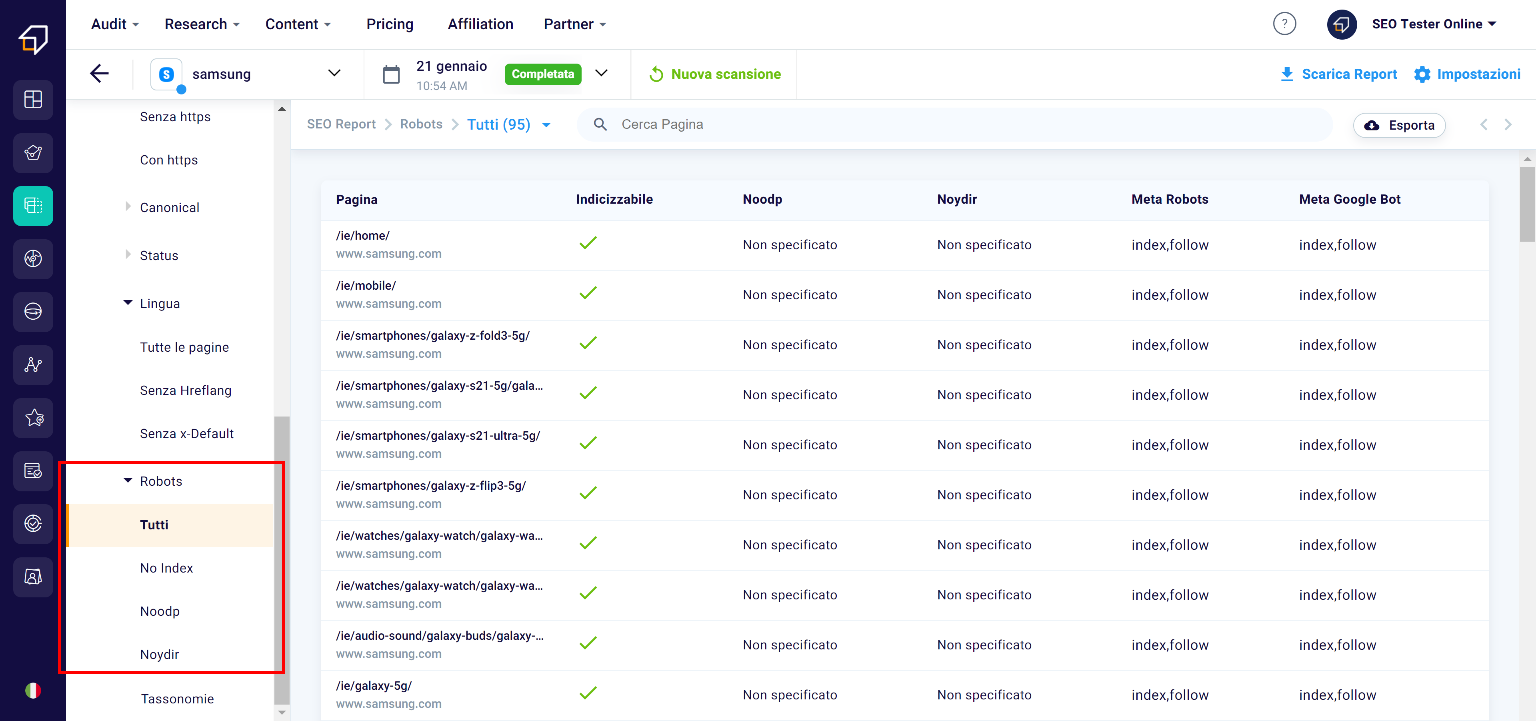
Robots

The robots.txt file within the site contains the “instructions” to be given to the crawler about the pages it must explore, how to do it and which ones it should ignore.

Here you will have the opportunity to view which pages in the robots.txt file have the noindex attribute – which invites you to block the indexing of that page to search engines – noodp and noydir, which instead suggest to search engine robots not use the site information found in the Yahoo and Open Directory Project directories.

Taxonomies

Finally, the Taxonomies provide us with a graphical representation of the distribution of the pages and the link between them within the domain.

How to export the report to PDF?

The SEO Spider is a very powerful tool and also allows you to “photograph” the status of the SEO to be able to send it to your client or your collaborators.

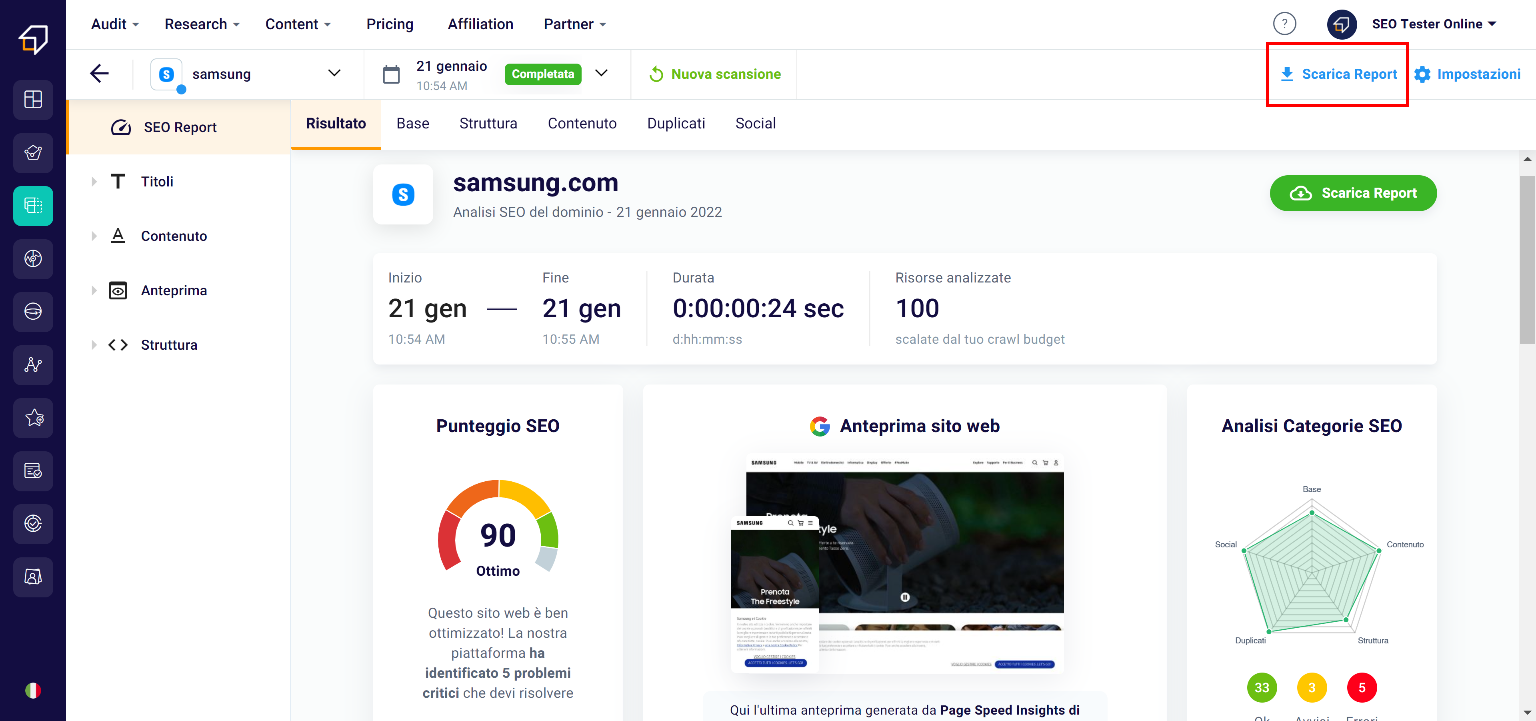
In fact, at the top right of any screen of the tool there is the “Download Report” button.

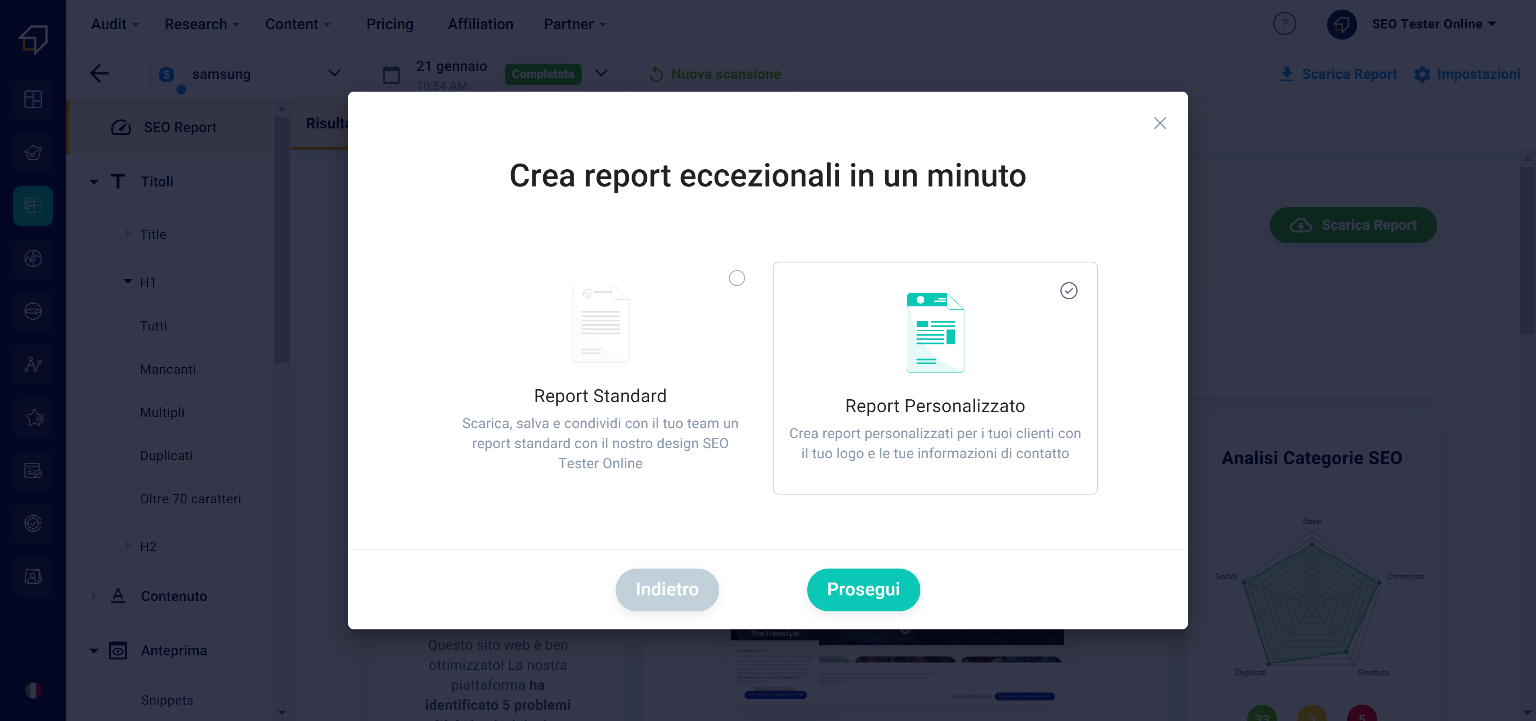
By clicking on this button, you can choose to create a standard report or a “White label report”, that is, customized with your logo and company information.

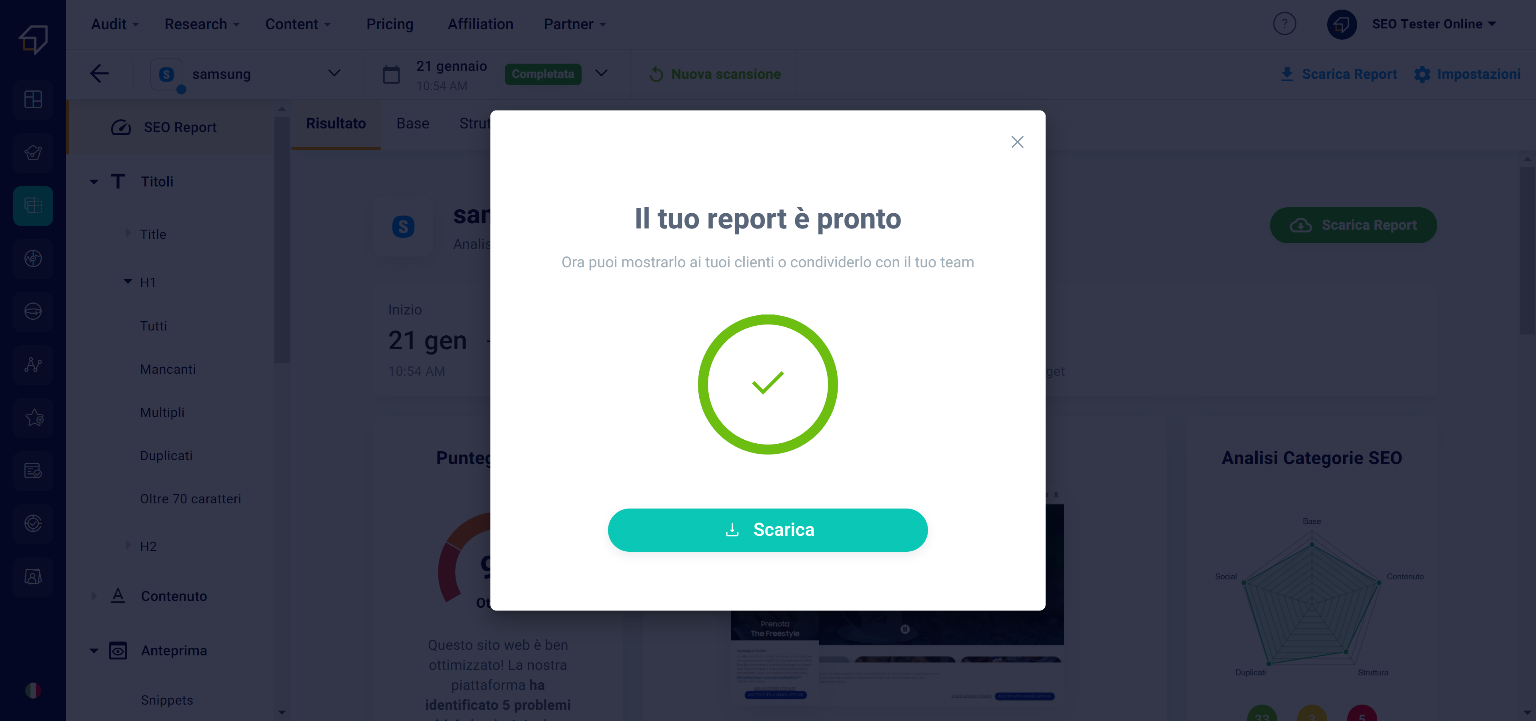
If you choose the standard report, click the “Download” button at the bottom right. It will take a few seconds to prepare it.

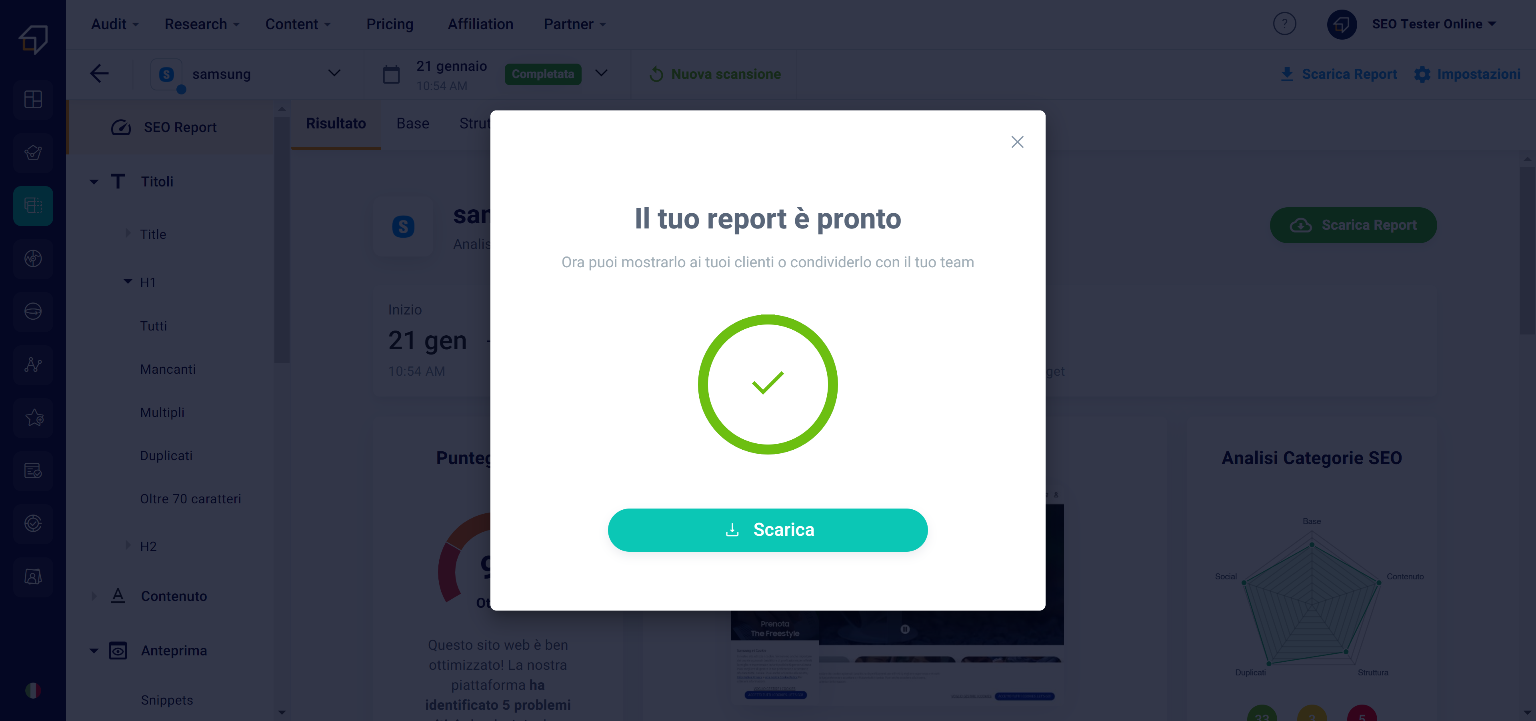
Once ready, you can save it to your computer by clicking on the “Download” button.

What will be downloaded will be a .pdf document in which you will find all the information of the various sections of the tool, including the aspects to improve and advice on how to do it. This report features the SEO Tester Online logo and contact information

If you choose the white label custom report instead, you will need to add some information first. First, click on the “Continue” button.

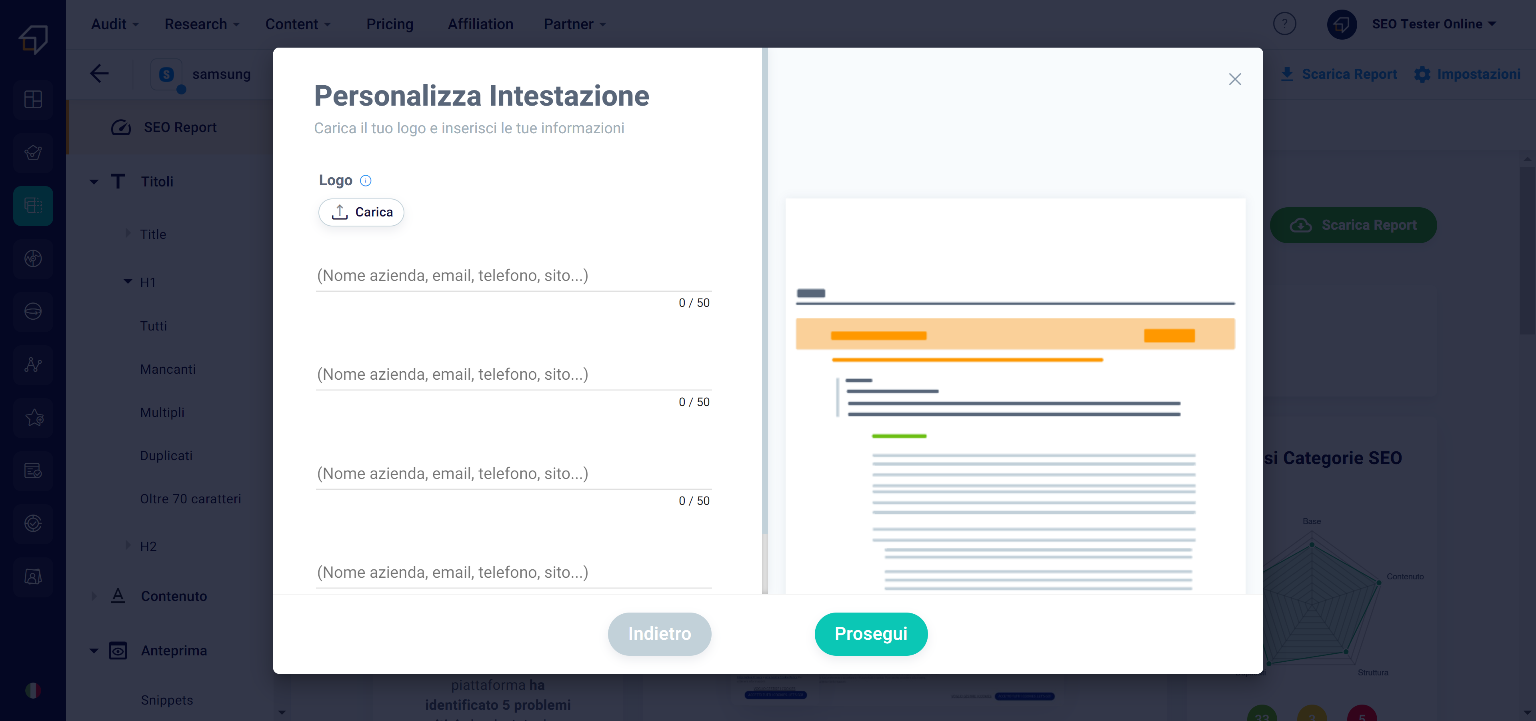
In the new window you will have to upload your company logo and the information you want to appear in the header of the report.

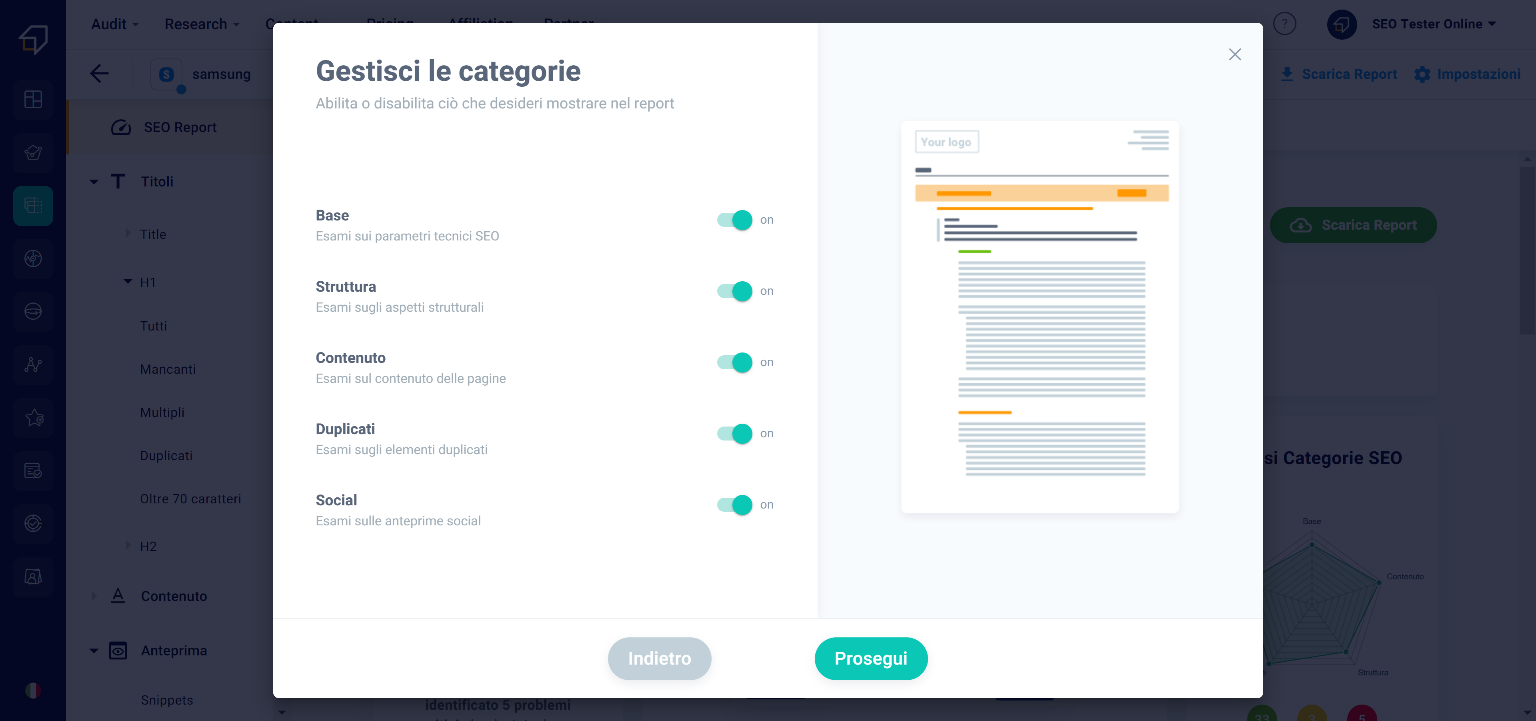
Subsequently, after clicking on the “Continue” button, thanks to the “On-Off” selectors you can decide which types of information to show in the PDF.

Finally, you can add notes using the text editor.

Then click on the “Download” button. The download will start in a short time!

SEO Project Guide

In this short and practical guide, we will explain how to keep all the SEO aspects of your websites under control by creating a project. Thanks to our tools, in fact, you can set up and monitor your SEO project in a few simple steps.

How to create an SEO project?

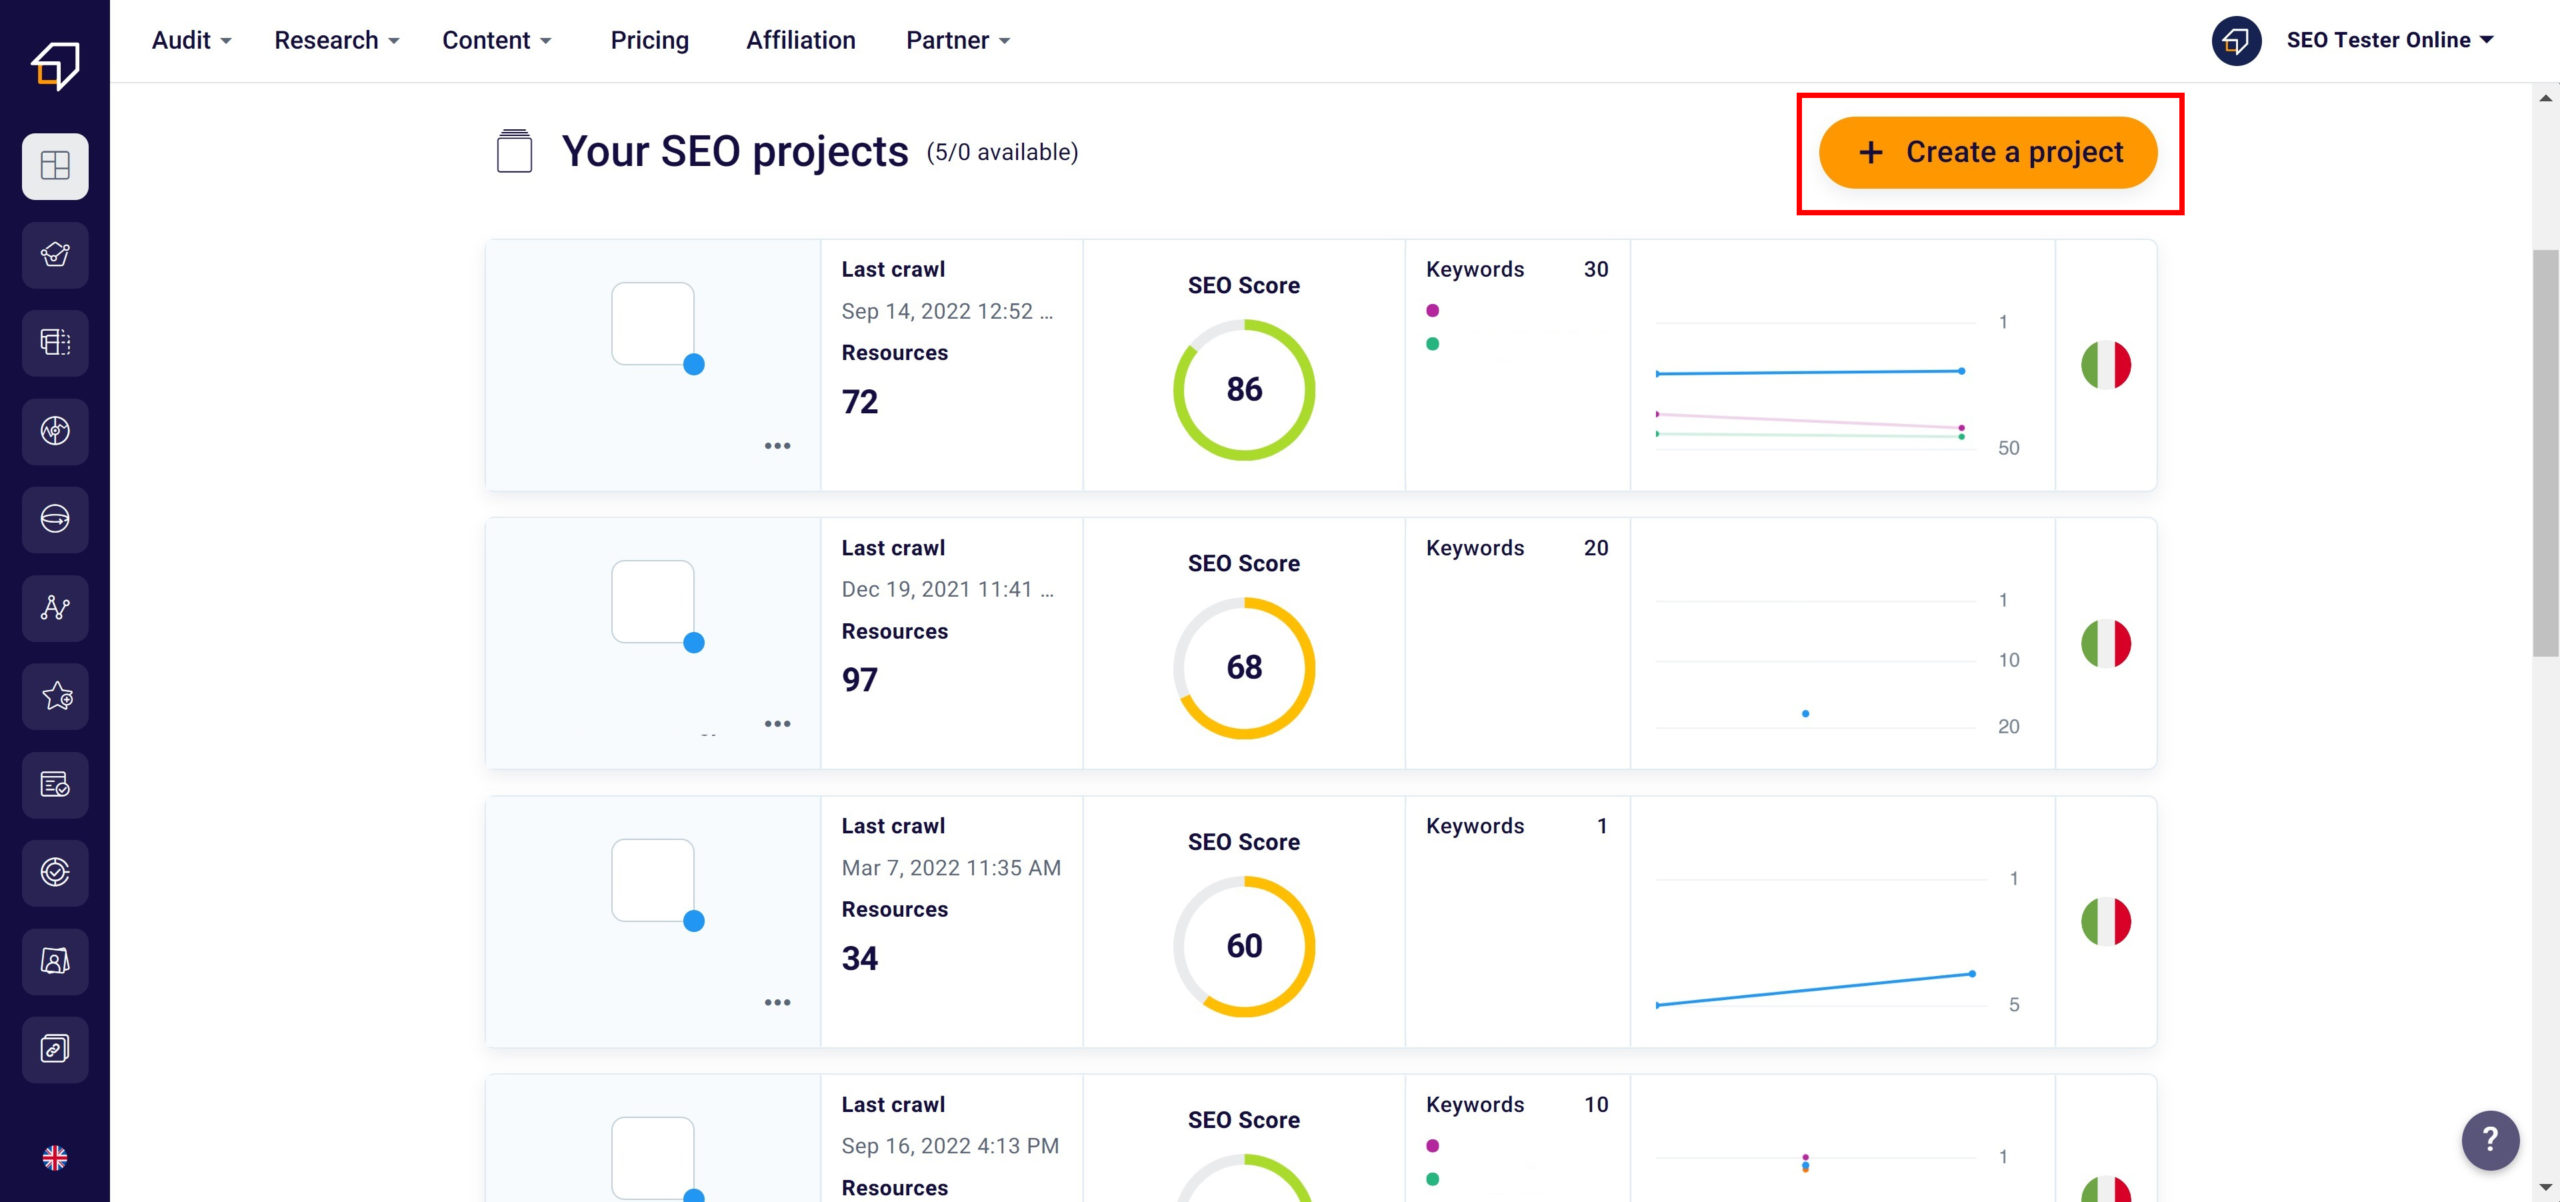
To make it happen, just click on the orange button “+ Create SEO project” in the dashboard accessible from here.

Create SEO project

Once configured, you can monitor it whenever you want from the dashboard section to be accessed by clicking the first icon in the left sidebar. As you can see in the screenshot there are several projects.

By clicking “Find out the score” under the word “Scan finished” you will land on the dashboard of our SEO Spider.

Find out the score

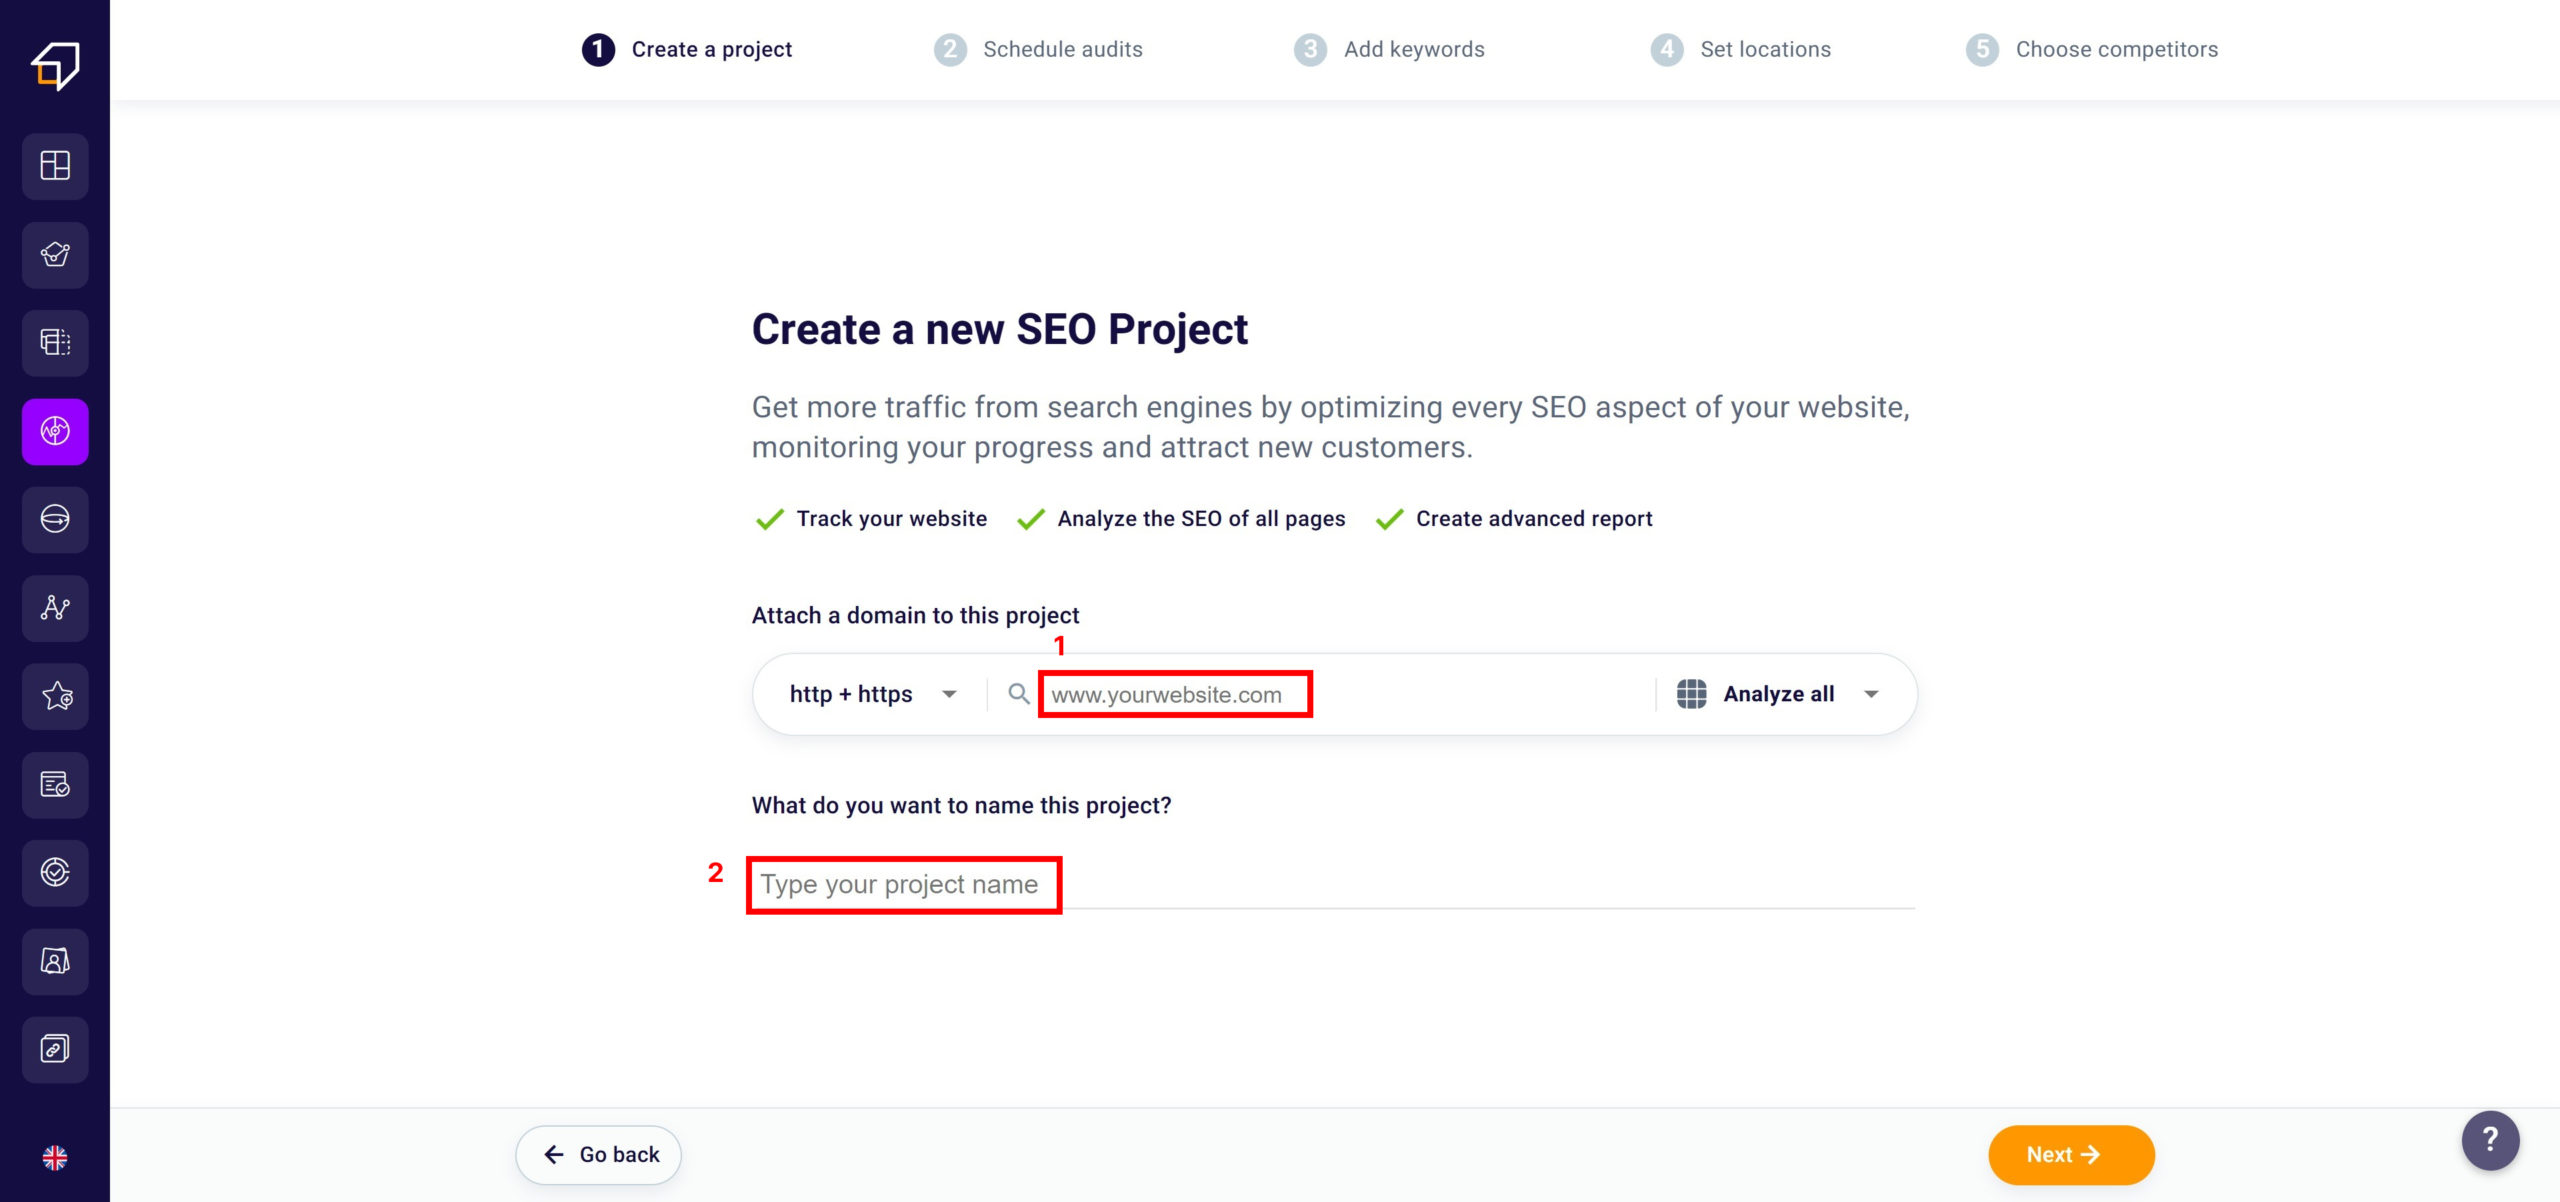
After clicking on “+ Create Project” this page will be displayed.

How to set up an SEO project?

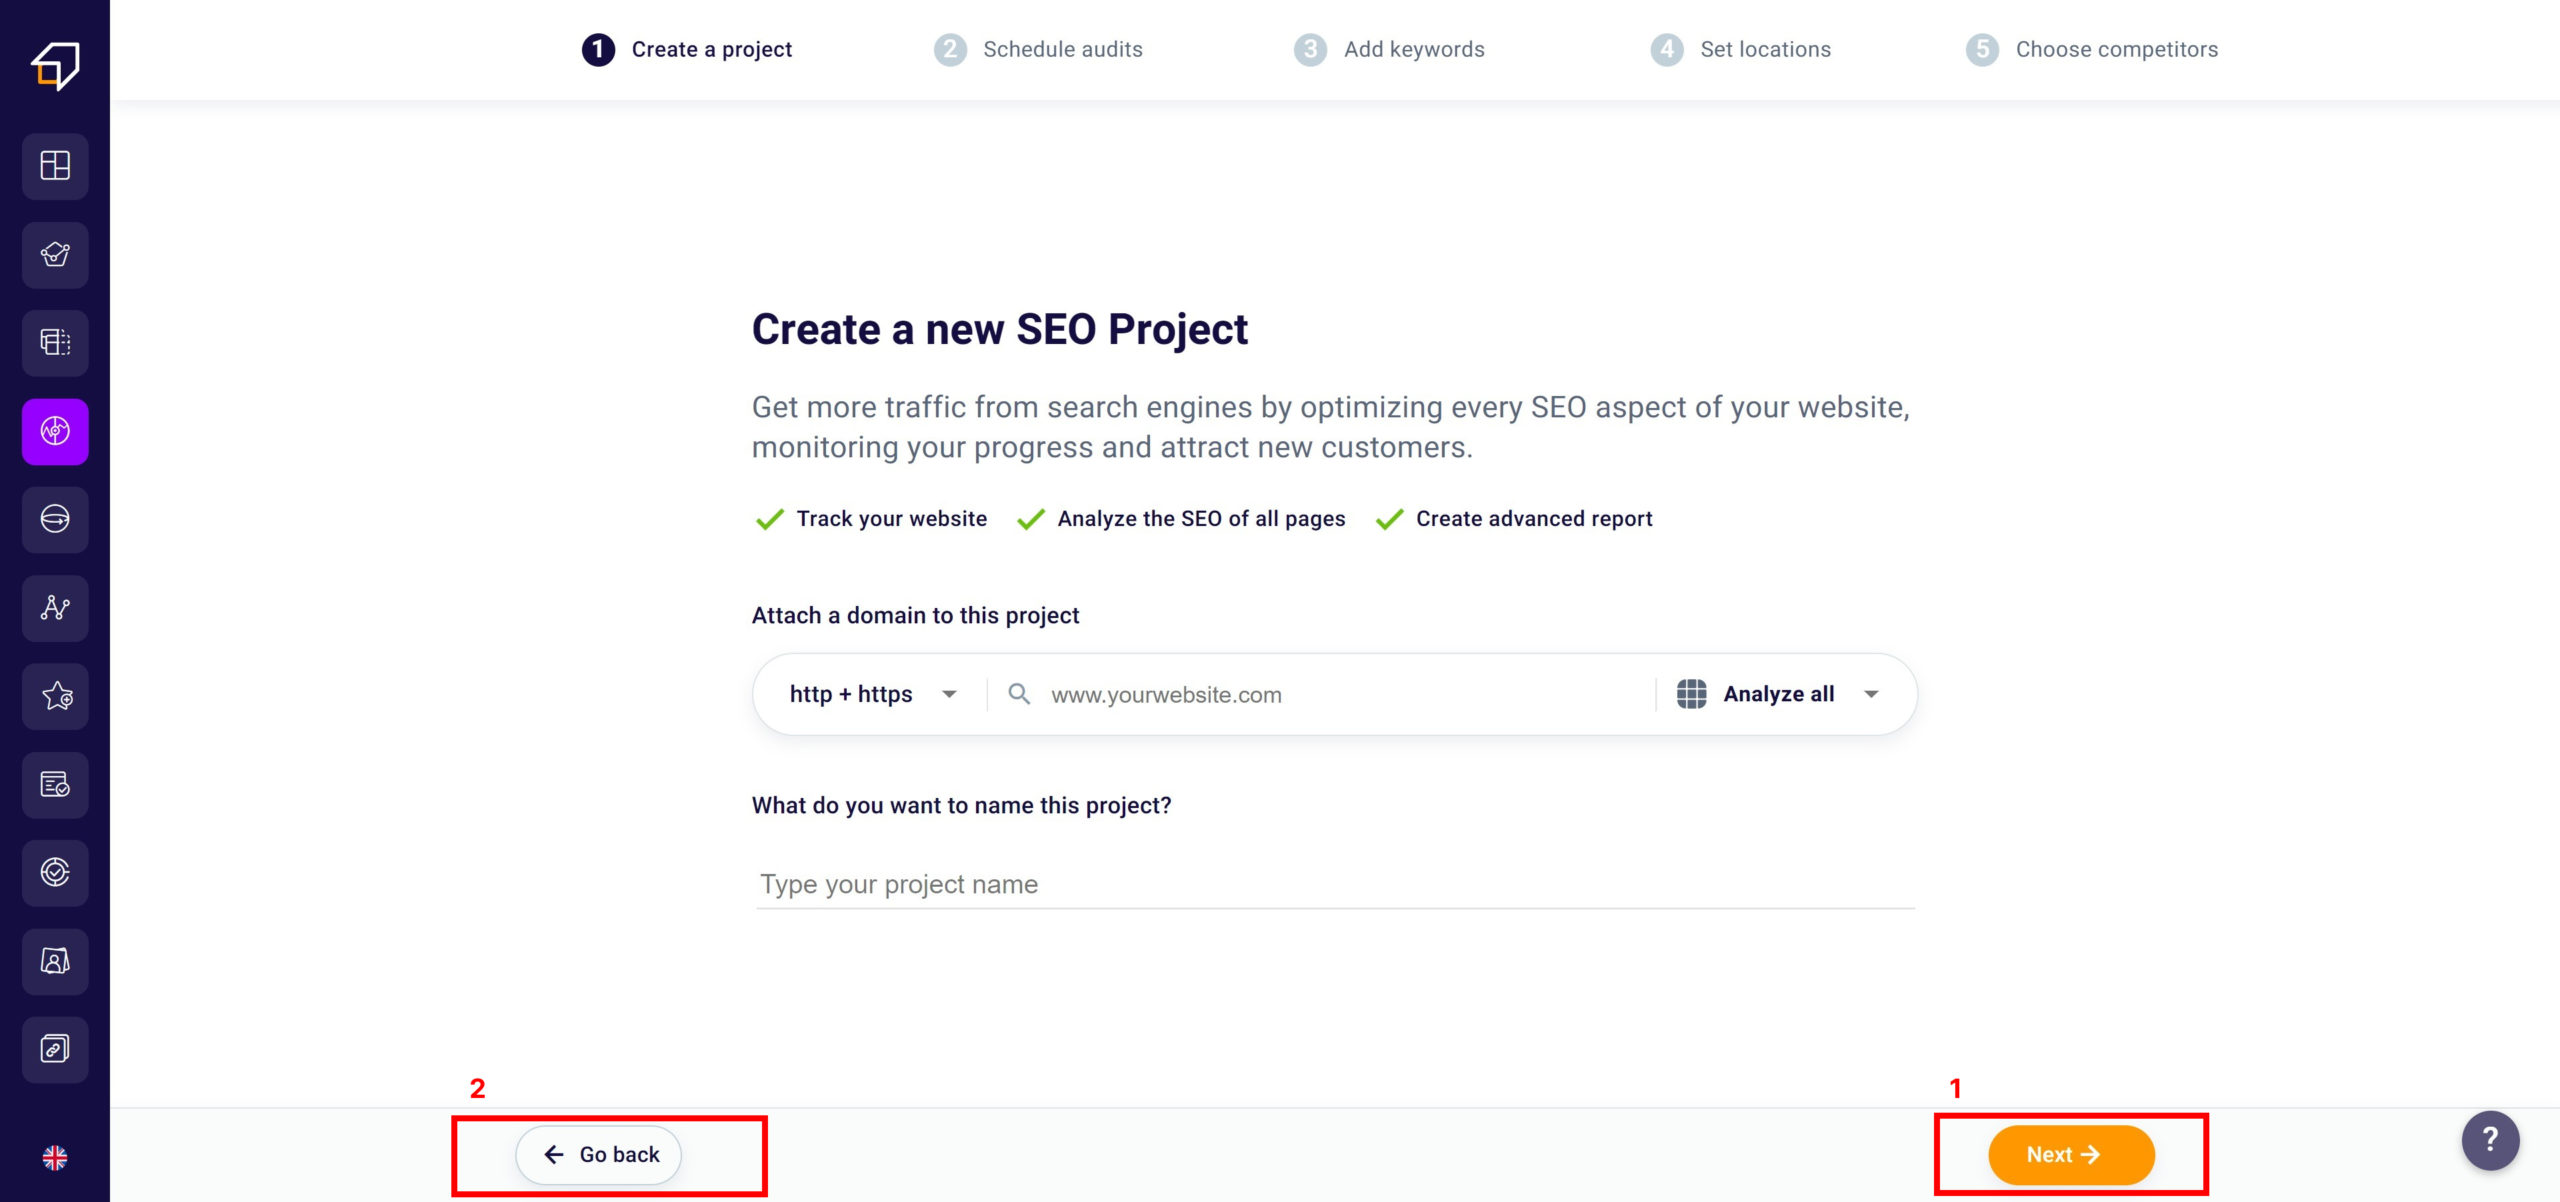
The first step to set one is to write the URL (1) of the site you want to analyze in the search bar.

Thanks to the select on the left of the box, you can choose to scan only the pages that contain the http protocol, only those that contain the https protocol, or both. 

select http protocol

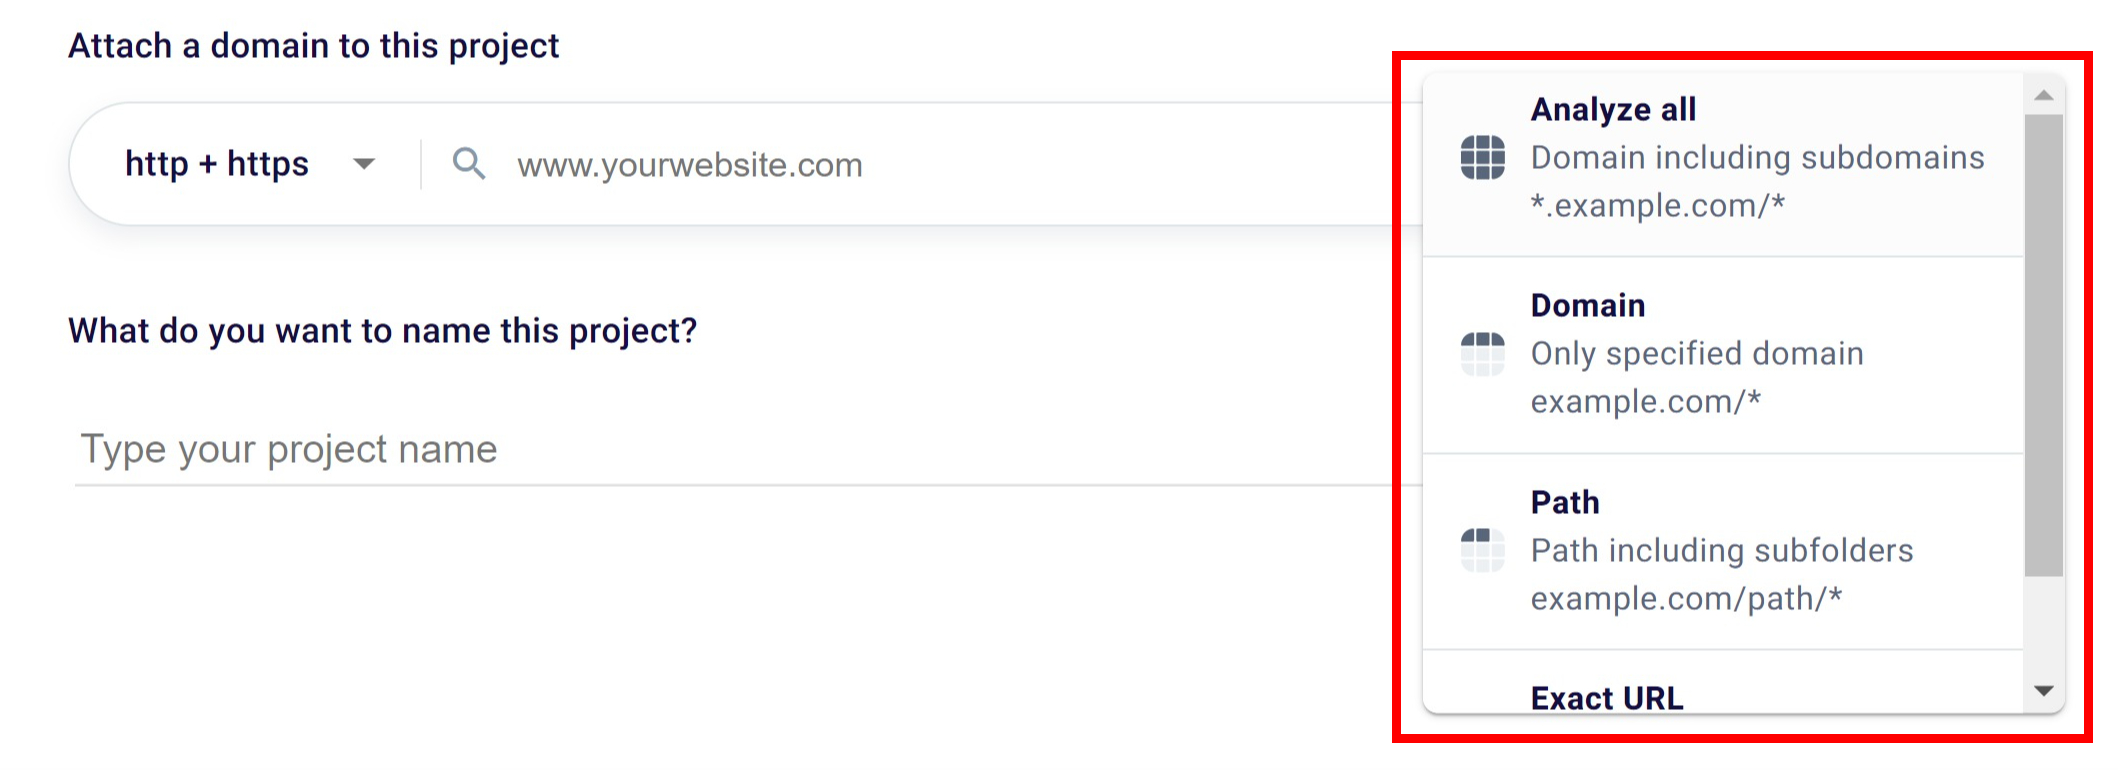
On the right, however, there is a select with which to choose whether to analyze only the page relating to the URL you typed, the domain, the subfolders or the whole site. By default, our tool will offer you this last option.

choose whether to analyze only the page relating to the URL you typed

How to name a project?

To give your SEO project a name, just type it in the appropriate input box (2).

After you have named the project you can go on by clicking the orange button at the bottom right “Continue” (1).

continue or go back

To go back to the “Your activities” section, however, you can click on the white “Go back” button (2) at the bottom left.

How to best set up scan rules?

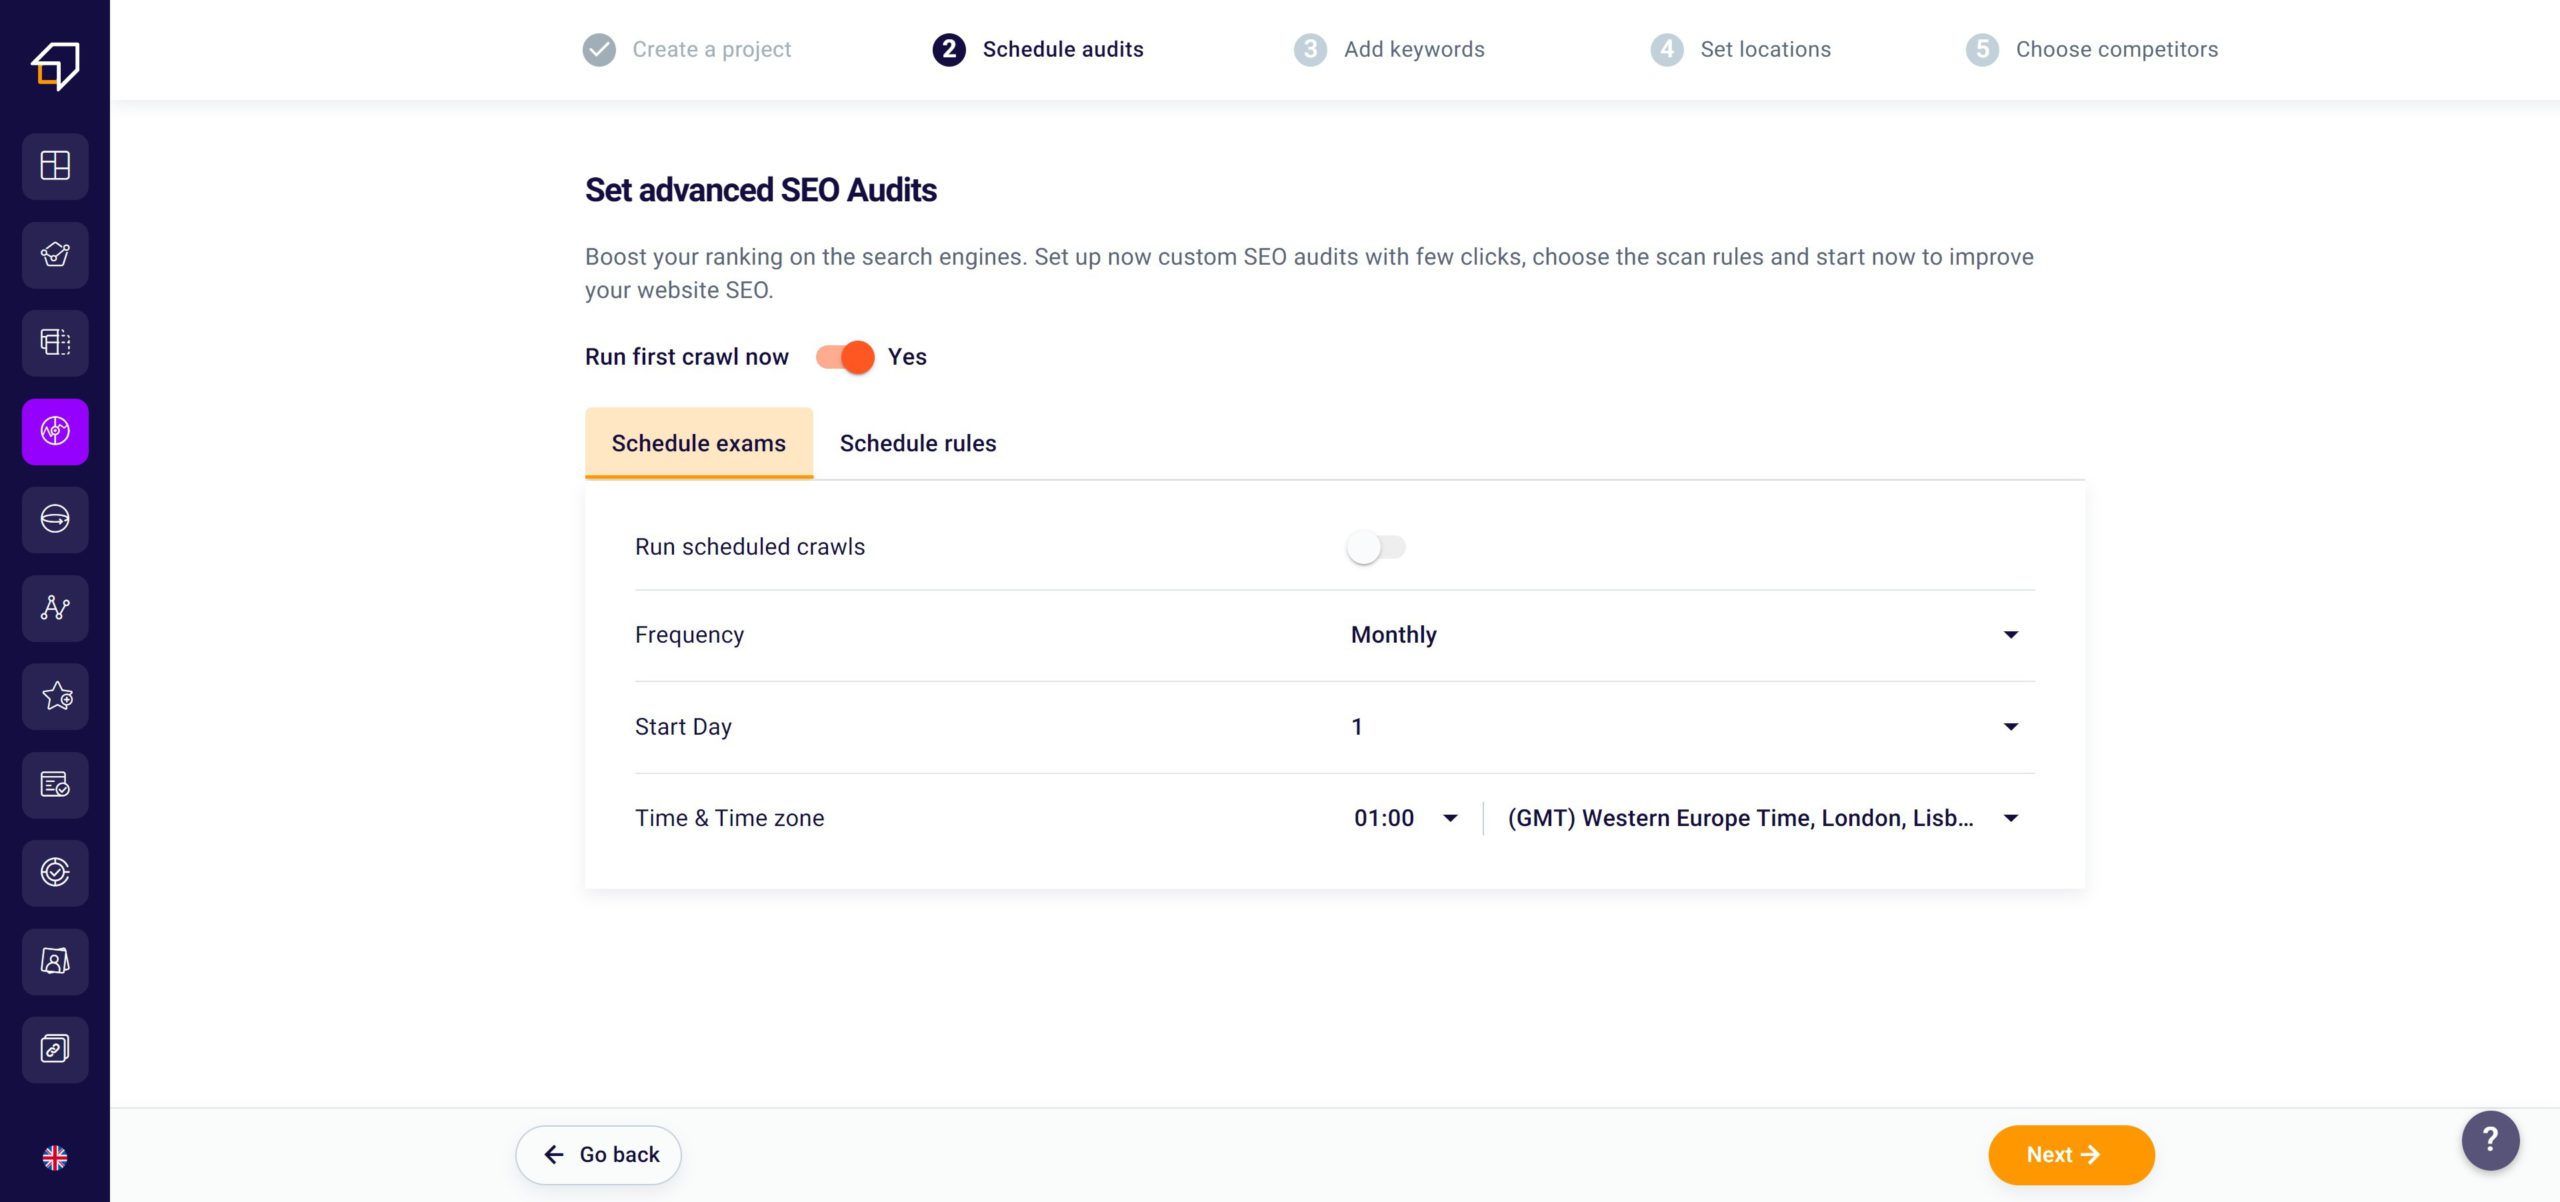
After clicking on “Continue”, you can decide how to perform the SEO scan of your site. By clicking on the switch (toggle) in orange you can determine whether to start the SEO analysis immediately or not. By default the scan will be active and then it will start immediately. In case you decide not to activate it immediately, you can also activate the scan at a later time.

determine whether to start the SEO analysis immediately or not

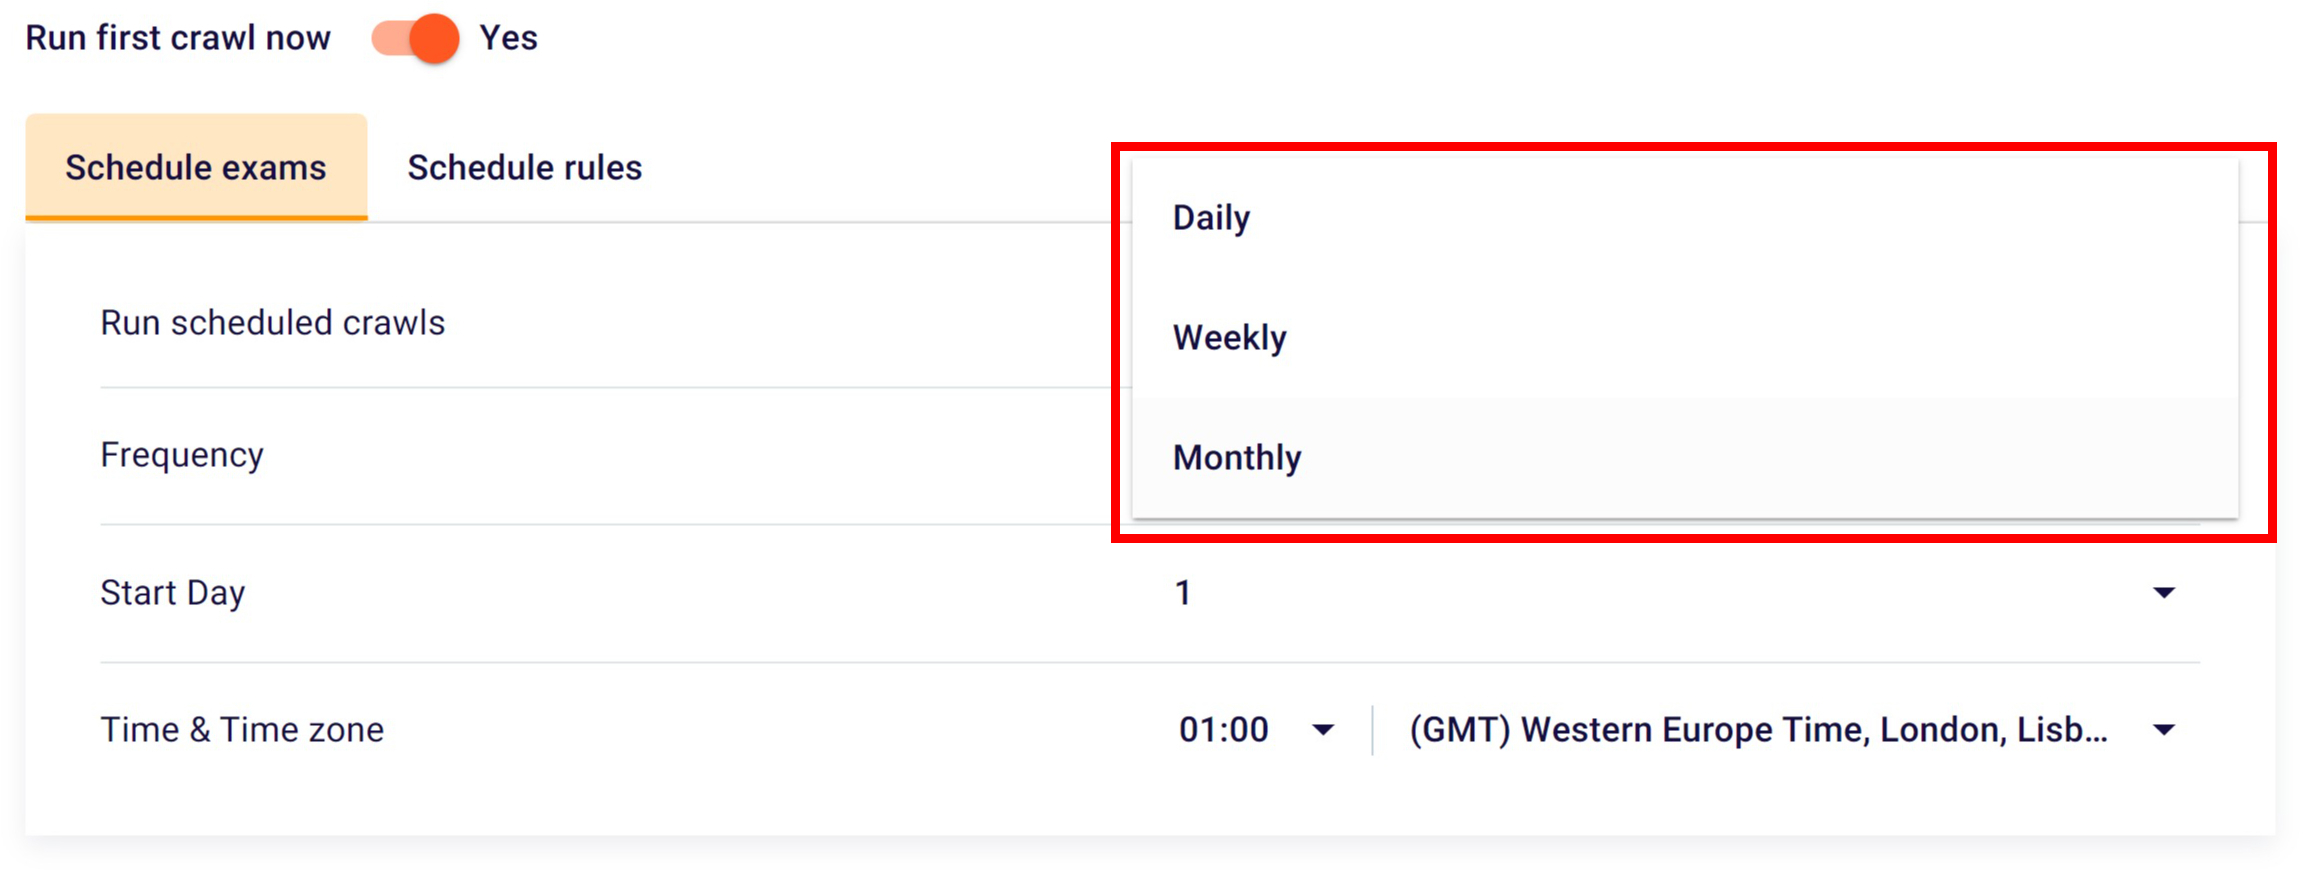
Then you will have the opportunity to schedule the exams, deciding whether or not to start the spiders on a regular basis, also selecting the frequency (monthly, weekly or daily), the starting day and the time zone in which to start the analysis.

schedule the exams

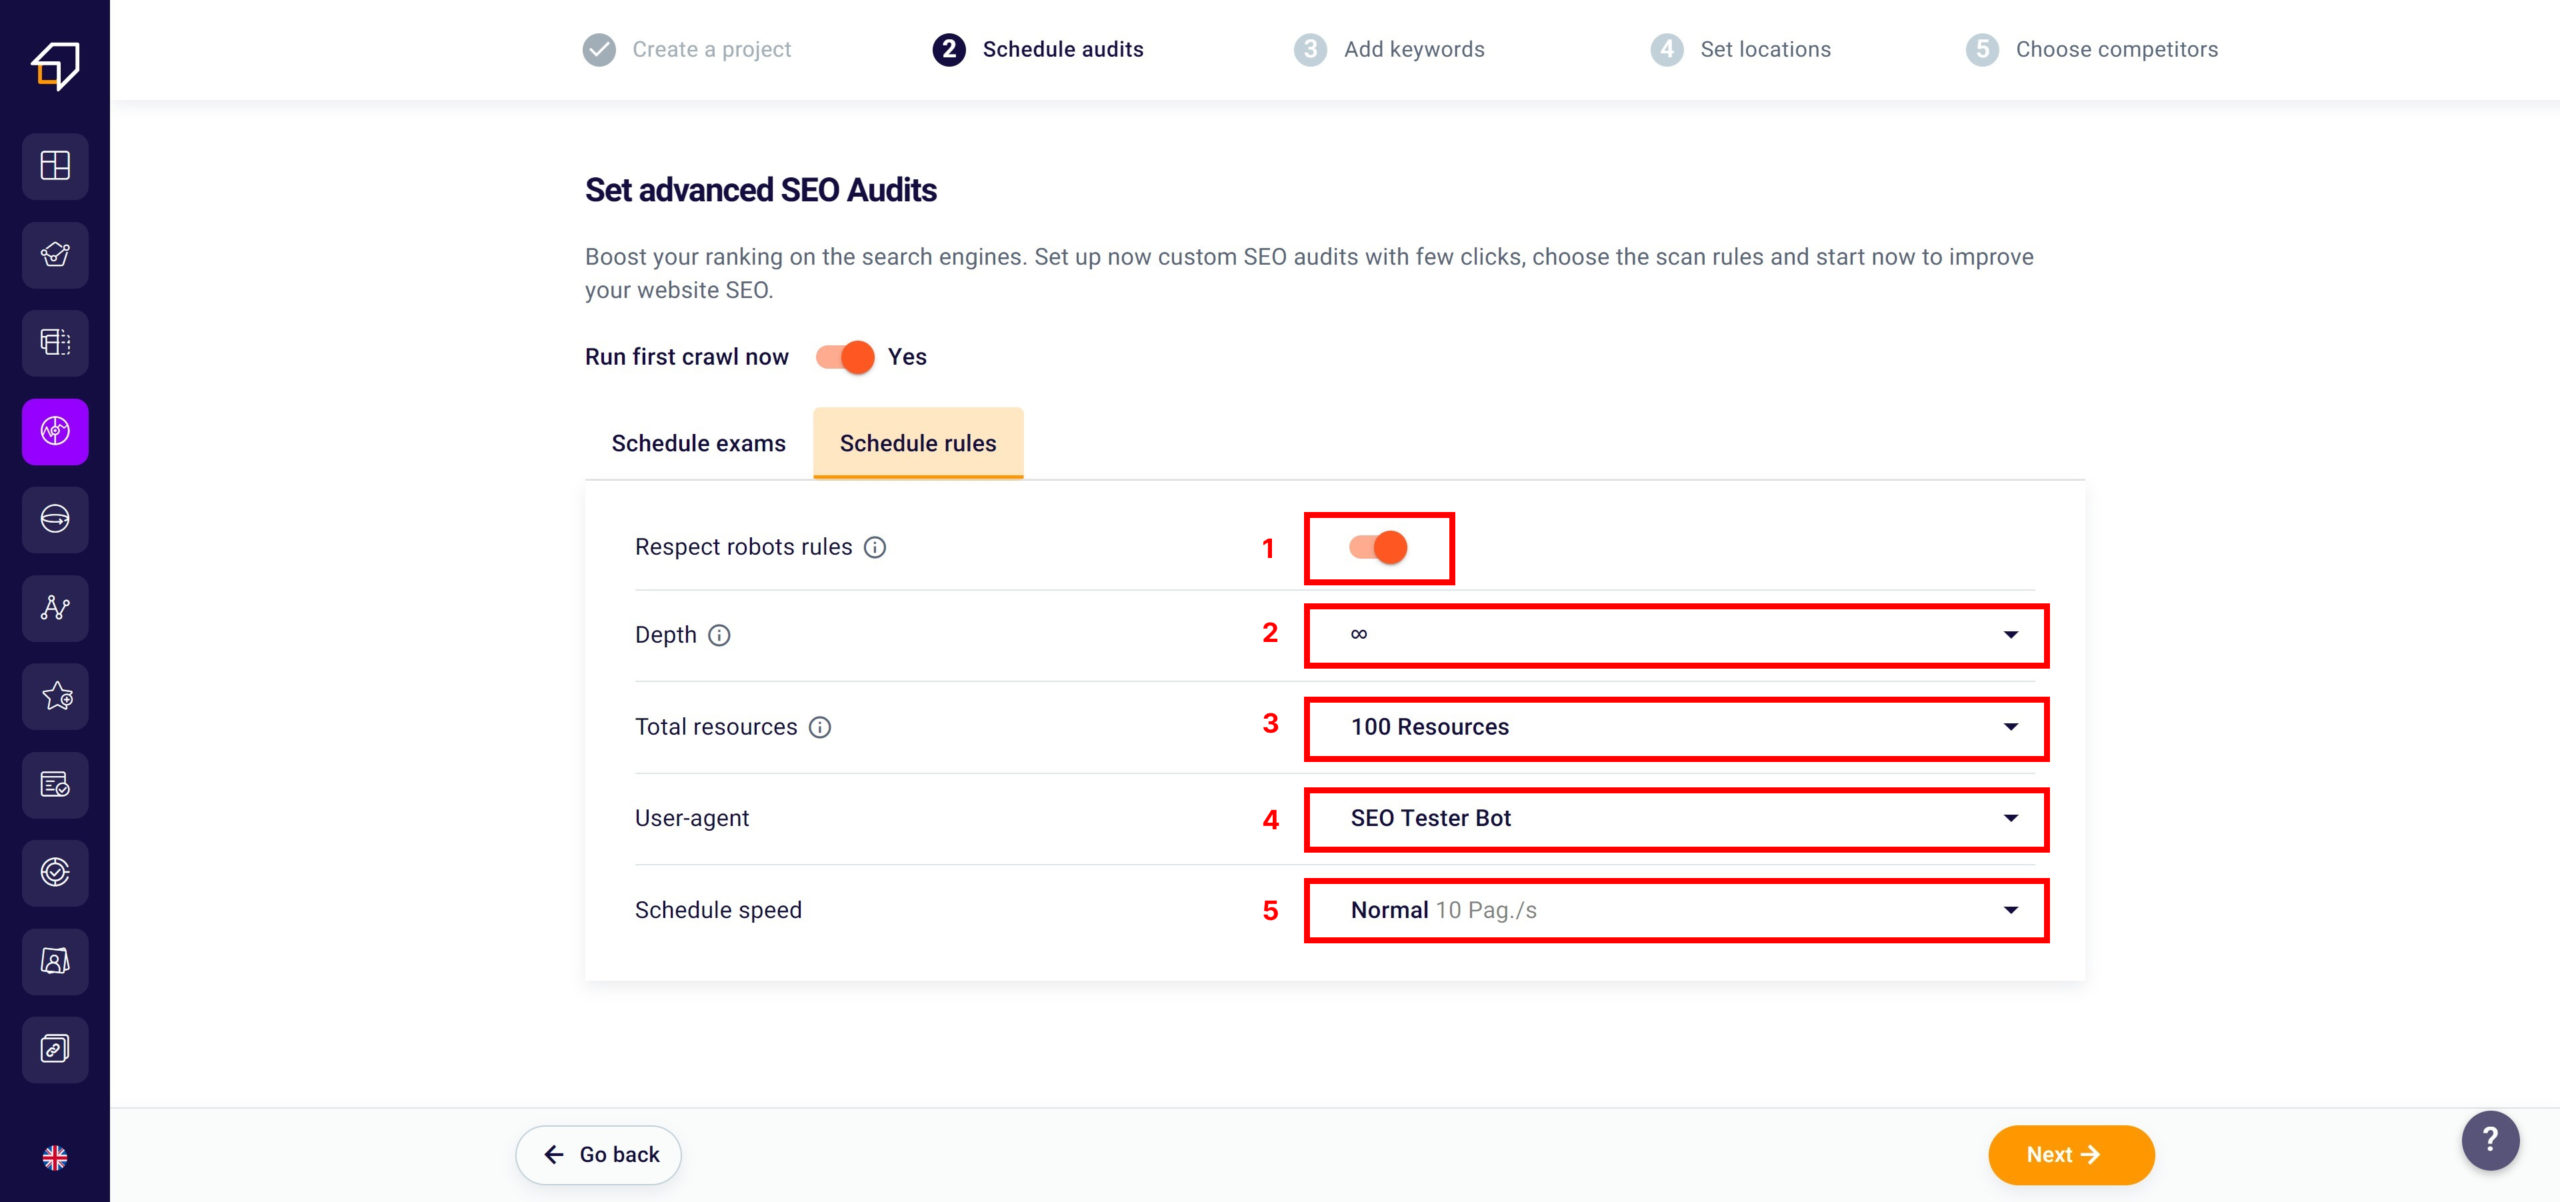
If you want to set clear and specific crawling rules instead, you will need to click “SEO crawling rules”. This screen will appear.

specific crawling rules

By clicking the switch next to “Respect robots directives” (1), you can choose whether to follow the directives included in the robots.txt file of the site / page you are analyzing. In case you decide not to follow them, our spider will scan all the links without making a distinction between do-follow and no-follow. 

How deep do you want the crawler to crawl your website? Decide using the select next to the word “Depth”.

The depth of a page is defined based on the number of levels present within the site. The levels, in turn, are determined by the clicks users have to make from the homepage. The more clicks it takes to get to a page, the deeper the level.

By clicking on “∞” (2) you can choose how many levels to analyze.

By modifying the “Total resources” field (3) you can instead set how many pages (also called resources) to be crawled by our crawler every second. The maximum number of crawlable resources obviously depends on the limits of your plan which you can view in the Plans and Subscriptions section in “Credits and Limits”.

The “User agent” option (4), on the other hand, is an element that recognizes the application installed on the computer of a user who connects to a server. User agents are, for example, browsers, mail clients and bots. By choosing the bot you can then study your site from the point of view of a particular crawler.

Therefore, you can select the agent that is closest to your needs. The available options are: SEO Tester Bot, GoogleBot, GoogleBot News, GoogleBot Mobile, GoogleBot Smartphone, YandexBot, BingBot, Chrome, Opera, Firefox, Edge, Internet Explorer.

Finally, we recommend that you set the “scan speed” (5) to Normal. Although you can choose between more than 7 speeds, the one we recommend will allow you to have it in a relatively short time, in fact 10 pages per second are scanned, a scan of excellent quality. The fewer pages scanned per second, the higher the scan quality.

How to add keywords to the project?

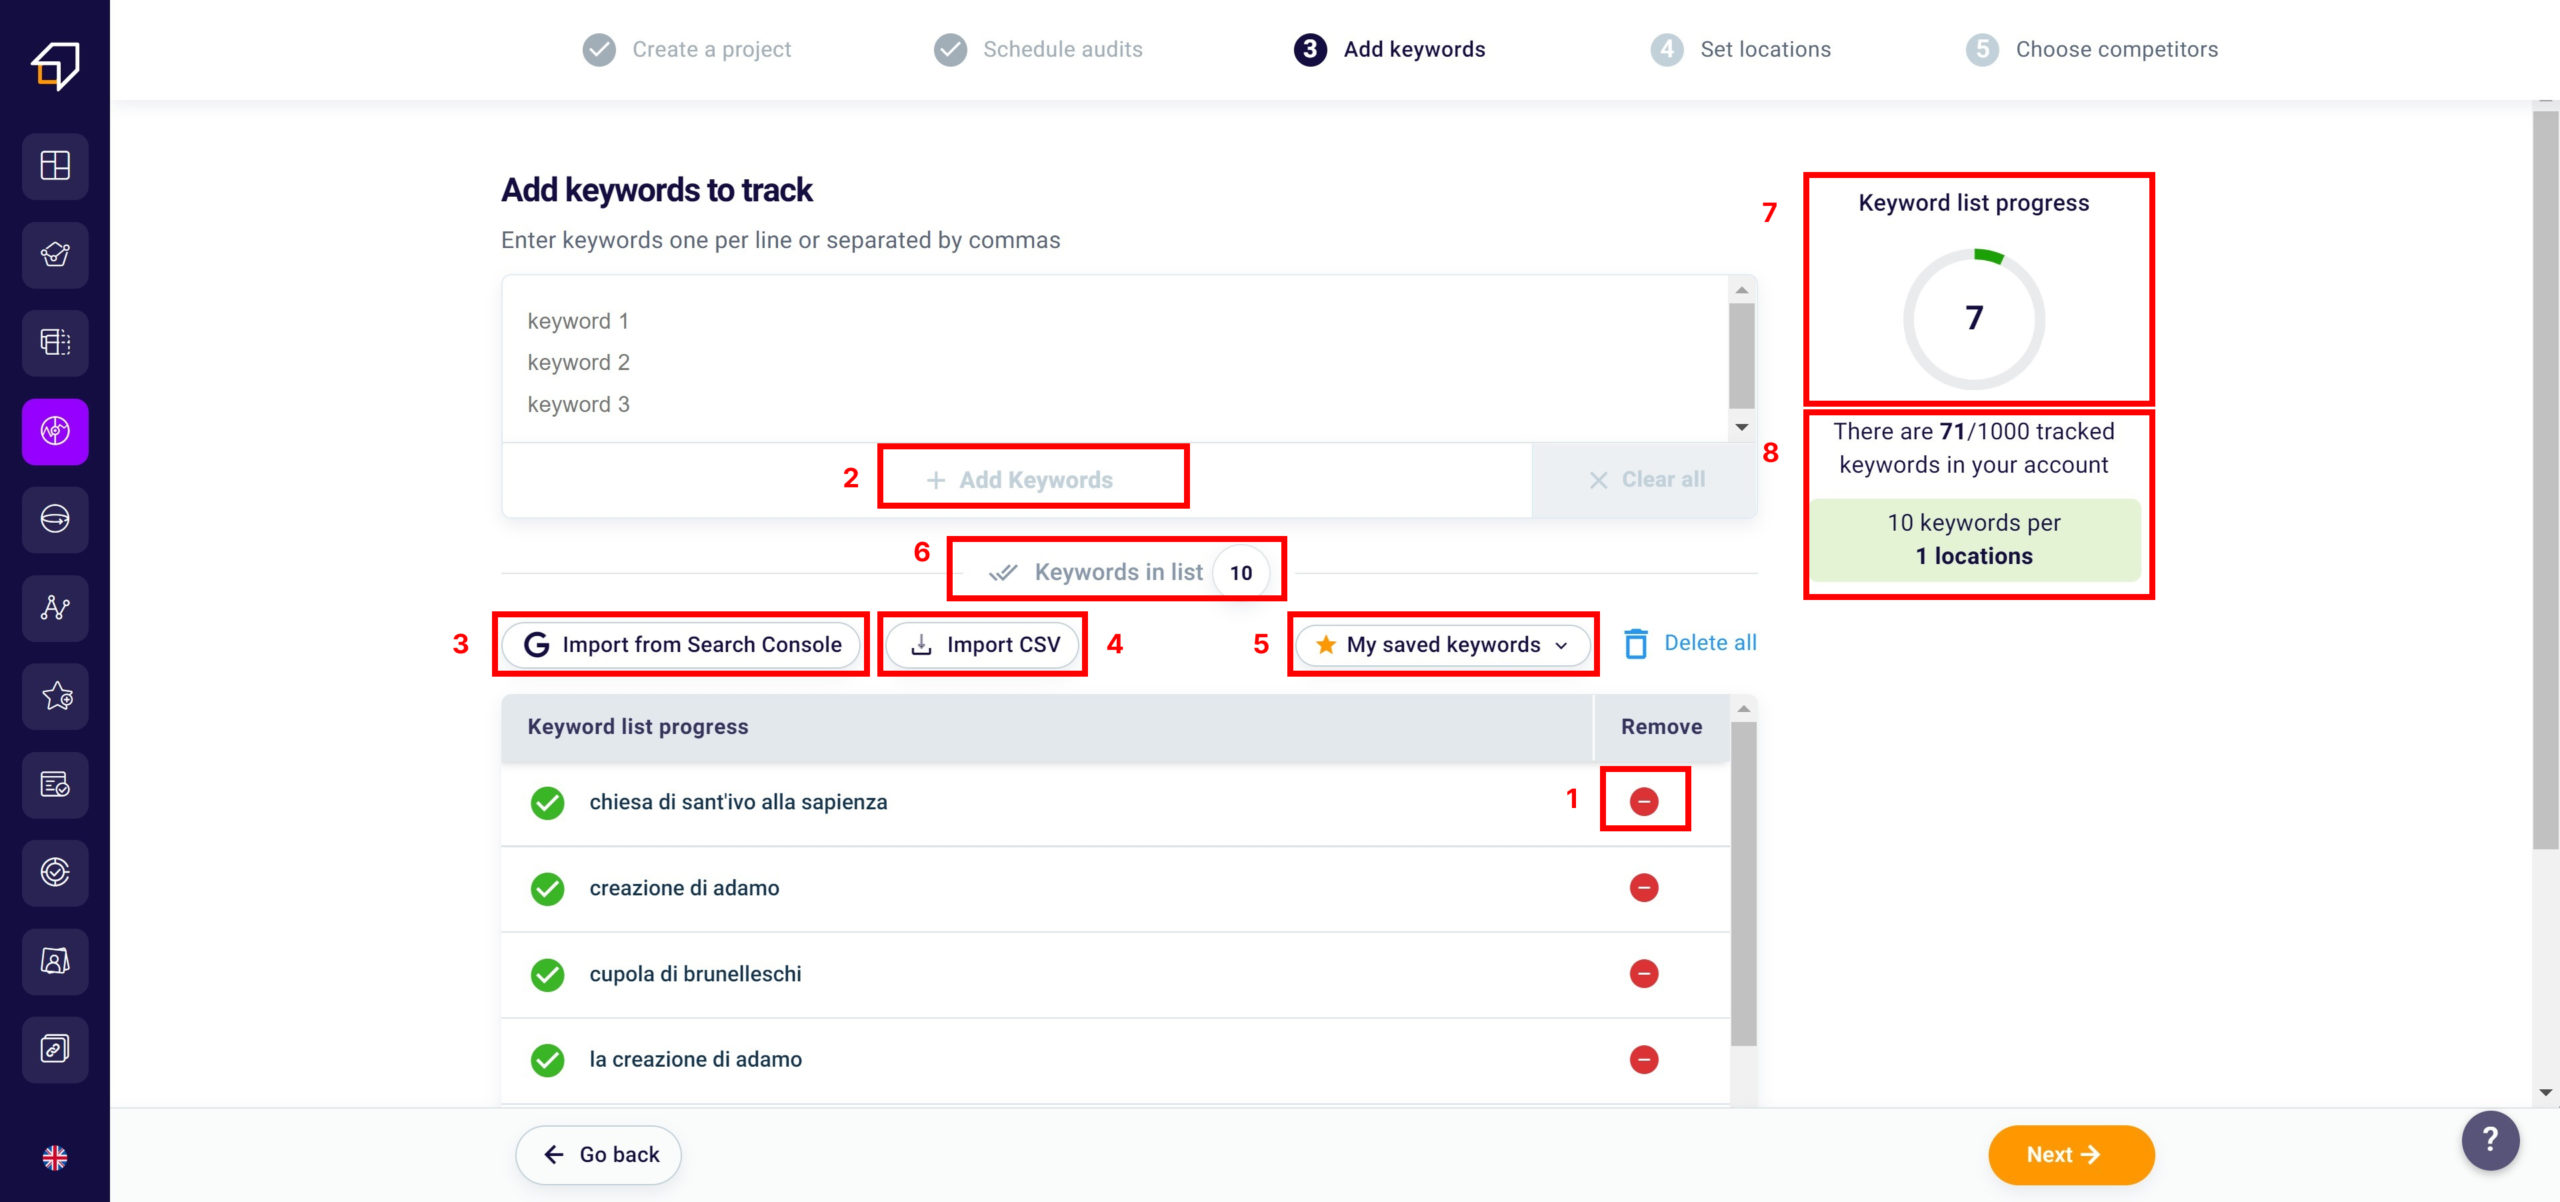
Thanks to our software, tracking your favorite keywords will be very simple. After clicking “Continue”, this screen will appear. 

Thanks to our algorithms, our tool will automatically show you some keyword suggestions to monitor. If you do not want to track the results of a specific keyword, all you have to do is click the “X” (1) to the right of the word you do not want to include in the list to be monitored.

keyword suggestions to monitor

If you want to add another one, you will have to click in the box containing the keywords, in conjunction with the word “add another tag” (2), write the word and type the comma “,” or click the enter key on your keyboard to separate it from the following ones .

With our software you have the possibility to import your keywords directly from Google Search Console. To do this, simply click “Import from Search Console” (3)

By clicking “Import CSV” (4) you can import and insert in the list of keywords to monitor the words contained in a .csv format file saved on your PC.

By selecting “My keywords” (5) instead, you will be able to draw from your keyword lists. If you want to find out how to create a Keyword List, read our guide.

At the bottom left you can instead view the “keywords within this list” (6)

On the right of the screen (6) you can see how many words you are tracking and how many more you can track. The maximum number of traceable keywords is 1000.

As you can see, in the example above the tool specifies “You are monitoring 204/1000 keywords”. These “204” words are related to all of your SEO projects, and not to the single project you are creating right now. If you want to expand the maximum number of keywords, contact us on support@seotesteronline.com.

How to set the search engine, the country and the device you want to monitor? 

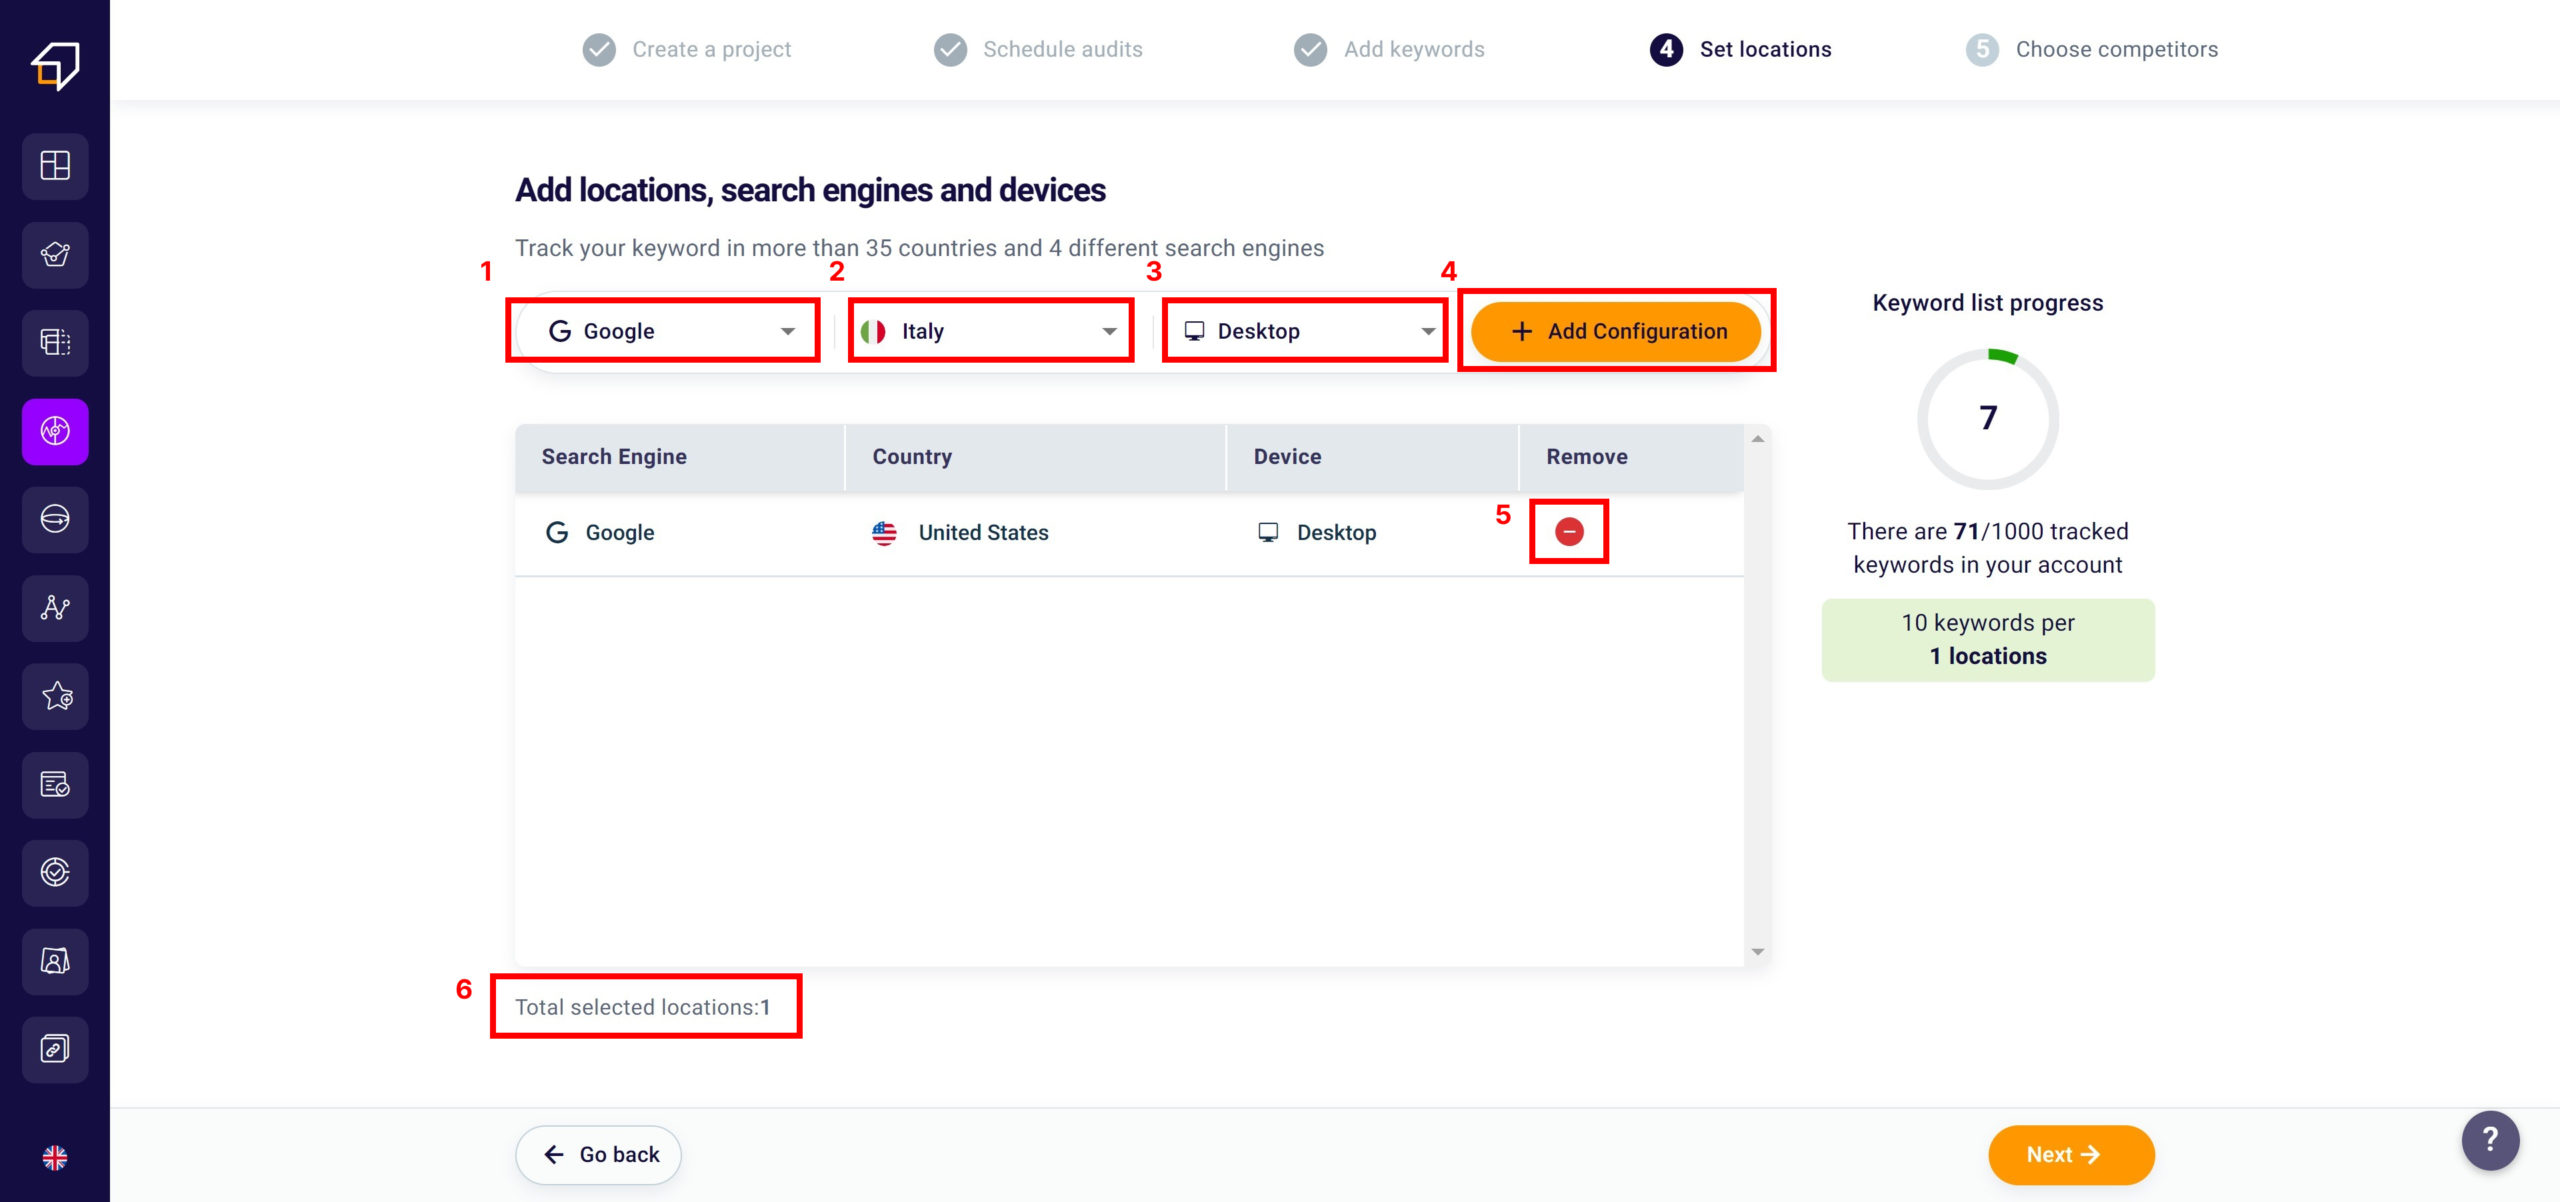
Click “Continue” and access the fourth step relating to the creation of your SEO project.

To add a new configuration it will be sufficient to choose, by clicking in the corresponding select, a search engine (1) between Google, Bing, Yahoo and Yandex, a country (2) among the 36 available and a device (3) between mobile and desktop. 

set the search engine, the country and the device you want to monitor

After choosing the new configuration for which to track your keywords, you will need to click on the orange button “+ Add configuration” (4).

You can remove the default configuration or one of those you have entered by clicking the small red button under the “Remove” column (5). 

You can enter as many as you want until reaching 1000 keywords (total, therefore considering all your projects). If you want to expand your limits please contact us at support@seotesteronline.com.
You can view when you want all the configurations chosen near the word “Total selected location” (6) at the bottom left.

Remember that if you choose multiple locations and enter a certain number of words (e.g. words entered = 20), our software will track the results for each keyword in each location. Eg if you have chosen 3 locations and entered 20 words, the total result will be 60 monitored words.

Finally click on “Continue”.

How to monitor the SEO results of your competitors?

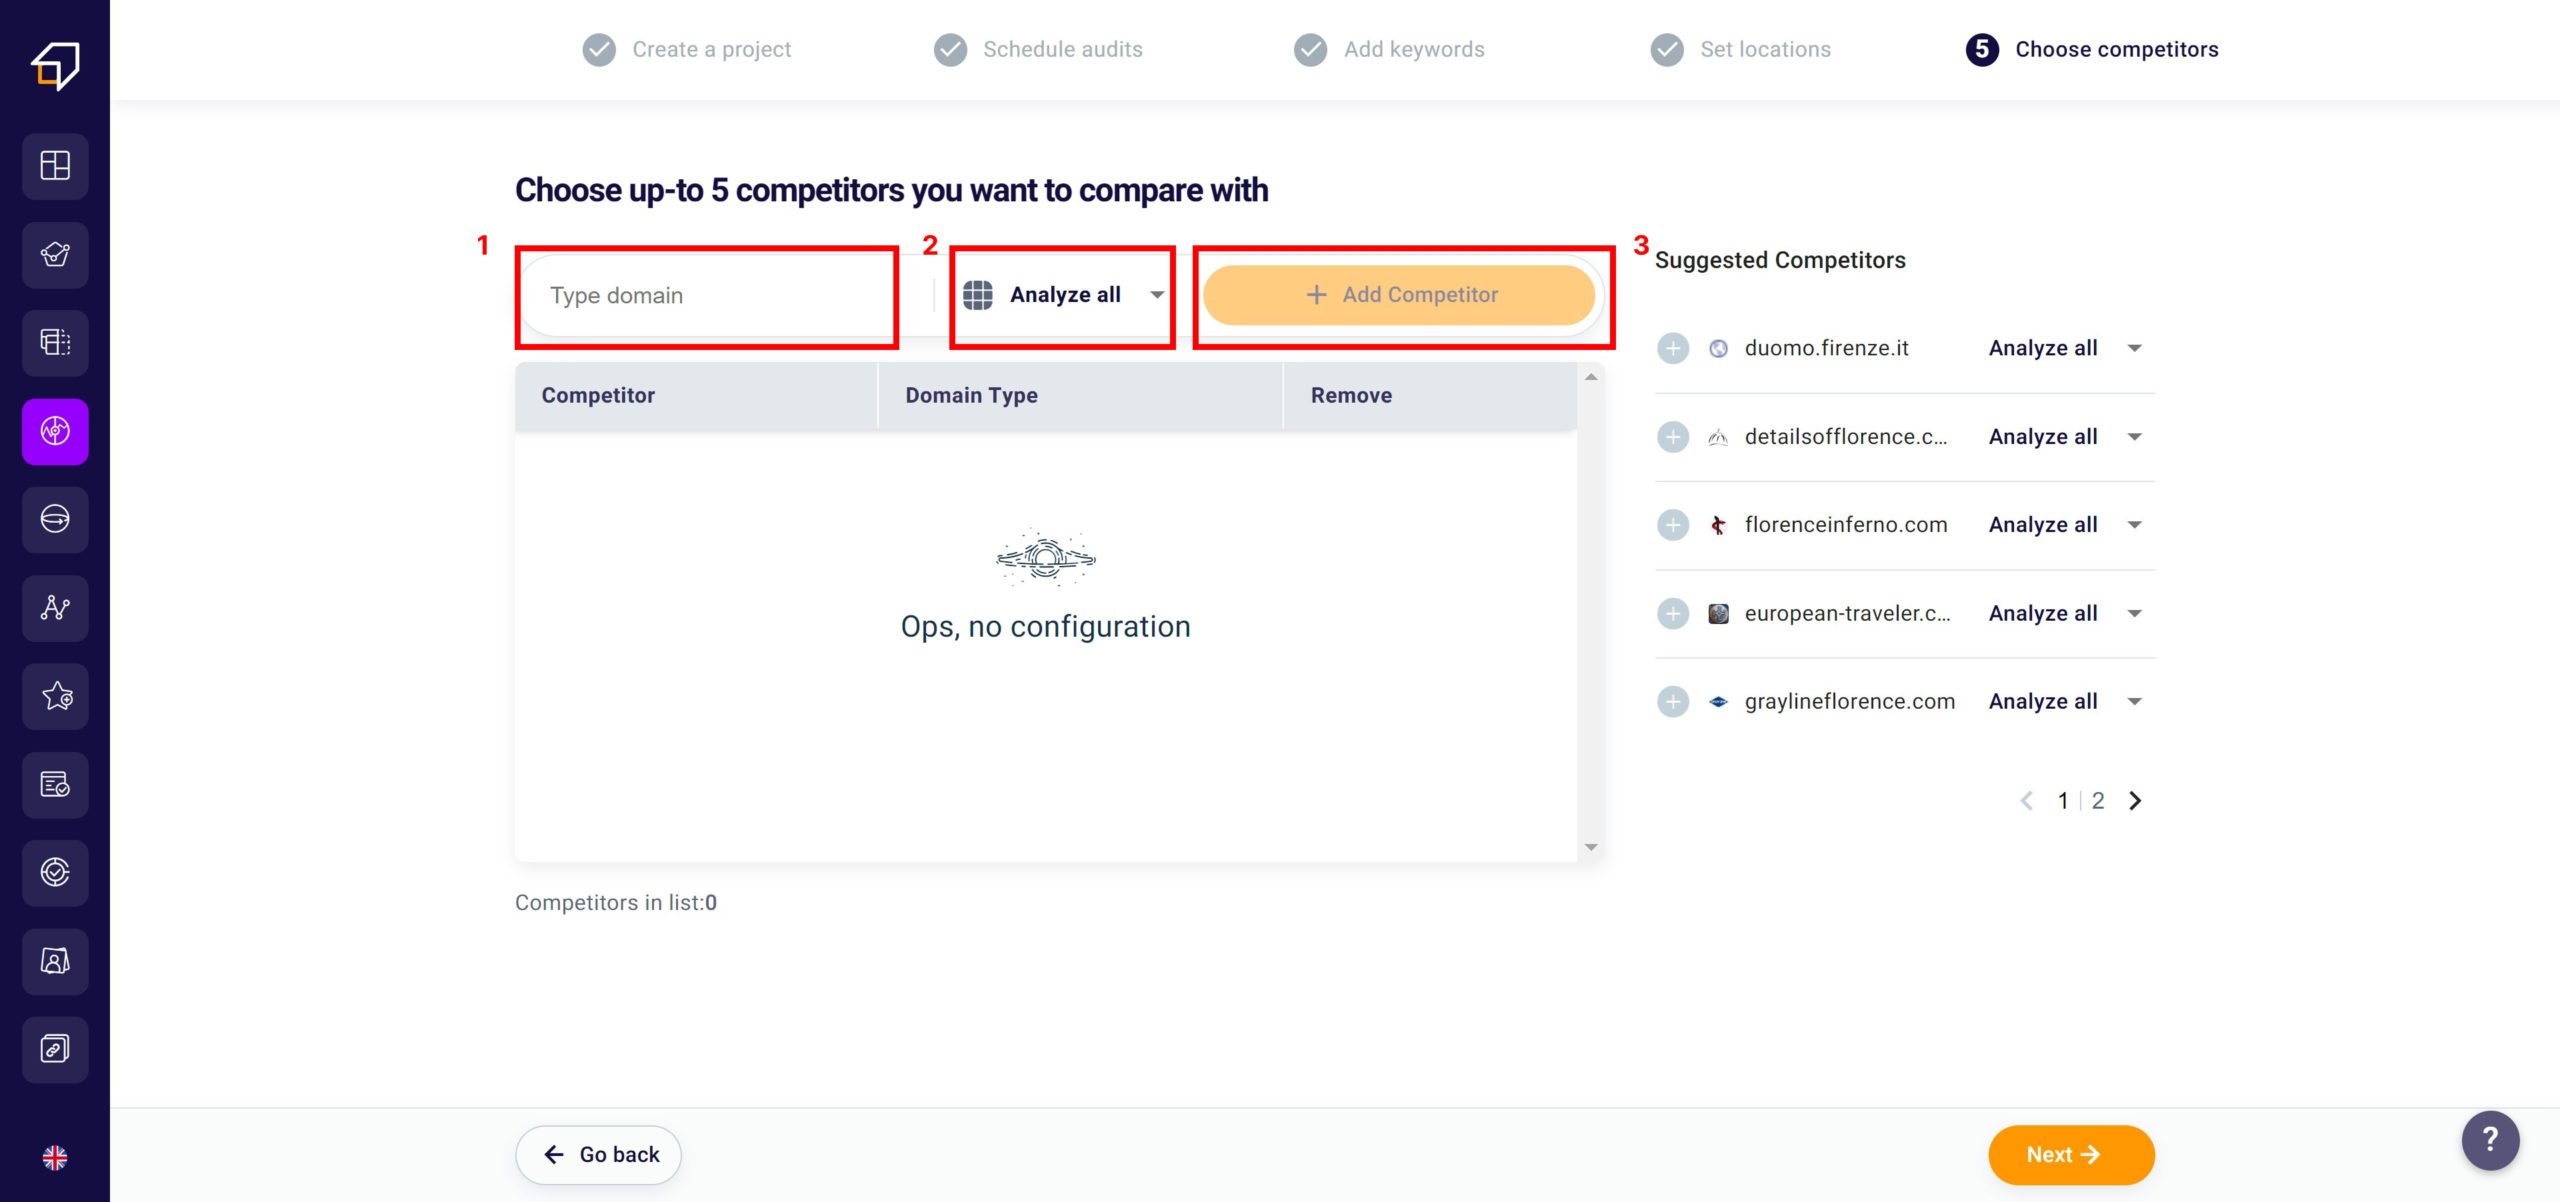
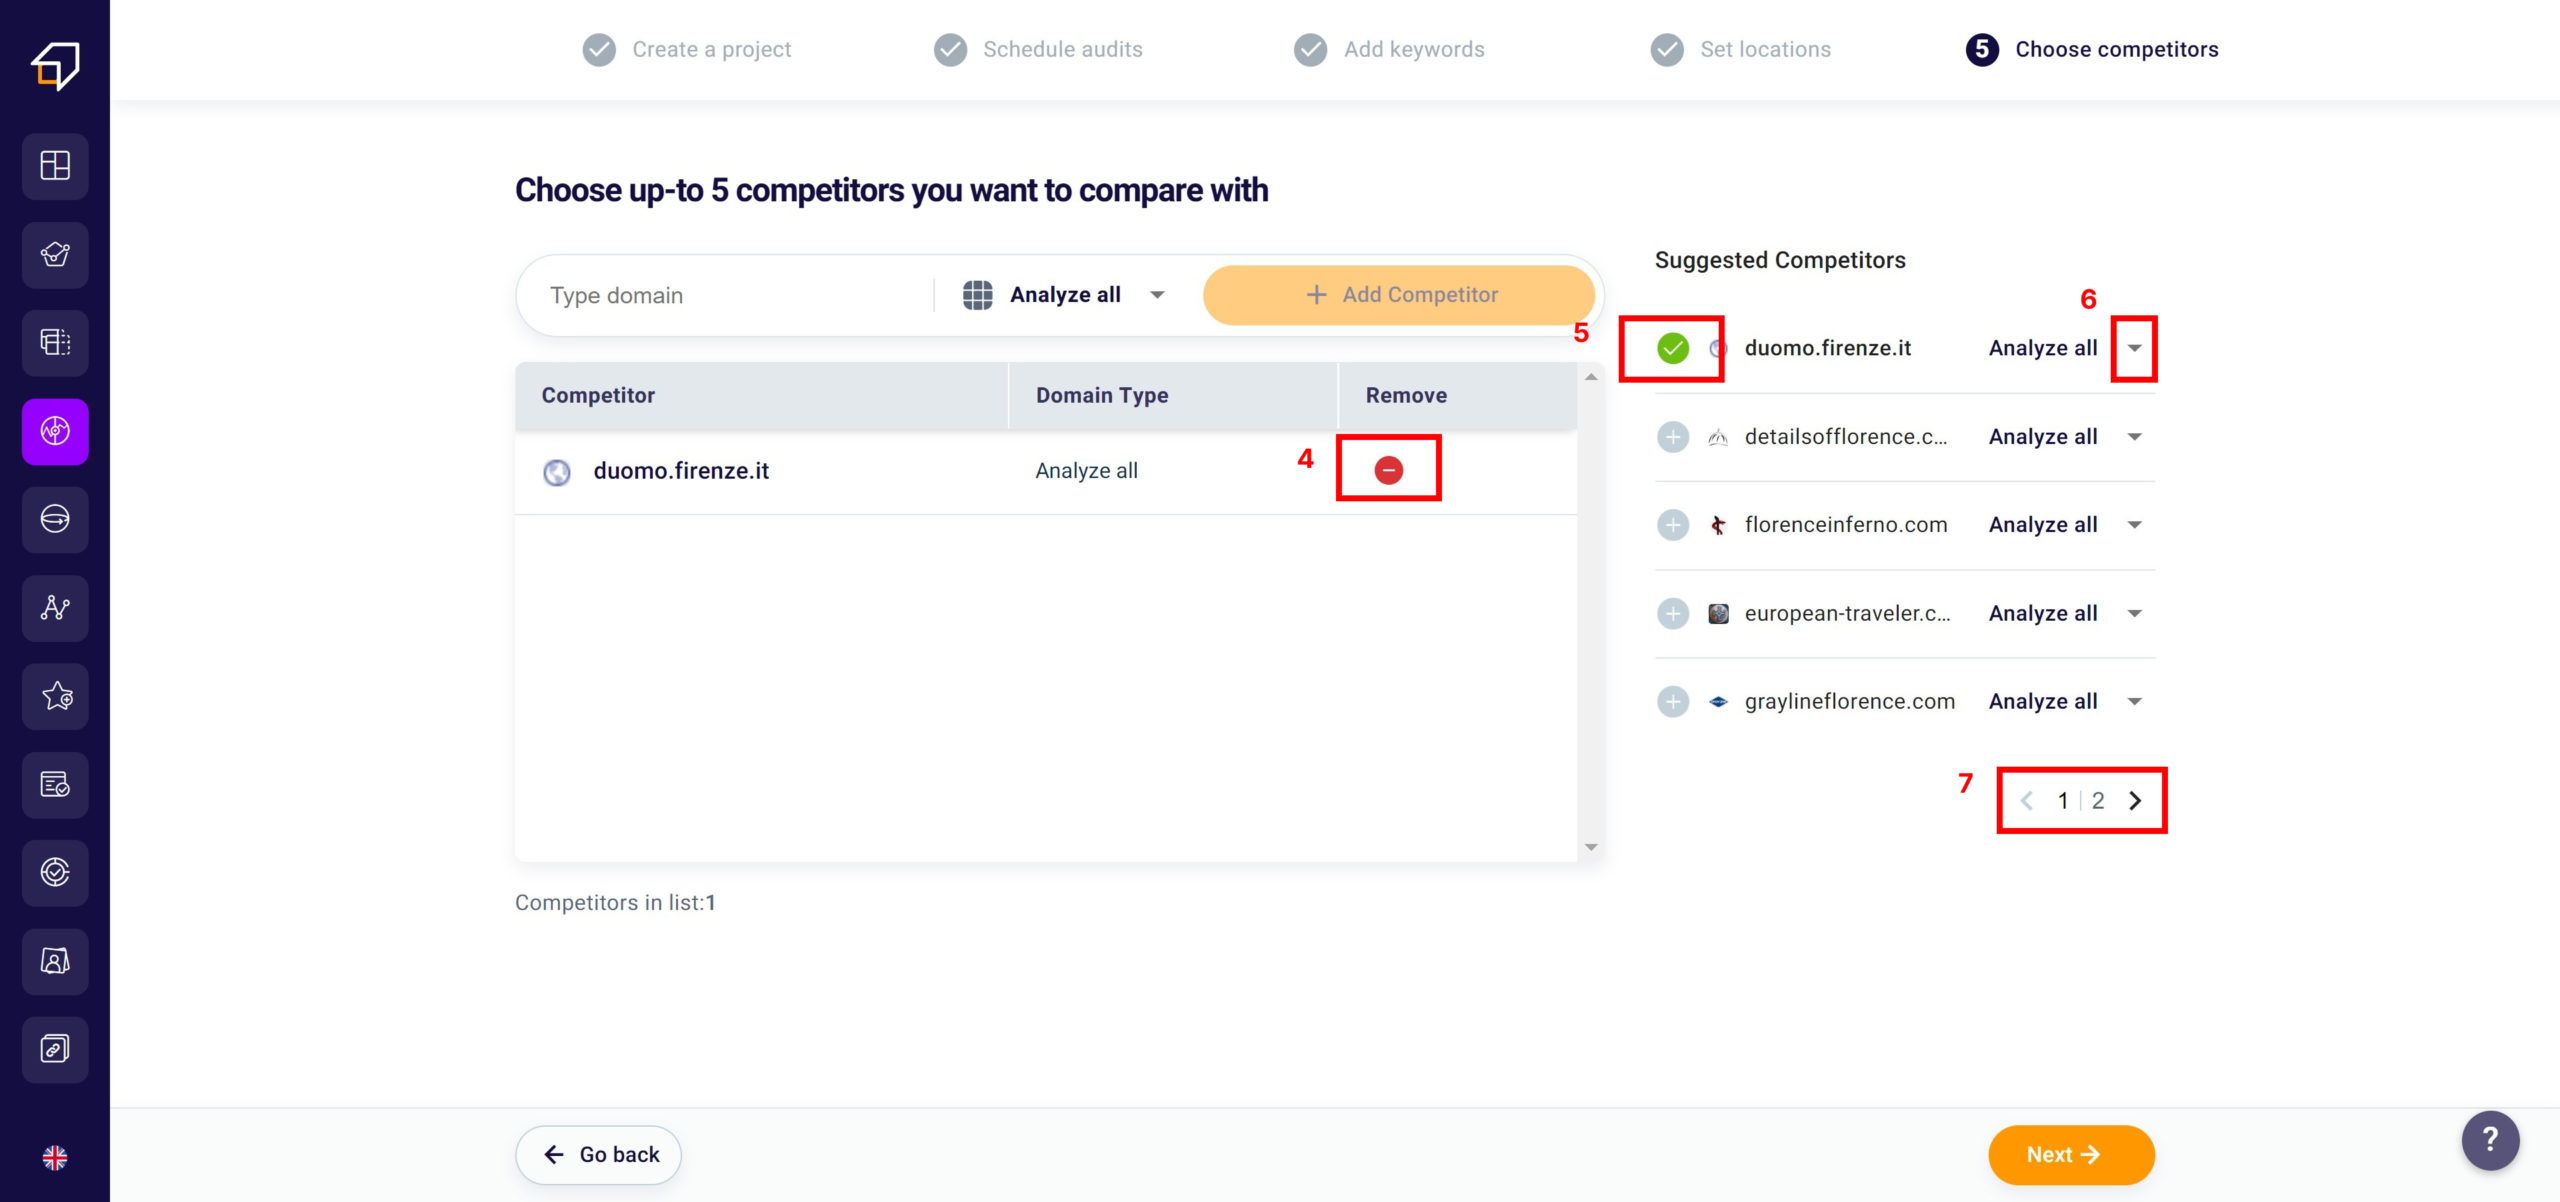
To do this, you will have to write a specific site or URL (1) (eg competitor name.com), and then decide what to analyze: “Analyze all” (2), only the domain, only the subfolders or the specific page you typed the URL.

How to monitor the SEO results of your competitors

Then just click on the “+ Add Competitor” button (3) and that’s it!

Finally, if you want to remove an added competitor, click the red icon located under “Remove” (4). Remember that you can add up to a maximum of 5 competitors. By entering them you can track and compare your ranking with theirs.

Add Competitor

On the right section, our software automatically recommends some competitors to introduce to your list. To add them you will need to click the “+” button (5) to the left of the URL. Also in this case you can decide what to analyze by clicking “Analyze all” (6).

Click on “Continue” you will have created your project and you will be directed to the SEO Spider.

How to delete an SEO project?

How to delete a SEO Project

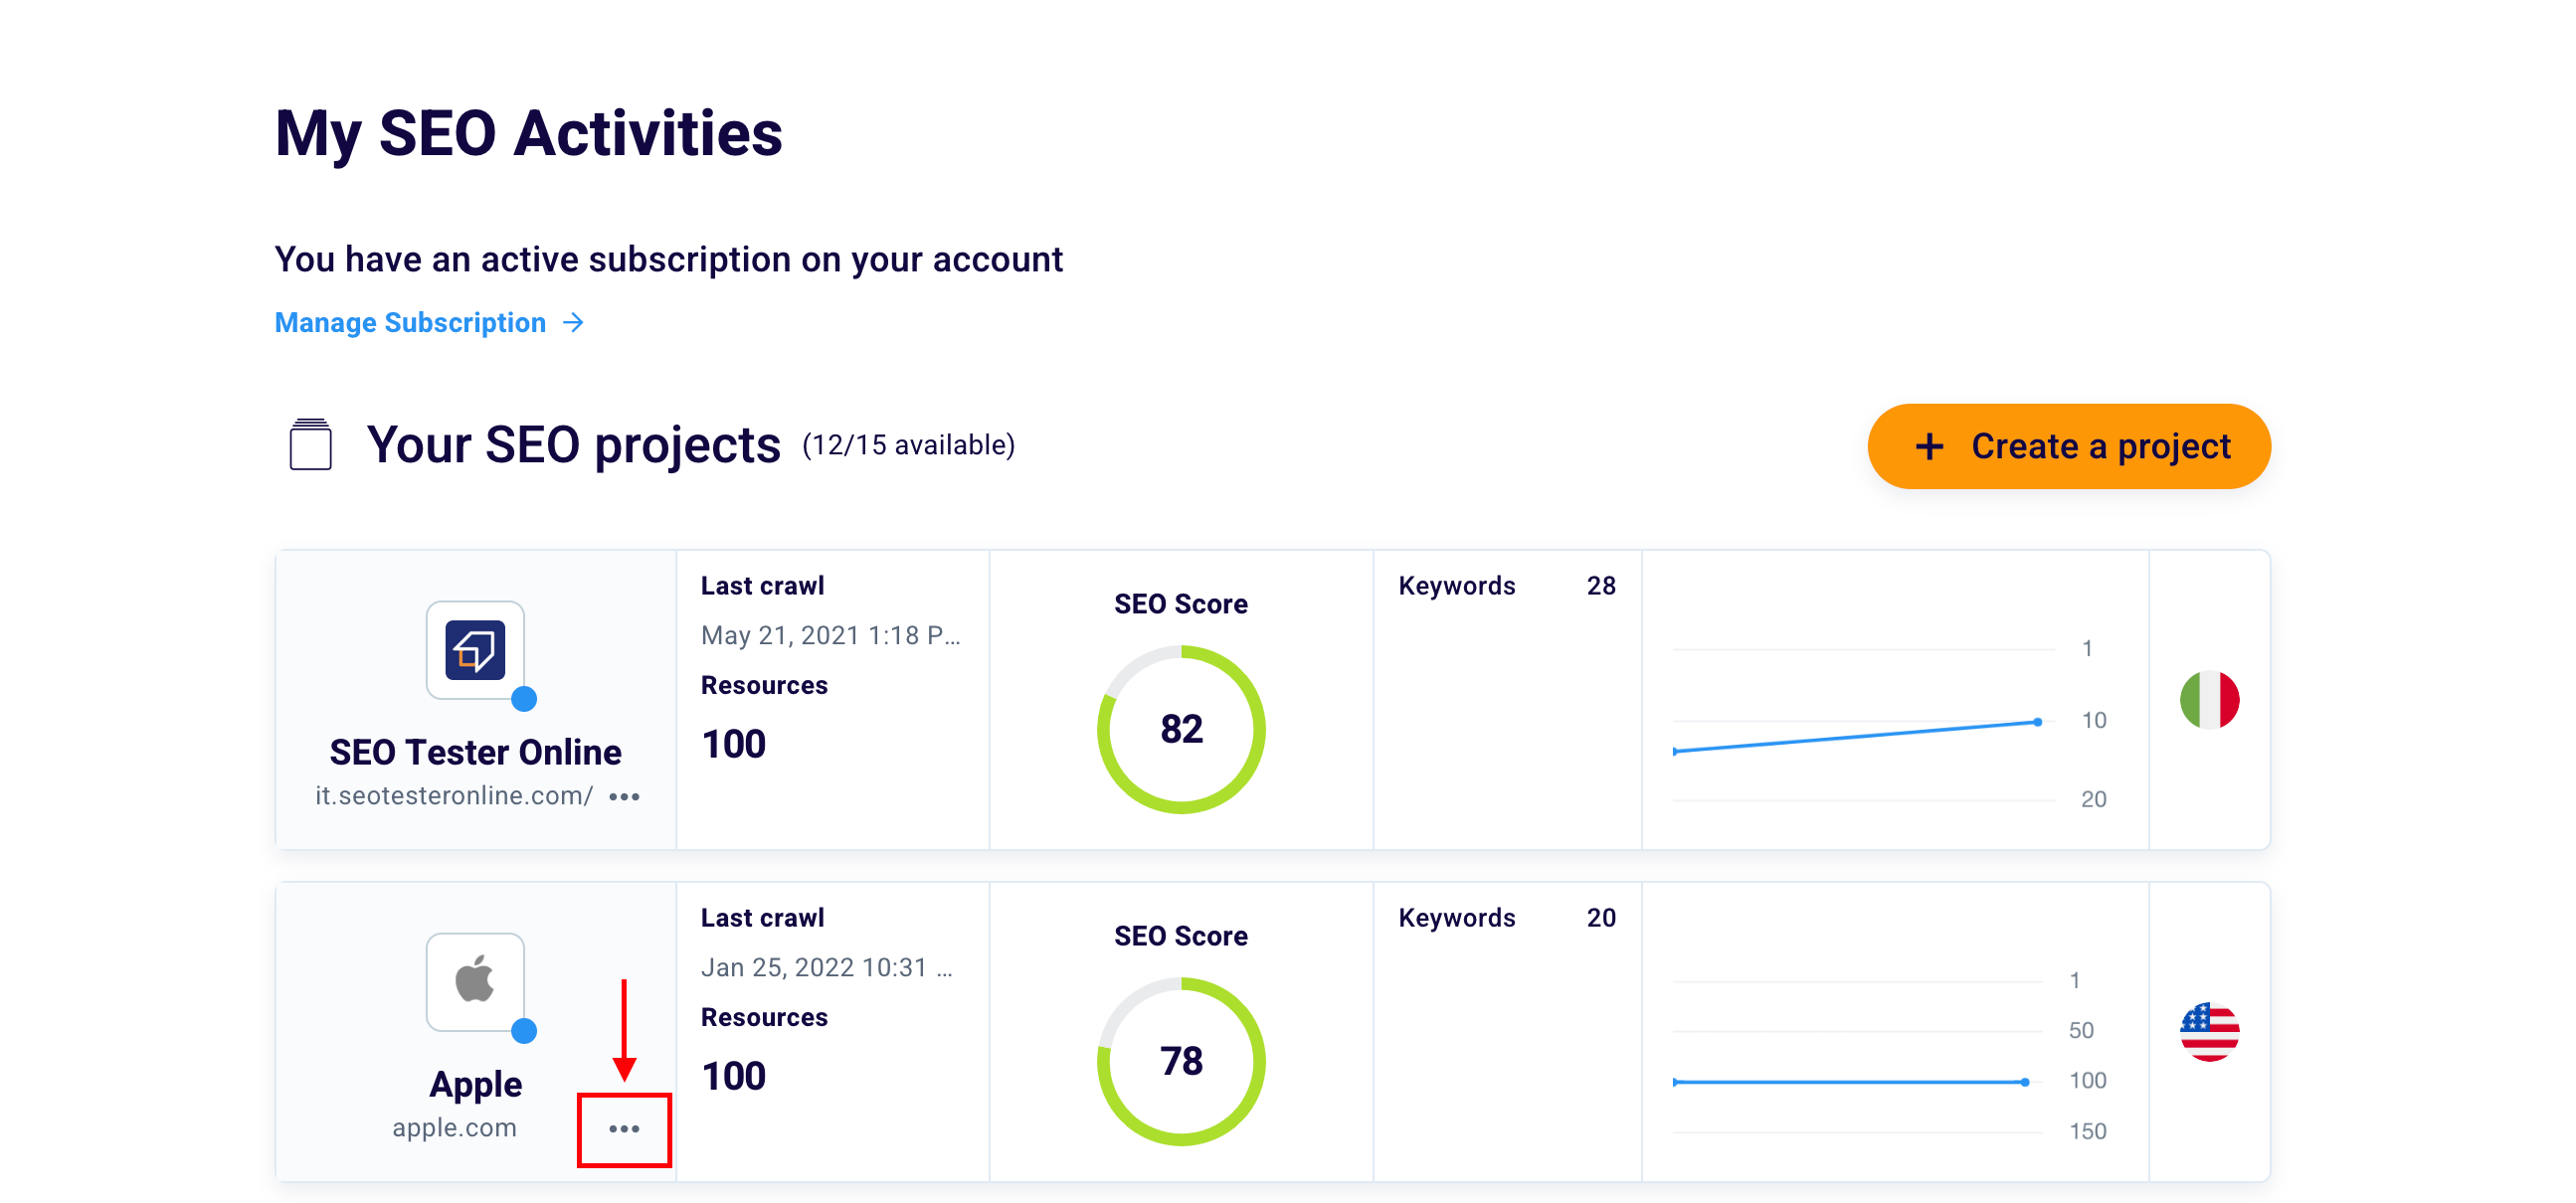
To delete an SEO project all you need to do is click the 3 points highlighted in this screenshot.

Delete Button

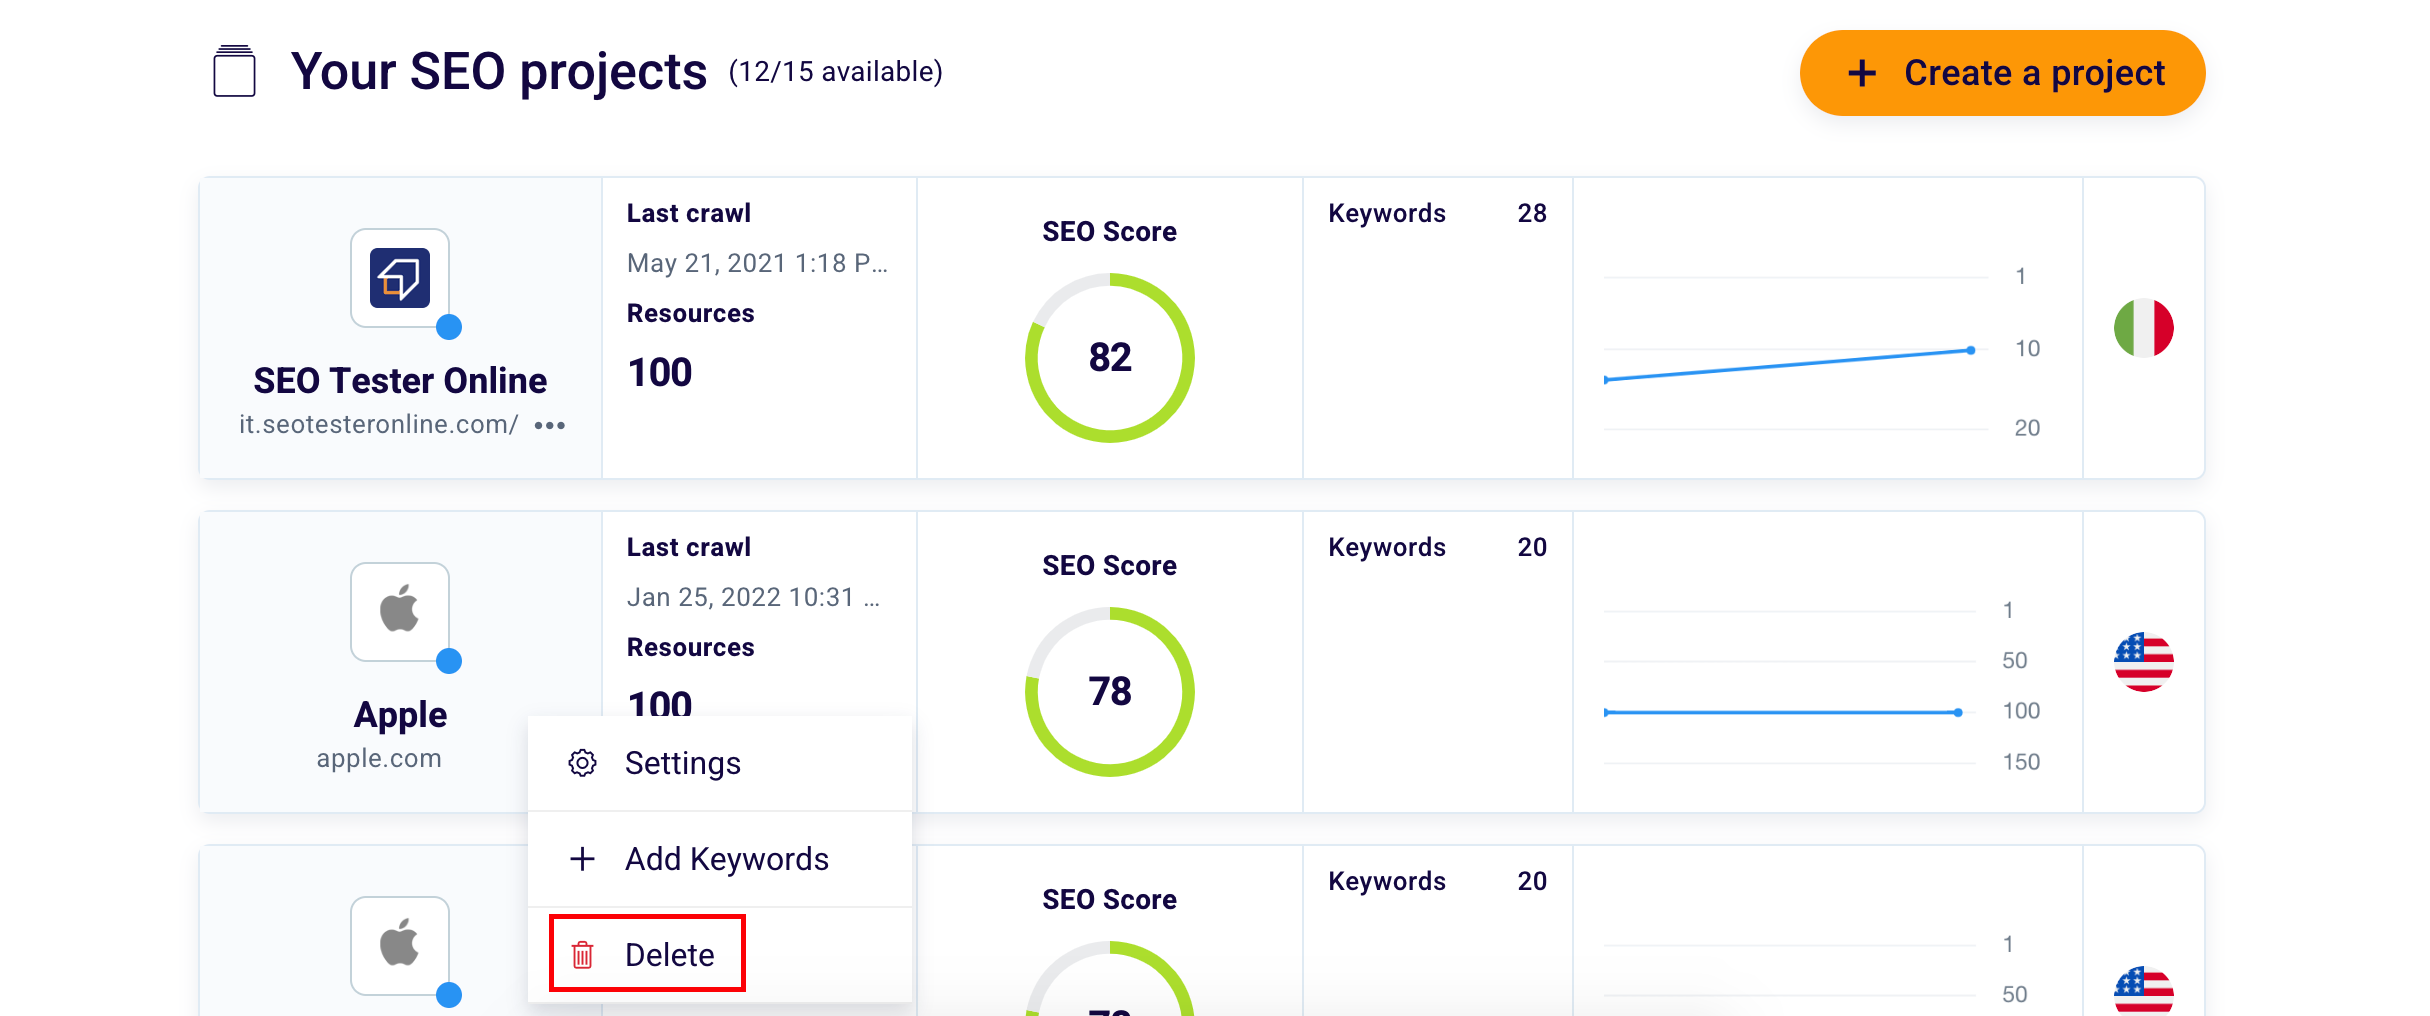
After that select “Delete” and you will get this screen.

SEO Tester Online Project

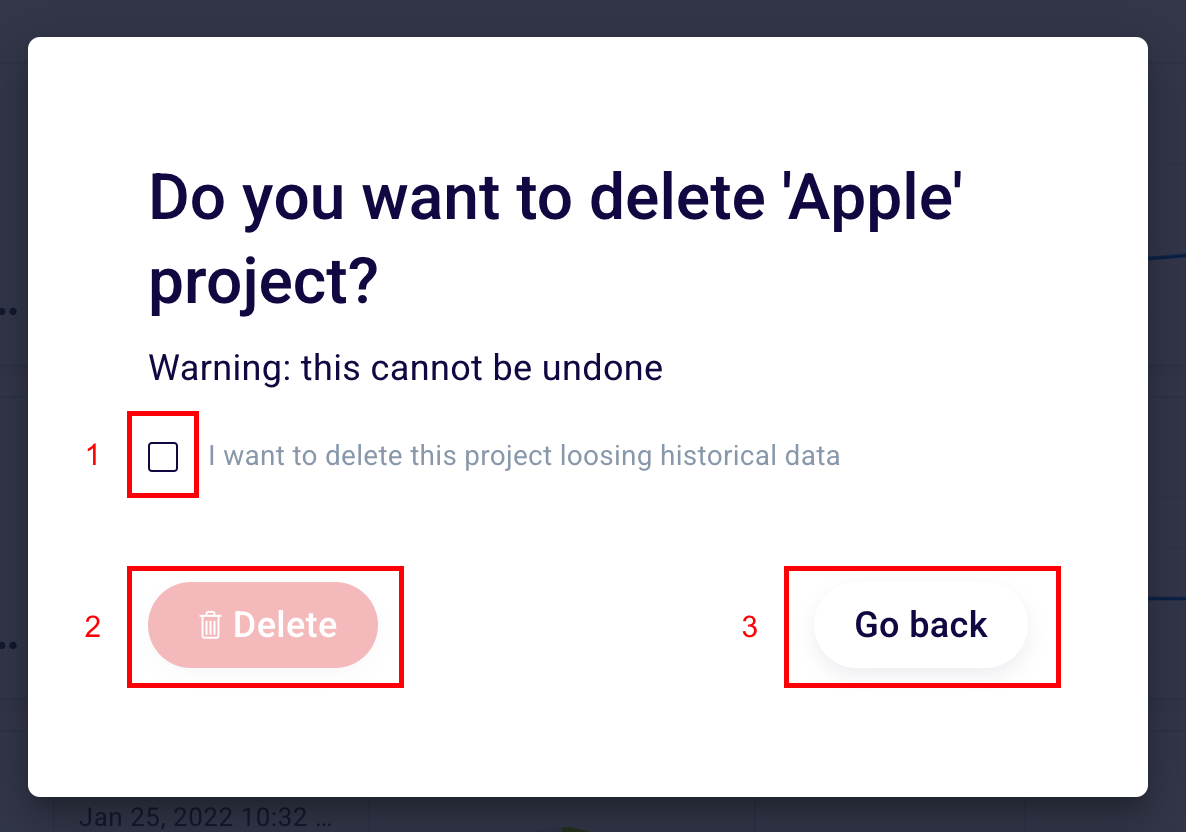
Click the box (1) highlighted in the image if you really want to delete the project. Remember that by deleting it permanently you will no longer be able to access the linked historical data.

Finally, click “Delete” (2) to finish the operation or “Go back” (3) if you want to cancel it and return to the dashboard.

How to edit a project or add keywords after its creation?

Modify Settings Project

Want to change project settings or add new keywords? Click the 3 points seen above to do so. Select “Settings” (1) to change the project configuration or “Add keyword” (2) to enter new words for monitoring.

To understand how it works and how to read this dashboard read the knowledge base of our scanning tool.

Remember that you can monitor your project whenever you want from the “Your activities” section seen at the beginning of the guide.

Do you want to understand how to monitor your results with the Keyword Rank Tracker? Read the specific knowledge base.

We hope this guide was useful for you if you have any further questions contact us at support@seotesteronline.com.
To continue monitoring all your projects, go back to the dashboard which you can access by clicking the first icon in the left sidebar or by clicking here.

Account Management Guide

After creating a new SEO Tester Online account and logging in, you will be redirected to the Dashboard.

Remember that while browsing the various tools, you can return to this area by clicking on the “Dashboard” icon in the left side menu.

To view or change the information on the Account page, you will need to click on the “Profile” button at the top right and then on “Account Settings”.

After a few moments, you will be able to manage all the data entered during the registration phase.

To change your email instead, as the notice below suggests, you will need to send a request to our Support by writing to support@seotesteronline.com.

How to change my account information?

Within the “Account” page you will be able to change your personal data, information relating to your business and decide whether to receive updates from SEO Tester Online via email.

consenso per la newsletter

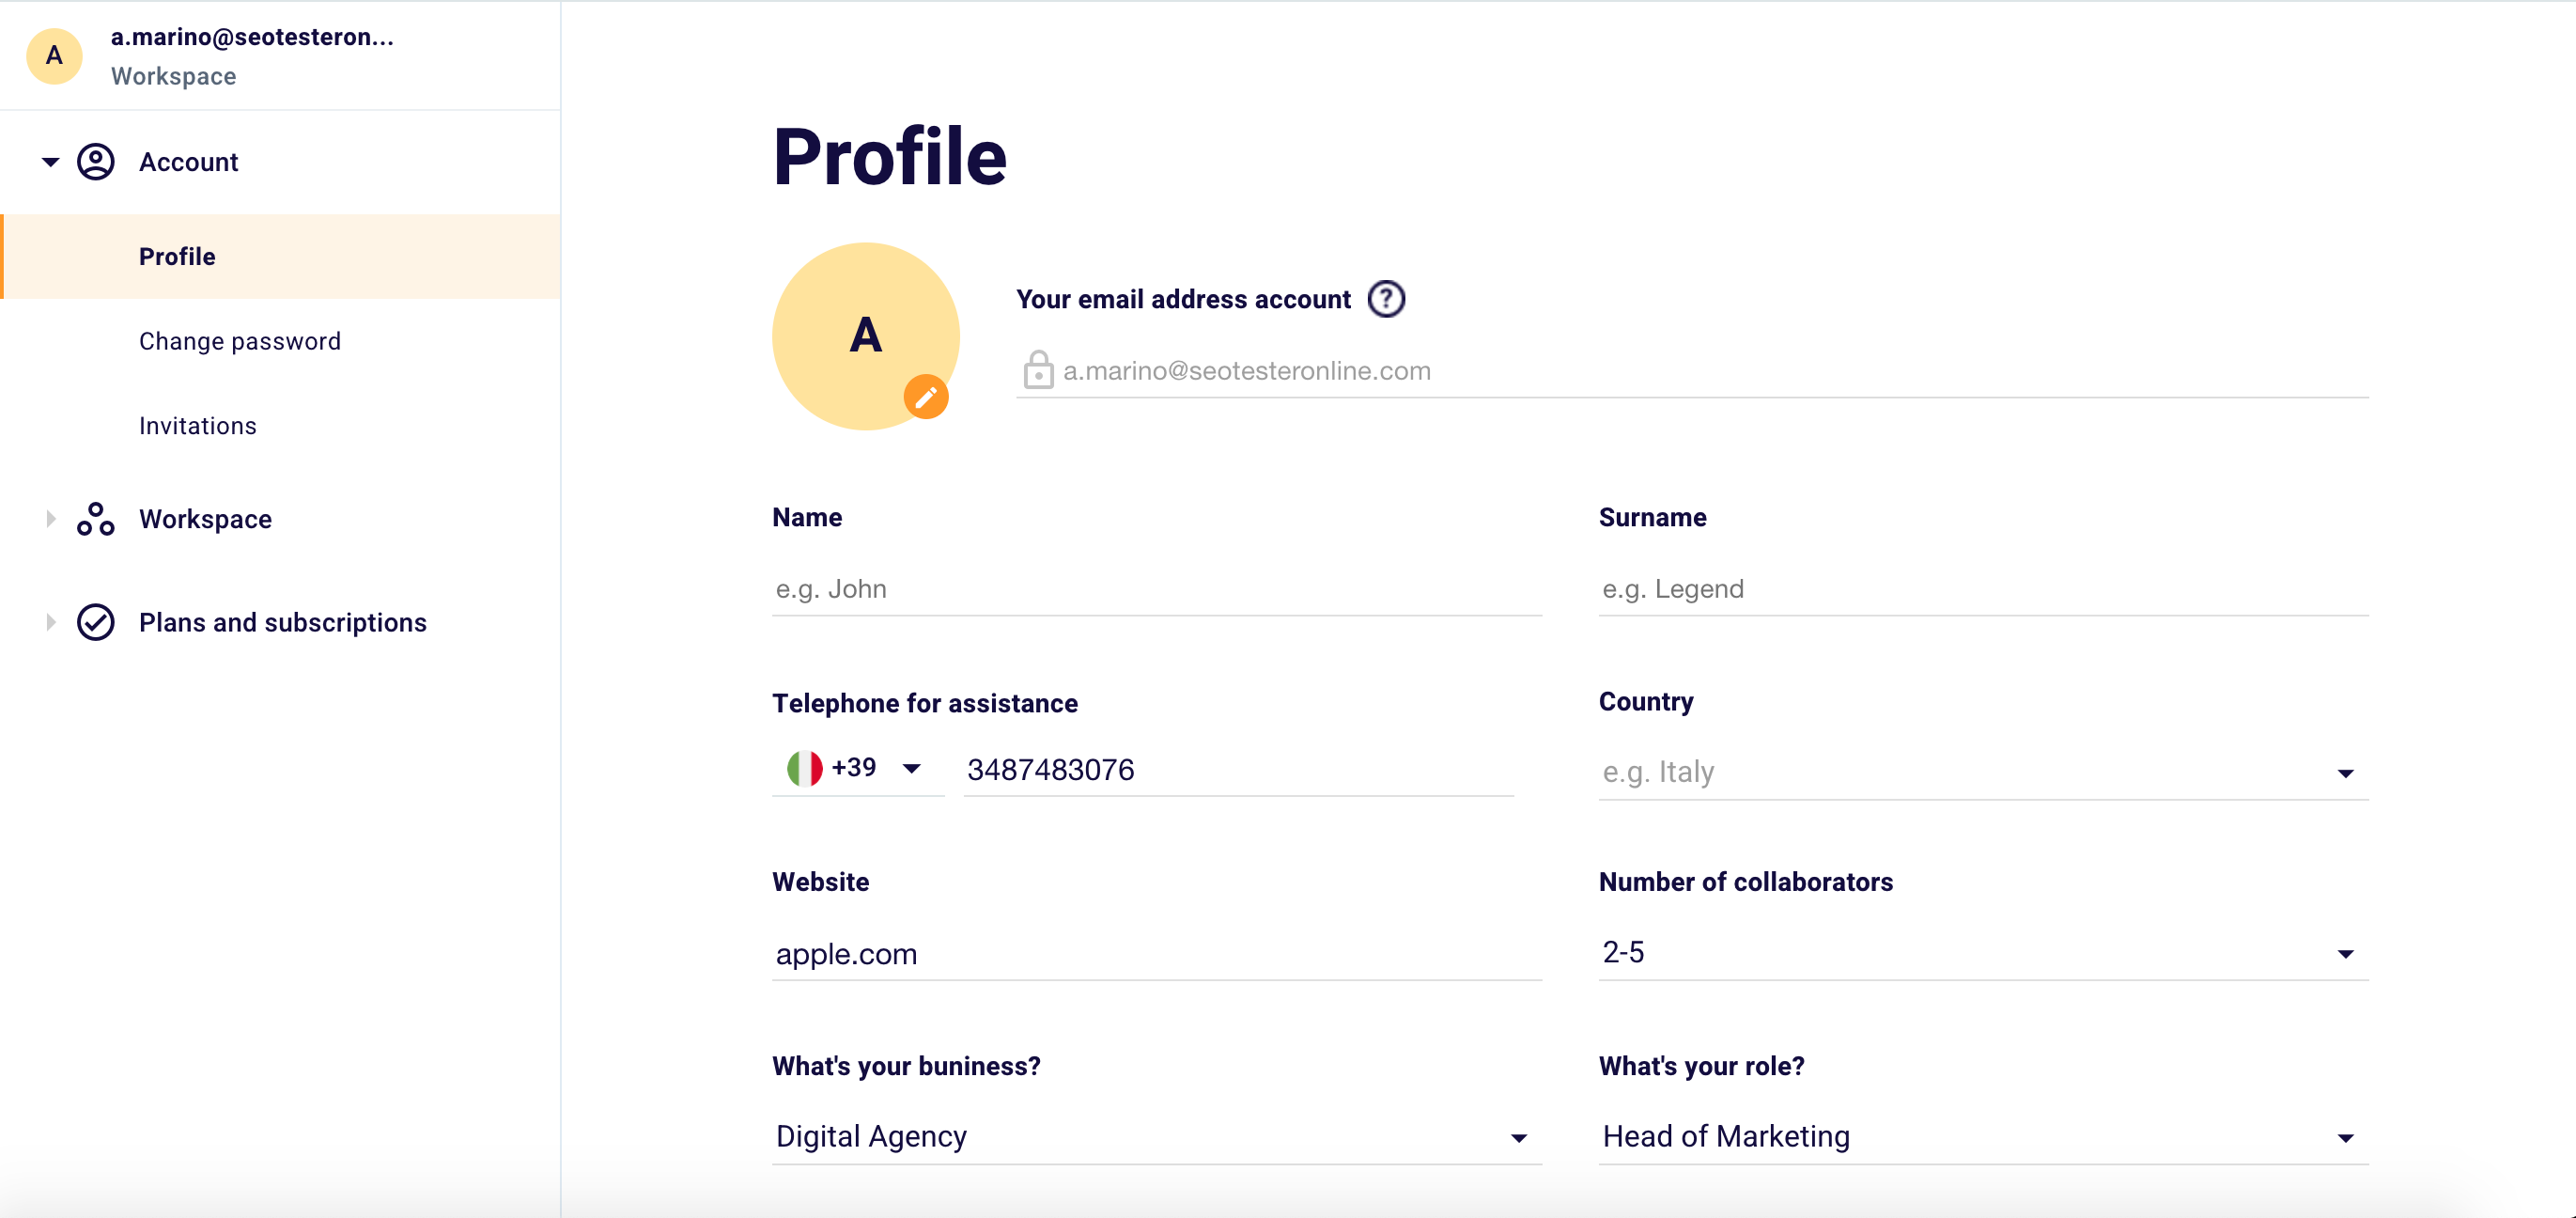
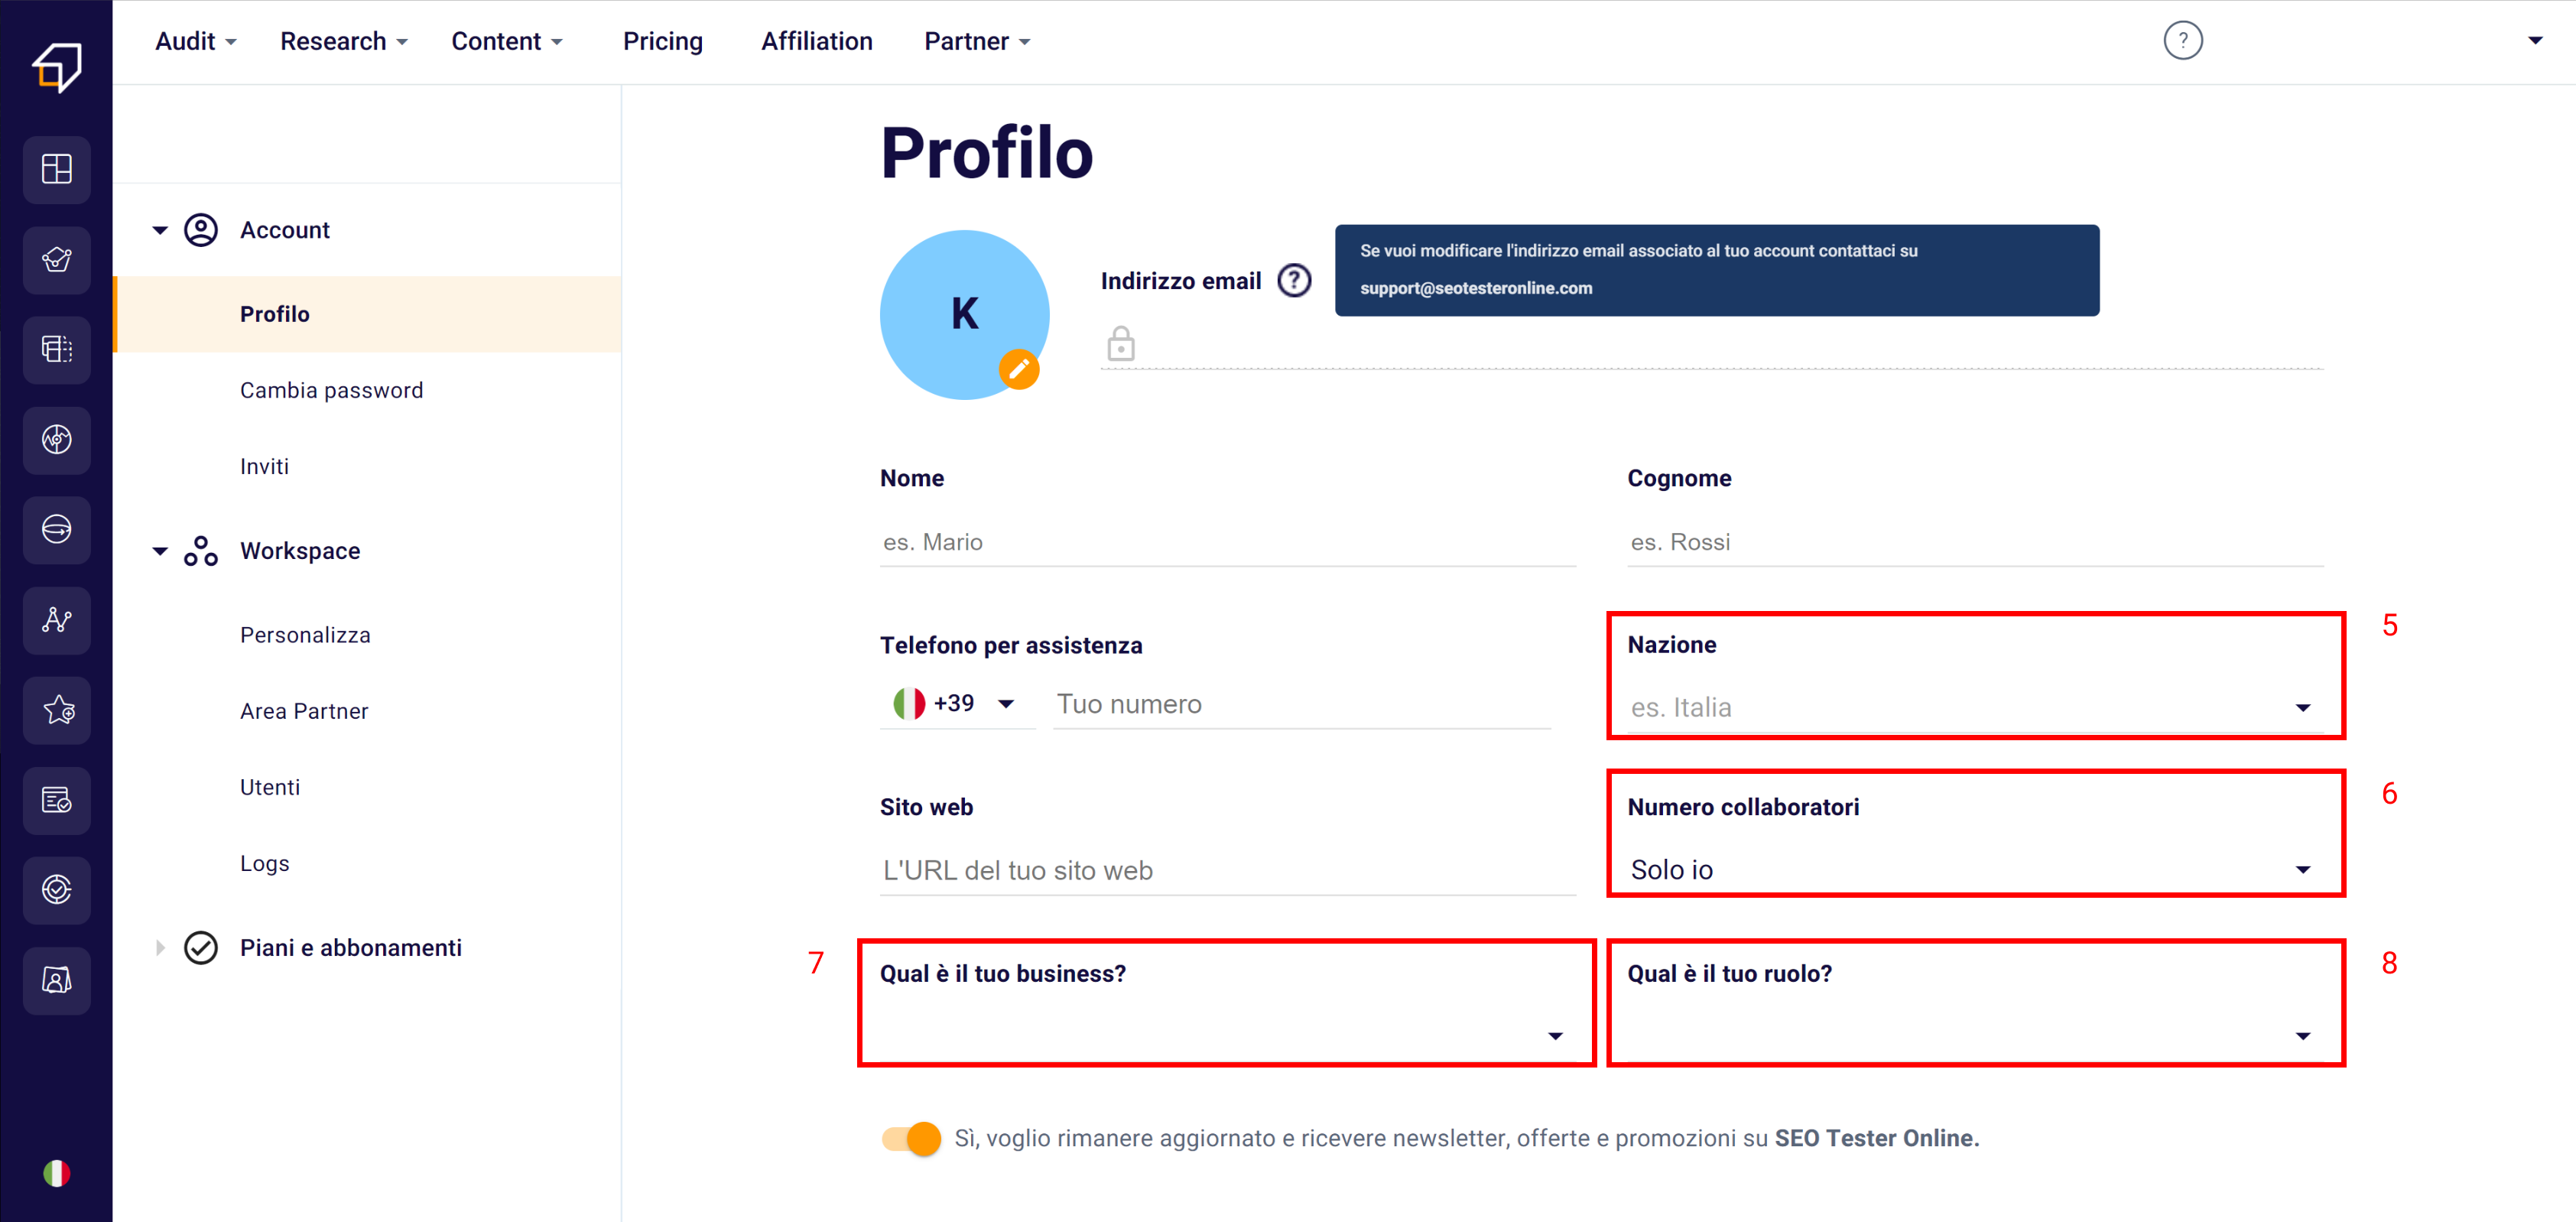
In case you want to update your name, you will need to select the “Name” box (1) and enter the new one.

The same procedure applies to all the other editable fields, such as “Surname” (2), “Telephone for assistance” (3) and “Website” (4).

To modify, instead, the sections “Country” (5), “Number of collaborators” (6), the type of your business (7) and your role (8), you can use the drop-down menus.

impostazioni modifica profilo

Furthermore, it will be possible to download all the information entered very easily thanks to the button “Export data to .csv” (1) located at the bottom of the page, just below the selector to activate the updates.

esporta informazioni profilo in csv

Next to it, you will also find the “Delete account” function to permanently delete your profile, although we hope you won’t need this.

Do you want to change your password?

To change your password you will need to access the relevant section from the menu on the left.

Here, in fact, you will be able to update the credential set during the registration phase.

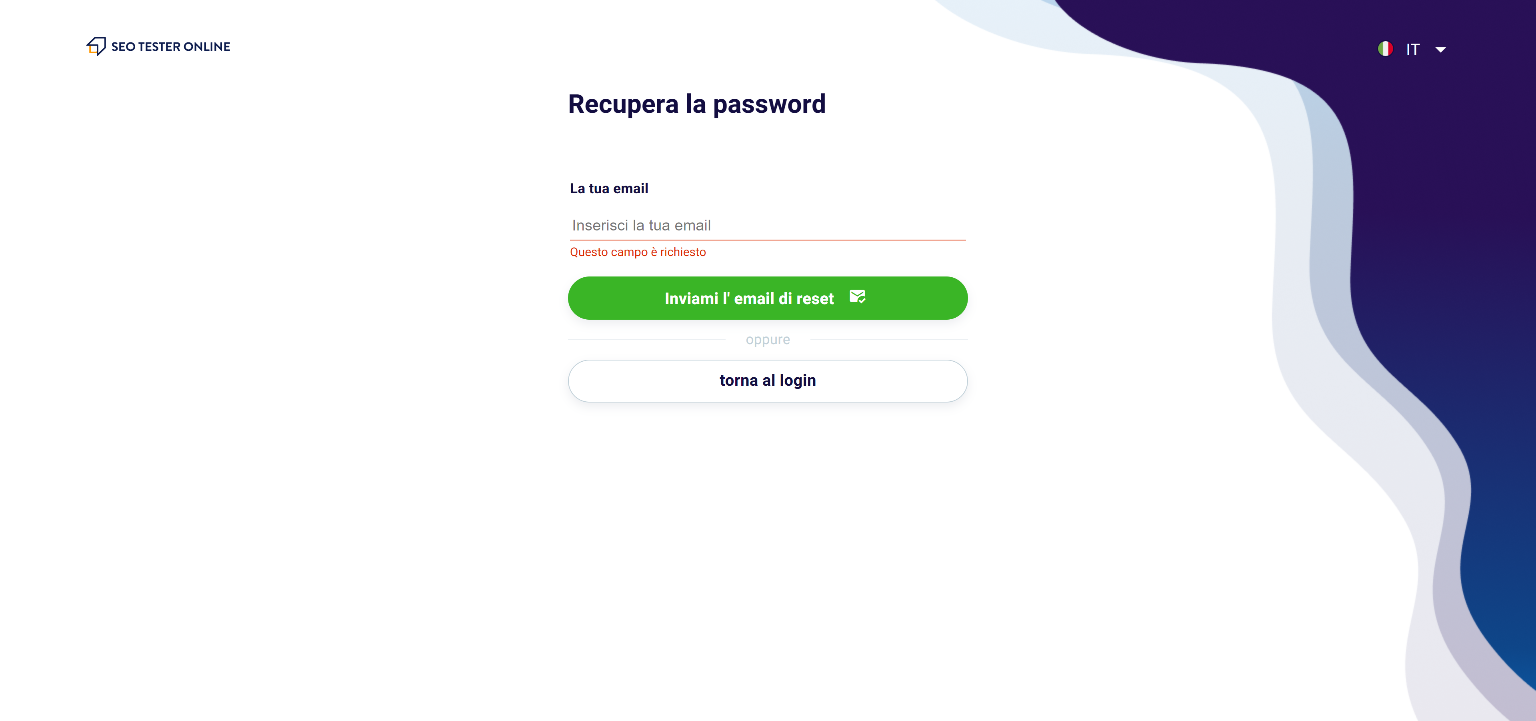
In case you have forgotten it, you can use our recovery service.

By clicking on “Click here”, in fact, you will be asked for the email address with which you registered, to which the platform will send you an email to proceed with the reset of your password.

inserisci indirizzo email per recupero password

Are you coming to invite new collaborators?

If you want to add new collaborators to your account, you will need to use the “Invitations” section. To access it, you can use the menu on the left.

This area will allow you to manage the permissions of your workspace. We talk about it in more detail in the Workspace Guide.

To invite a new collaborator, however, it will be necessary to click on the “Profile” button at the top right and select the item “Invite members”.

Within the page that appears, you can view the list of collaborators already involved and invite new ones using the “Invite members” button.

In the event that your plan does not foresee more than one user or if the number of users foreseen by your plan has been reached you will be shown a screen that will allow you to increase the number of foreseen users.

Therefore, using the selector (1) you must indicate the number of new collaborators and decide the type of tariff, choosing between the “Monthly” or “Annual” one (2).

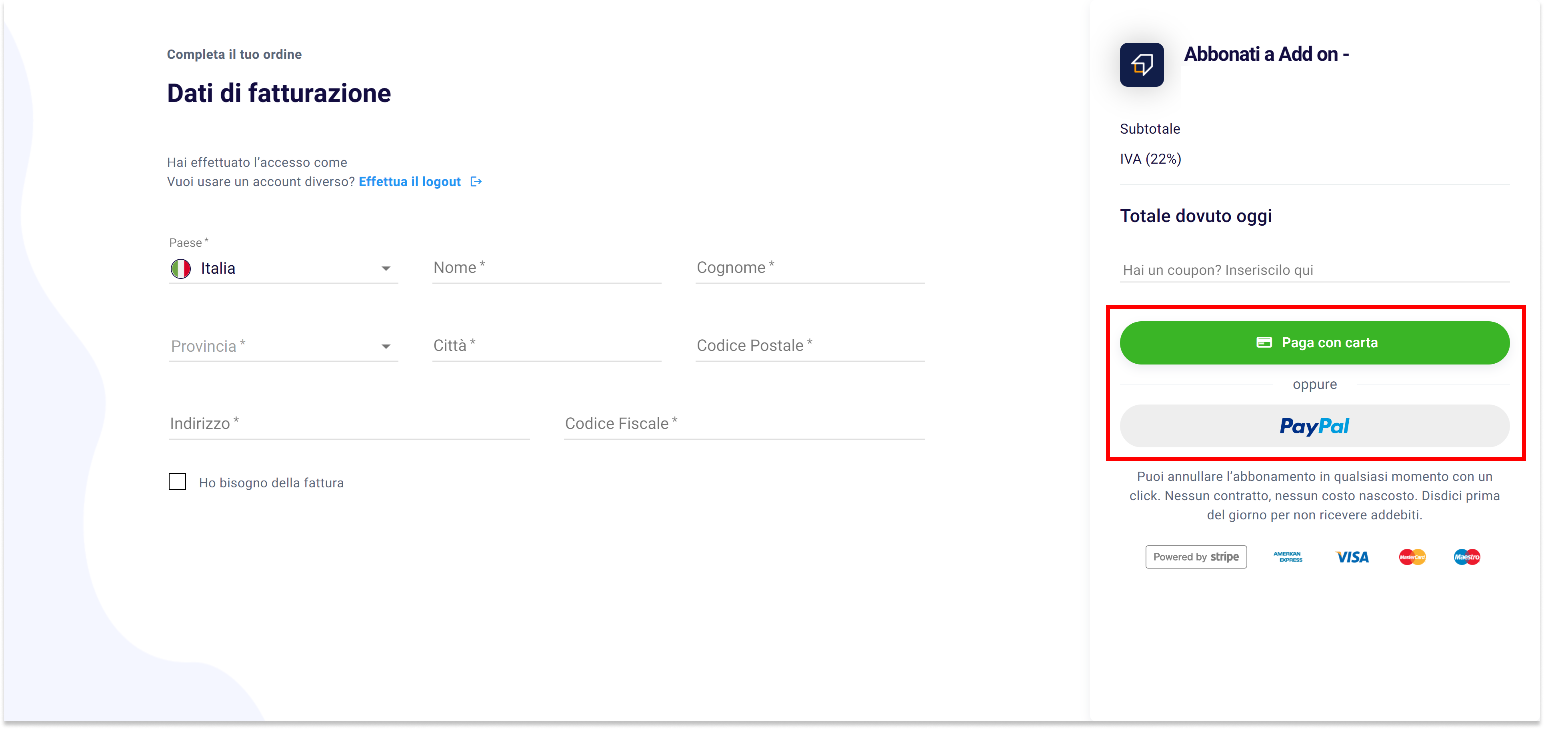
By clicking on “Proceed”, you will arrive at the payment page. By filling in all its parts and confirming the payment with the button “Pay with card” or “Pay with PayPal”, you will have finished the procedure for updating the Plan and you will be able to collaborate with your new colleagues.

procedura per il pagamento

Remember that the member limit can also be changed using the relative button “Increase user limit” on the “Users” page.

To learn more about managing your workgroup, we recommend that you read our Guide to the Workspace.

We hope this guide was useful to you. If you don’t have an SEO Tester Online Account yet, you can create it here.

Guide Plans and Subscriptions

To reach the “Plans and Subscriptions” section, simply click on your profile icon at the top right and then “Account Settings“.

You will be redirected to this page.

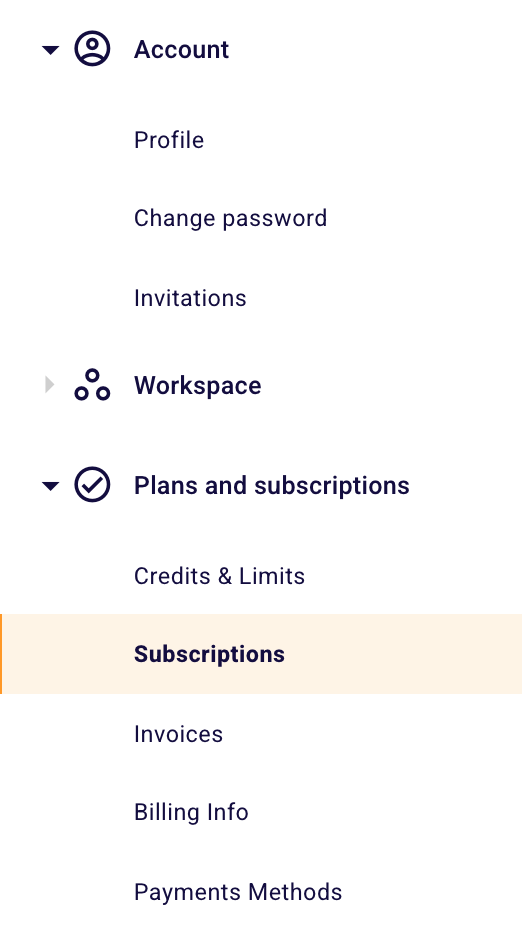
From here, to reach the Plans and Subscriptions section, you will need to click the same item on the menu on the left. Once clicked, you will land on a similar screen.

From here you just have to click “Plans and subscriptions” on the menu on the left of the screen and you will land on the corresponding page.

How to interpret the Credits and Limits section?

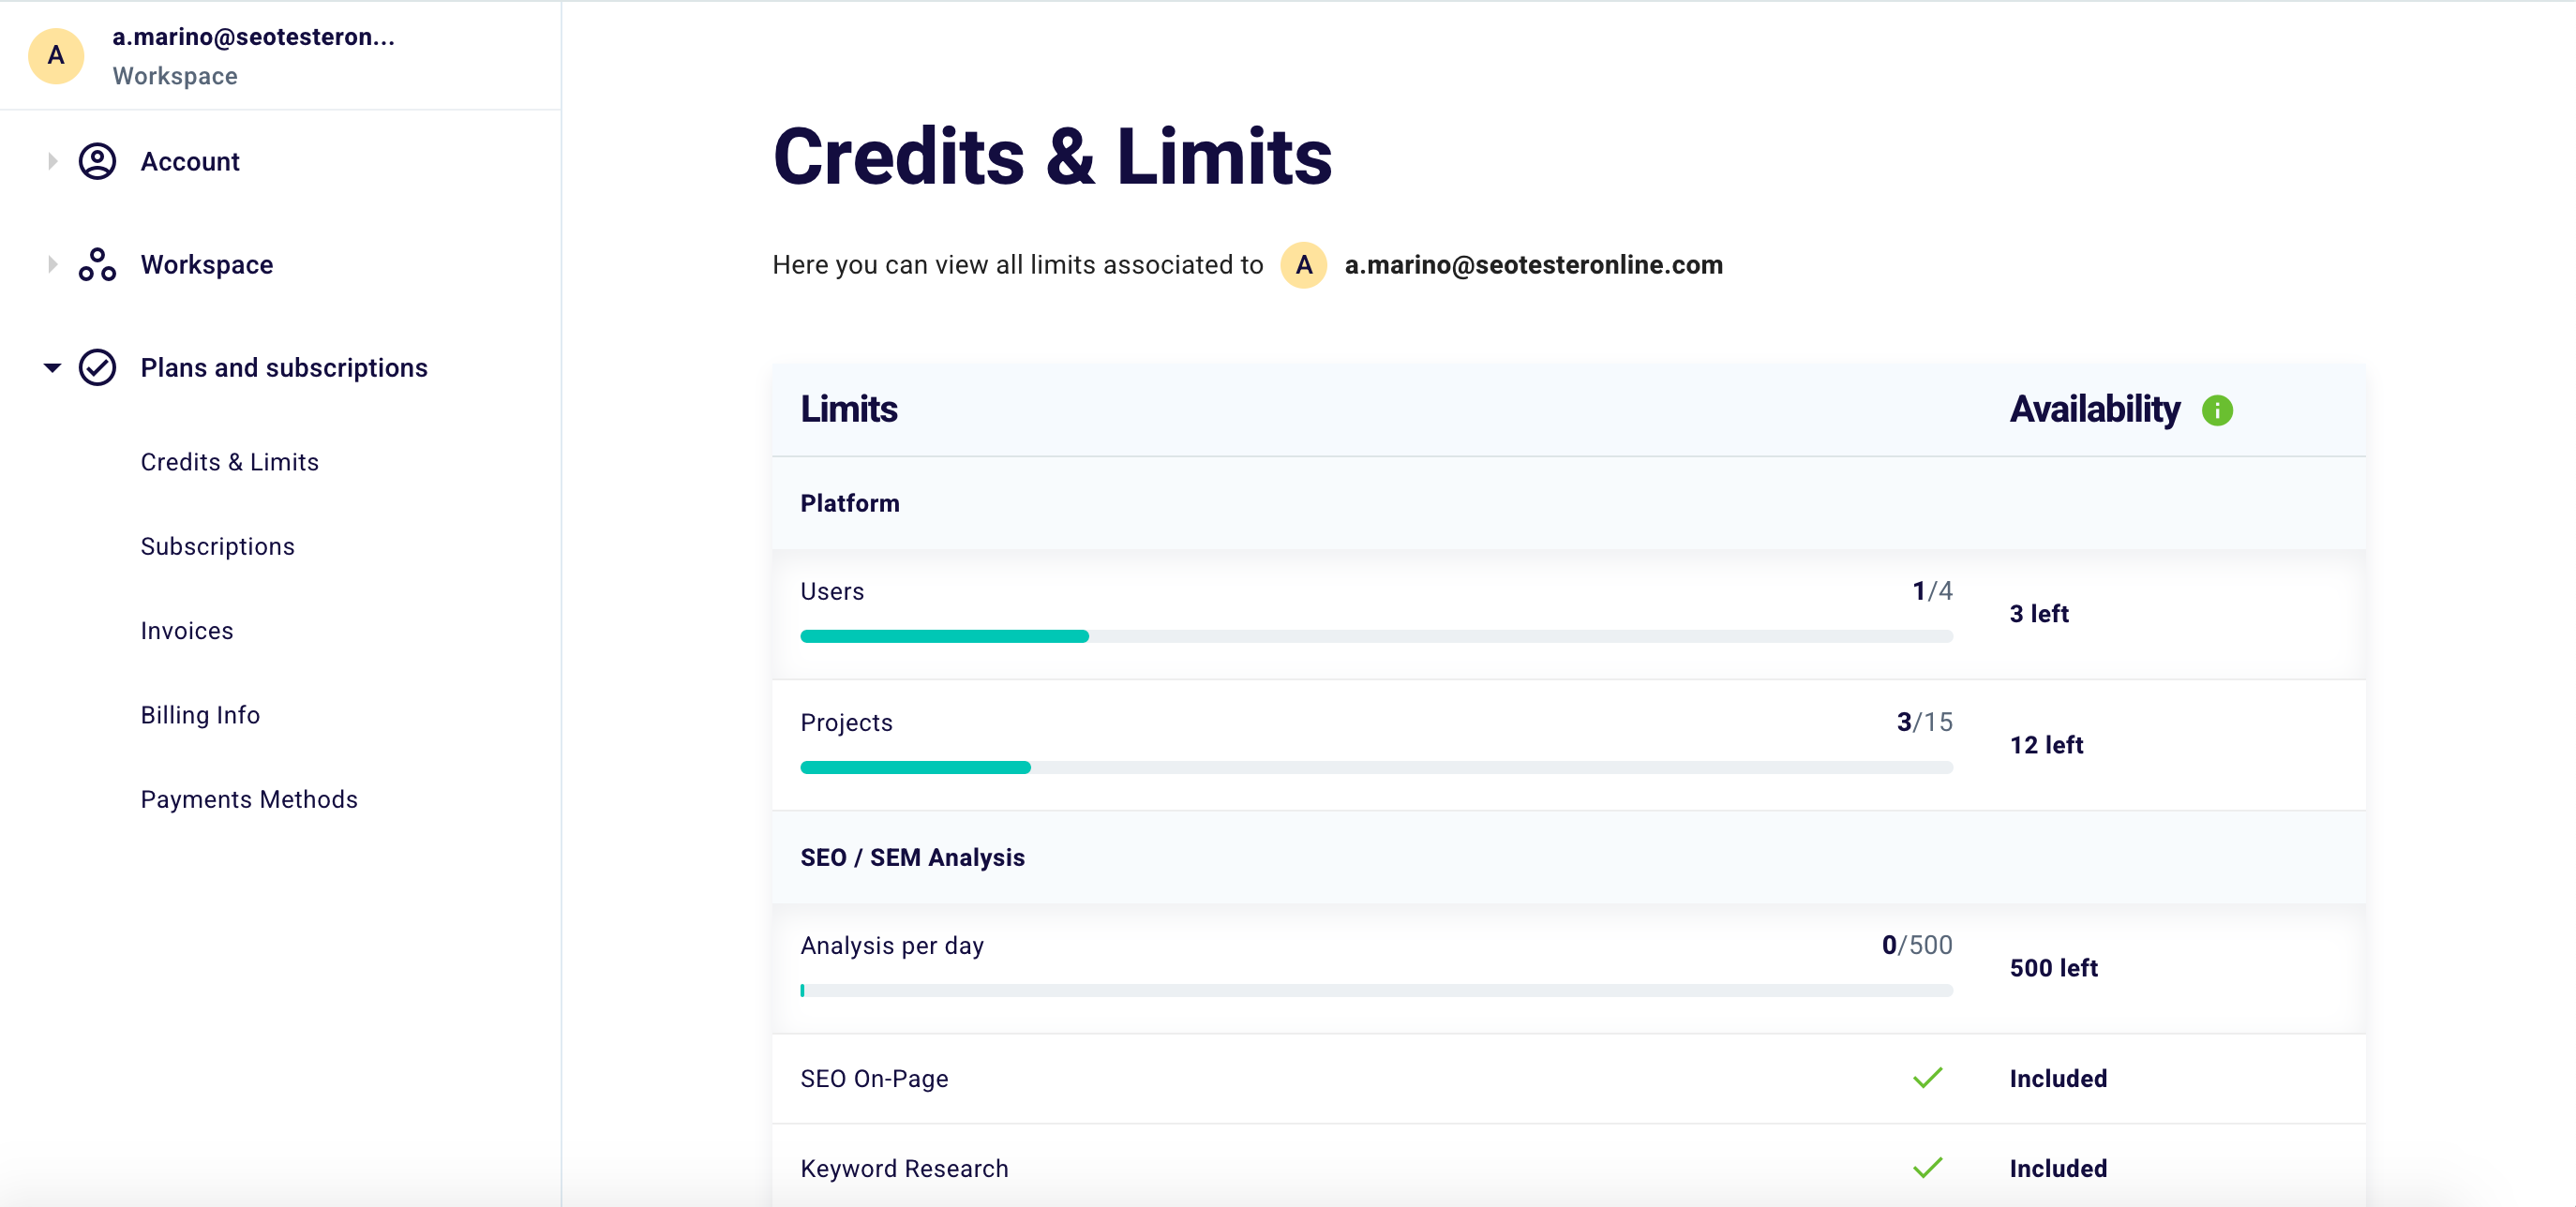
The first part of “Plans and subscriptions” is dedicated to “Credits and limits”.

In this section, you can monitor all the limits associated with your account, the credits you have left, the projects you can still create, the number of keywords you can still track the results, and so on. Here is a brief description of all the items within this section.

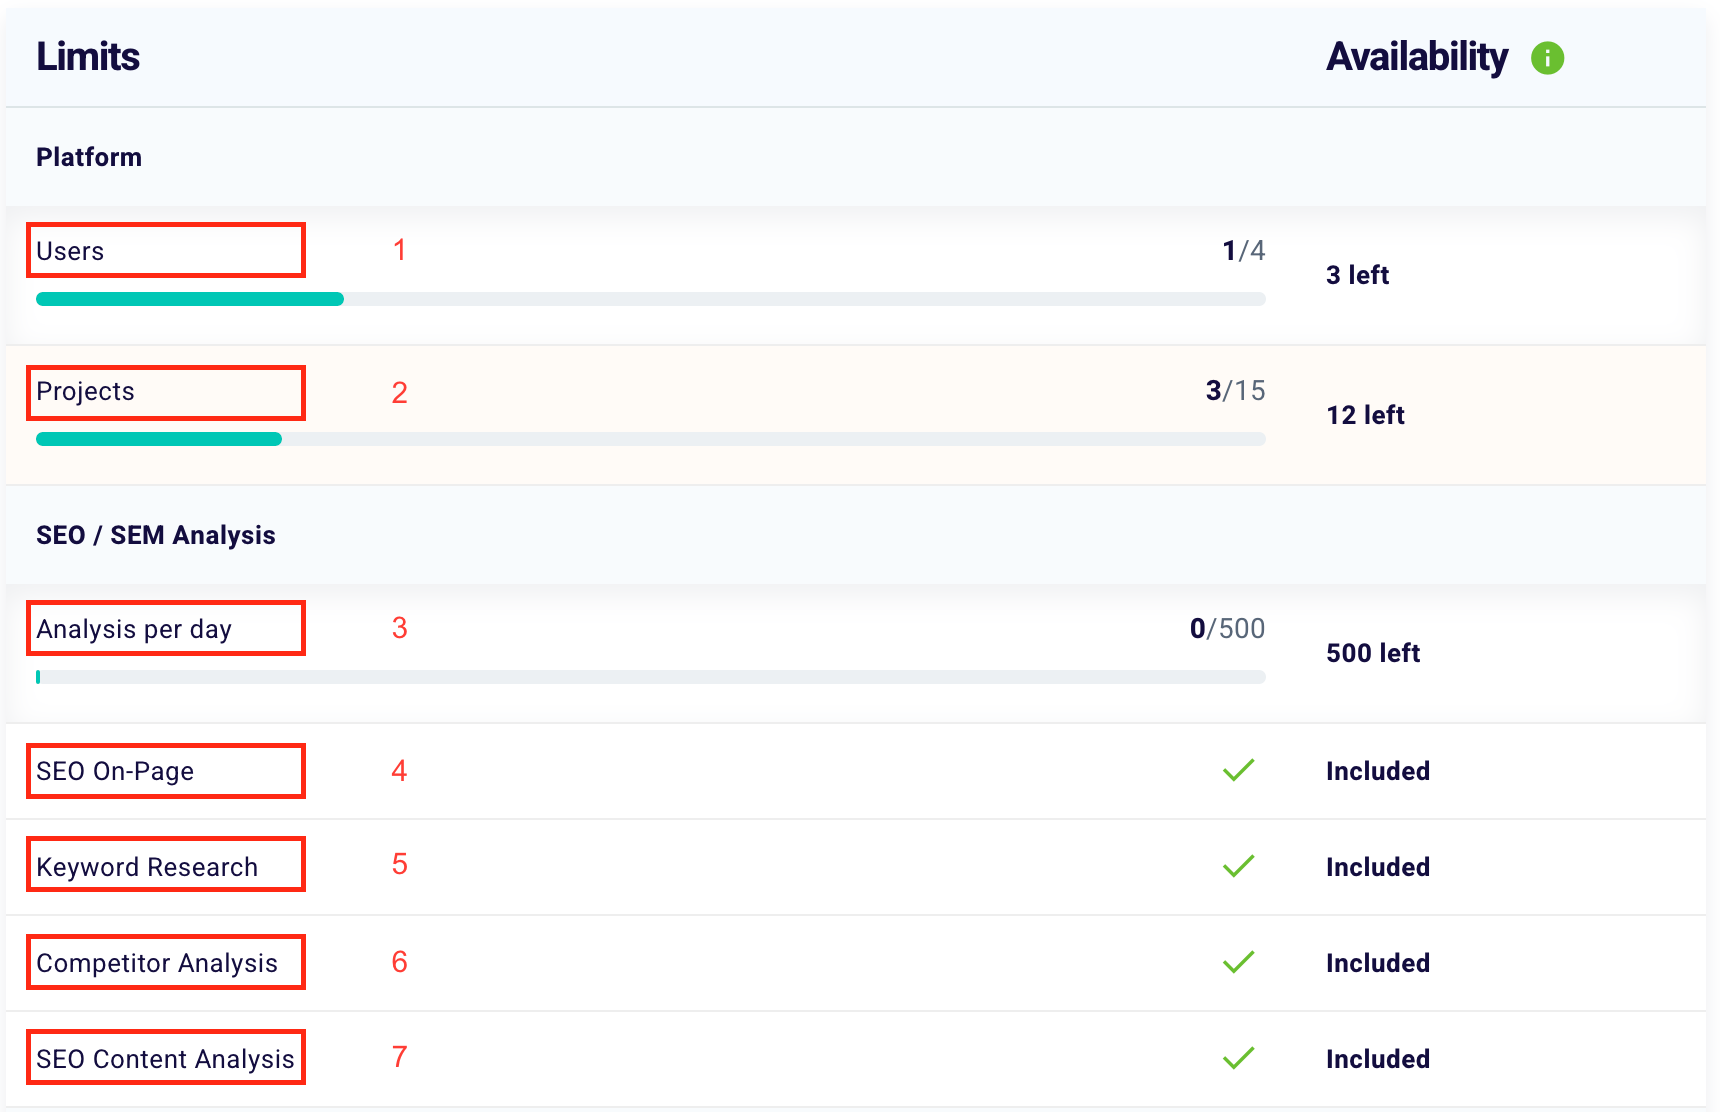
Users” (1) means the maximum number of users included in your plan. In this case, “4” corresponds to the maximum number of users of the plan and “1” the users already included. “3 left” stands for the number of users still to be included.

By “Projects” (2) we mean the number of SEO Projects you can create with your account. Projects allow you to easily monitor all SEO aspects of your site. Monitor both from a technical point of view (with the SEO Spider) and from a positioning point of view (with the Keyword Rank Tracker) In this case “15” corresponds to the maximum number of SEO projects in the plan and “3” the projects already created. “12 left” stands for the number of projects you can still create. You can remove a project at any time to make room for a new one. However, remember that if you do this you will lose the data history of that project.

With “Analysis per day” (3) we mean the maximum number of SEO analyses that you can perform each day with your account with our 4 tools: SEO Checker, Copy Metrics, Keyword Explorer Tool, and SERP Checker. In this case, “500” corresponds to the maximum number of daily analyzes of the plan and “0” the analyzes already made. “500 missing” stands for the number of SEO analyses you can still do.

SEO On-Page” (4) is the function that allows you to carry out in-depth On-Page SEO analyses, discover the SEO problems of your site and solve them in a simple way thanks to our advice.

Keyword Research” (5) is the function that allows you to find thousands of long-tail keywords with low SEO difficulty and high traffic potential every day.

Competitor Analysis” (6) is the function that allows you to spy on the SEO of your competitors and surpass them on search engines.

SEO Content Analysis” (7) is the function that allows you to analyze the SEO copywriting metrics of your content or those of your competitors.

In the specific case of this plan, it is evident that all these functions are included in the corresponding written to the right of each item.

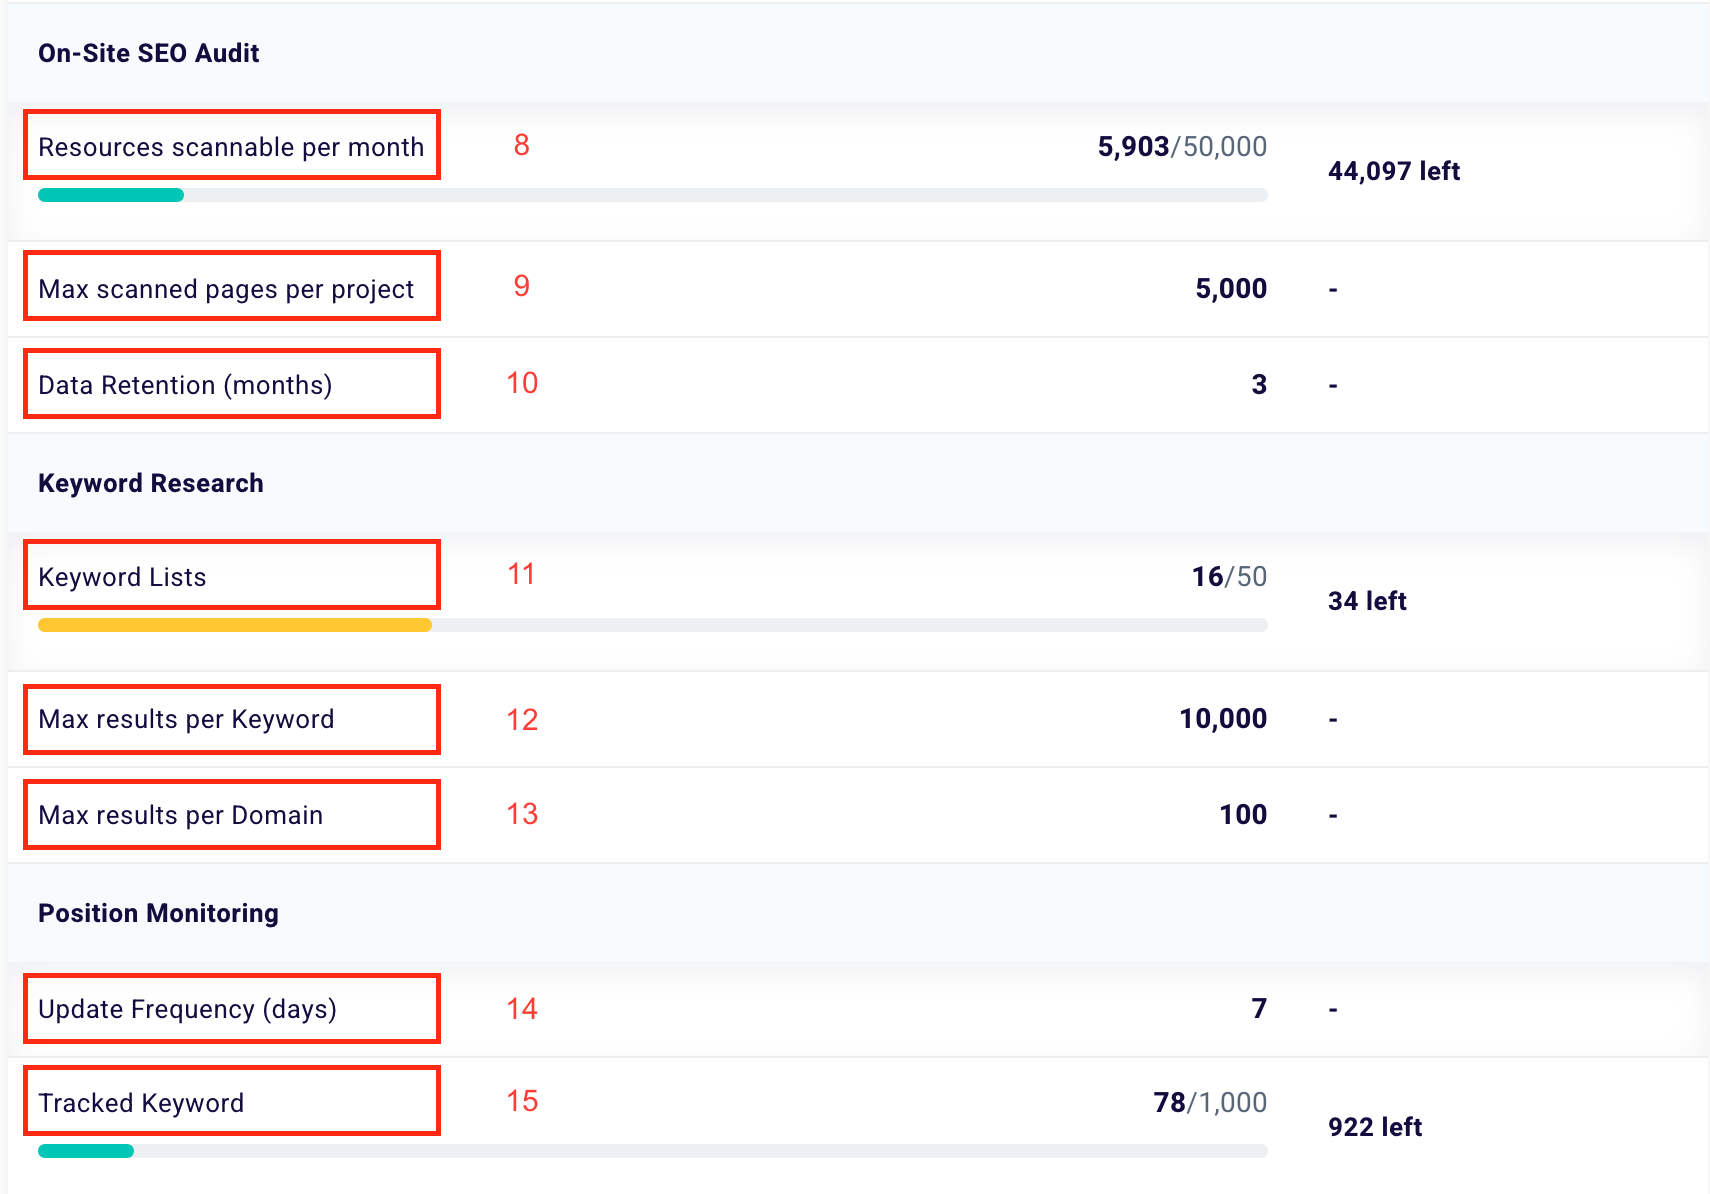
By “Resources scannable per Month” (8) we mean the number of web resources that you can crawl with our SEO Spider each month. In this case, “50,000” corresponds to the maximum number of scannable web resources of the plan and “5,903” the web resources already scanned. “44,097 left” stands for the number of web assets you can still scan.

By “Max scanned pages per project” (9) we mean the maximum number of web pages that you can scan in a single scan using our SEO Spider. In this case, “5,000” corresponds to the maximum number of scannable web resources per project included in the plan. In case you want to analyze a site that contains more than “5,000” pages all pages will be scanned, but you will be able to view the crawl of only the number of pages allowed by your subscription.

With “Data retention (months)” (10) we mean the maximum time for which we store historical data relating to the scans of your SEO projects. In this plan, the data retention months are “3”.

With “Keyword List” (11) we mean the maximum number of keyword lists that you can create on our platform. In this case “50 corresponds to the maximum number of keyword lists achievable with this plan and” 16 “the keyword lists already created. “34 missing” stands for the number of keyword lists you can still create.

With “Max results per keyword” (12) we mean the maximum number of results that can be displayed for each keyword analyzed. In this case, “10000” corresponds to the maximum number of results that you will be able to view compared to all those available.

With “Max results per domain” (13) we mean the maximum number of results that can be displayed for each analyzed domain. In this case “100” corresponds to the maximum number of results that you will be able to view compared to all those available.

With “Update frequency (days)” (14) we mean the frequency with which the results of each keyword monitored are updated. In this case, the data relating to each keyword traced is updated every 7 days.

Tracked keywords” (15) means the maximum number of keywords that you can track among your active projects. In this case, “1,000” corresponds to the maximum number of keywords traceable with this plan and “78” to the keywords whose results are already being tracked. “922 left” stands for the number of keywords you can still track.


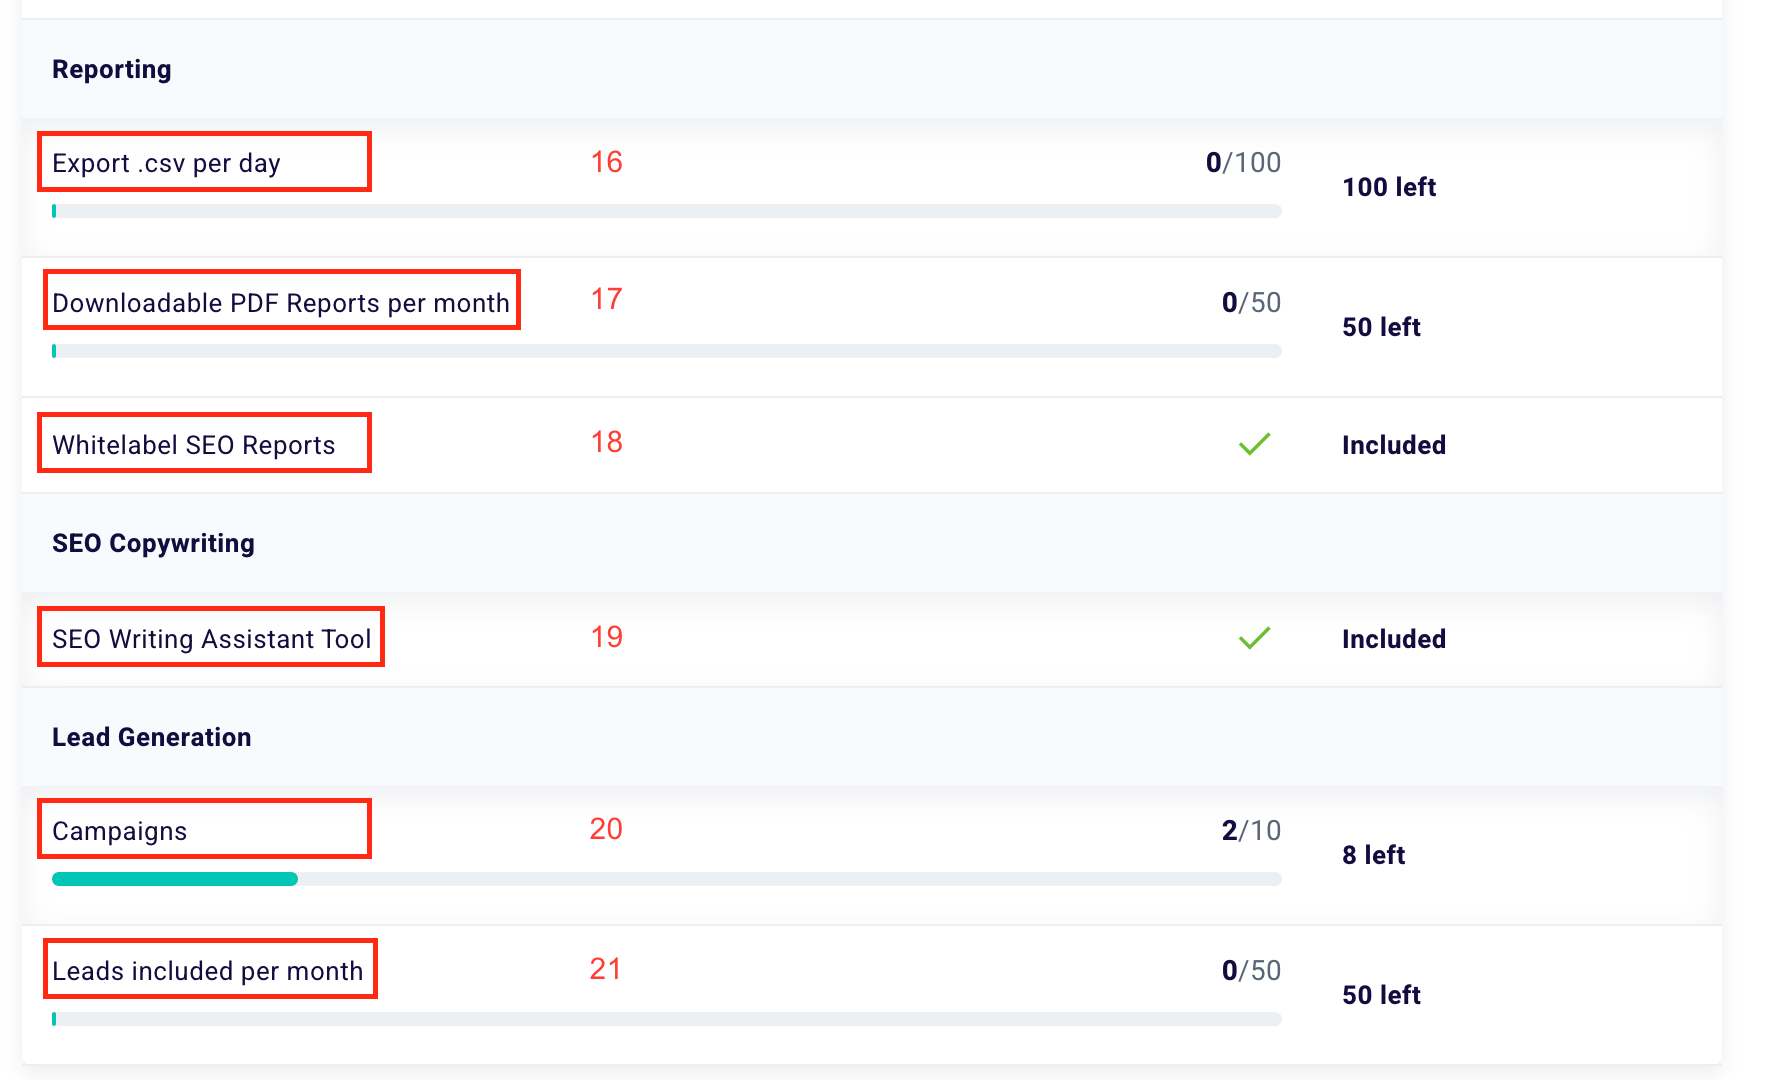
By “Exports .csv per day” (16) we mean the maximum number of data files (.csv) that you can download each day. In this case, “100” corresponds to the maximum number of .csv downloadable with this plan and “0” to the files you have exported. “0 left” stands for the number of .csvs you can still download.

With “Downloadable PDF Reports per Month” (17) we mean the maximum number of SEO PDF Reports that you can download each month. In this case “50” corresponds to the maximum number of Reports that can be downloaded with this plan and “0” to the Reports you have already downloaded. “100 left” stands for the number of SEO reports that you can still download.

White-label Reports” (18) is the function that allows you to send customizable and White-label SEO Reports to your clients and collaborators. In this case, this feature is included in the user’s plan.

SEO Writing Assistant Tool” (19) is the function that allows you to write contents that rank among the top positions thanks to SEO advice processed in real-time by our editorial assistant. In this case, this feature is included in the user’s plan.

Campaigns” (20) means the maximum number of lead generation campaigns you can create with our platform. In this case, “10” corresponds to the maximum number of campaigns that you can set up with this plan and “2” to the campaigns you have already set up. “8 left” stands for the number of lead generation campaigns you can still create.

With “Leads included per month” (21) we mean the number of contacts included in your plan for which you can view all the information collected by your forms for free. In this case, “50” corresponds to the maximum number of leads whose information you can view with this plan and “0” to the leads you have already collected and whose information you have access to. “50 left” stands for the number of lead generations that you can still see the metrics for.

How can I expand the limits of my plan?

In case you are shown a screen that says “Insufficient Credits” and you want to create another project or expand the limits of your plan, just send an email to support@seotesteronline.com. We will help you understand how to do it in a few simple steps.
How to manage the subscription and payment methods?

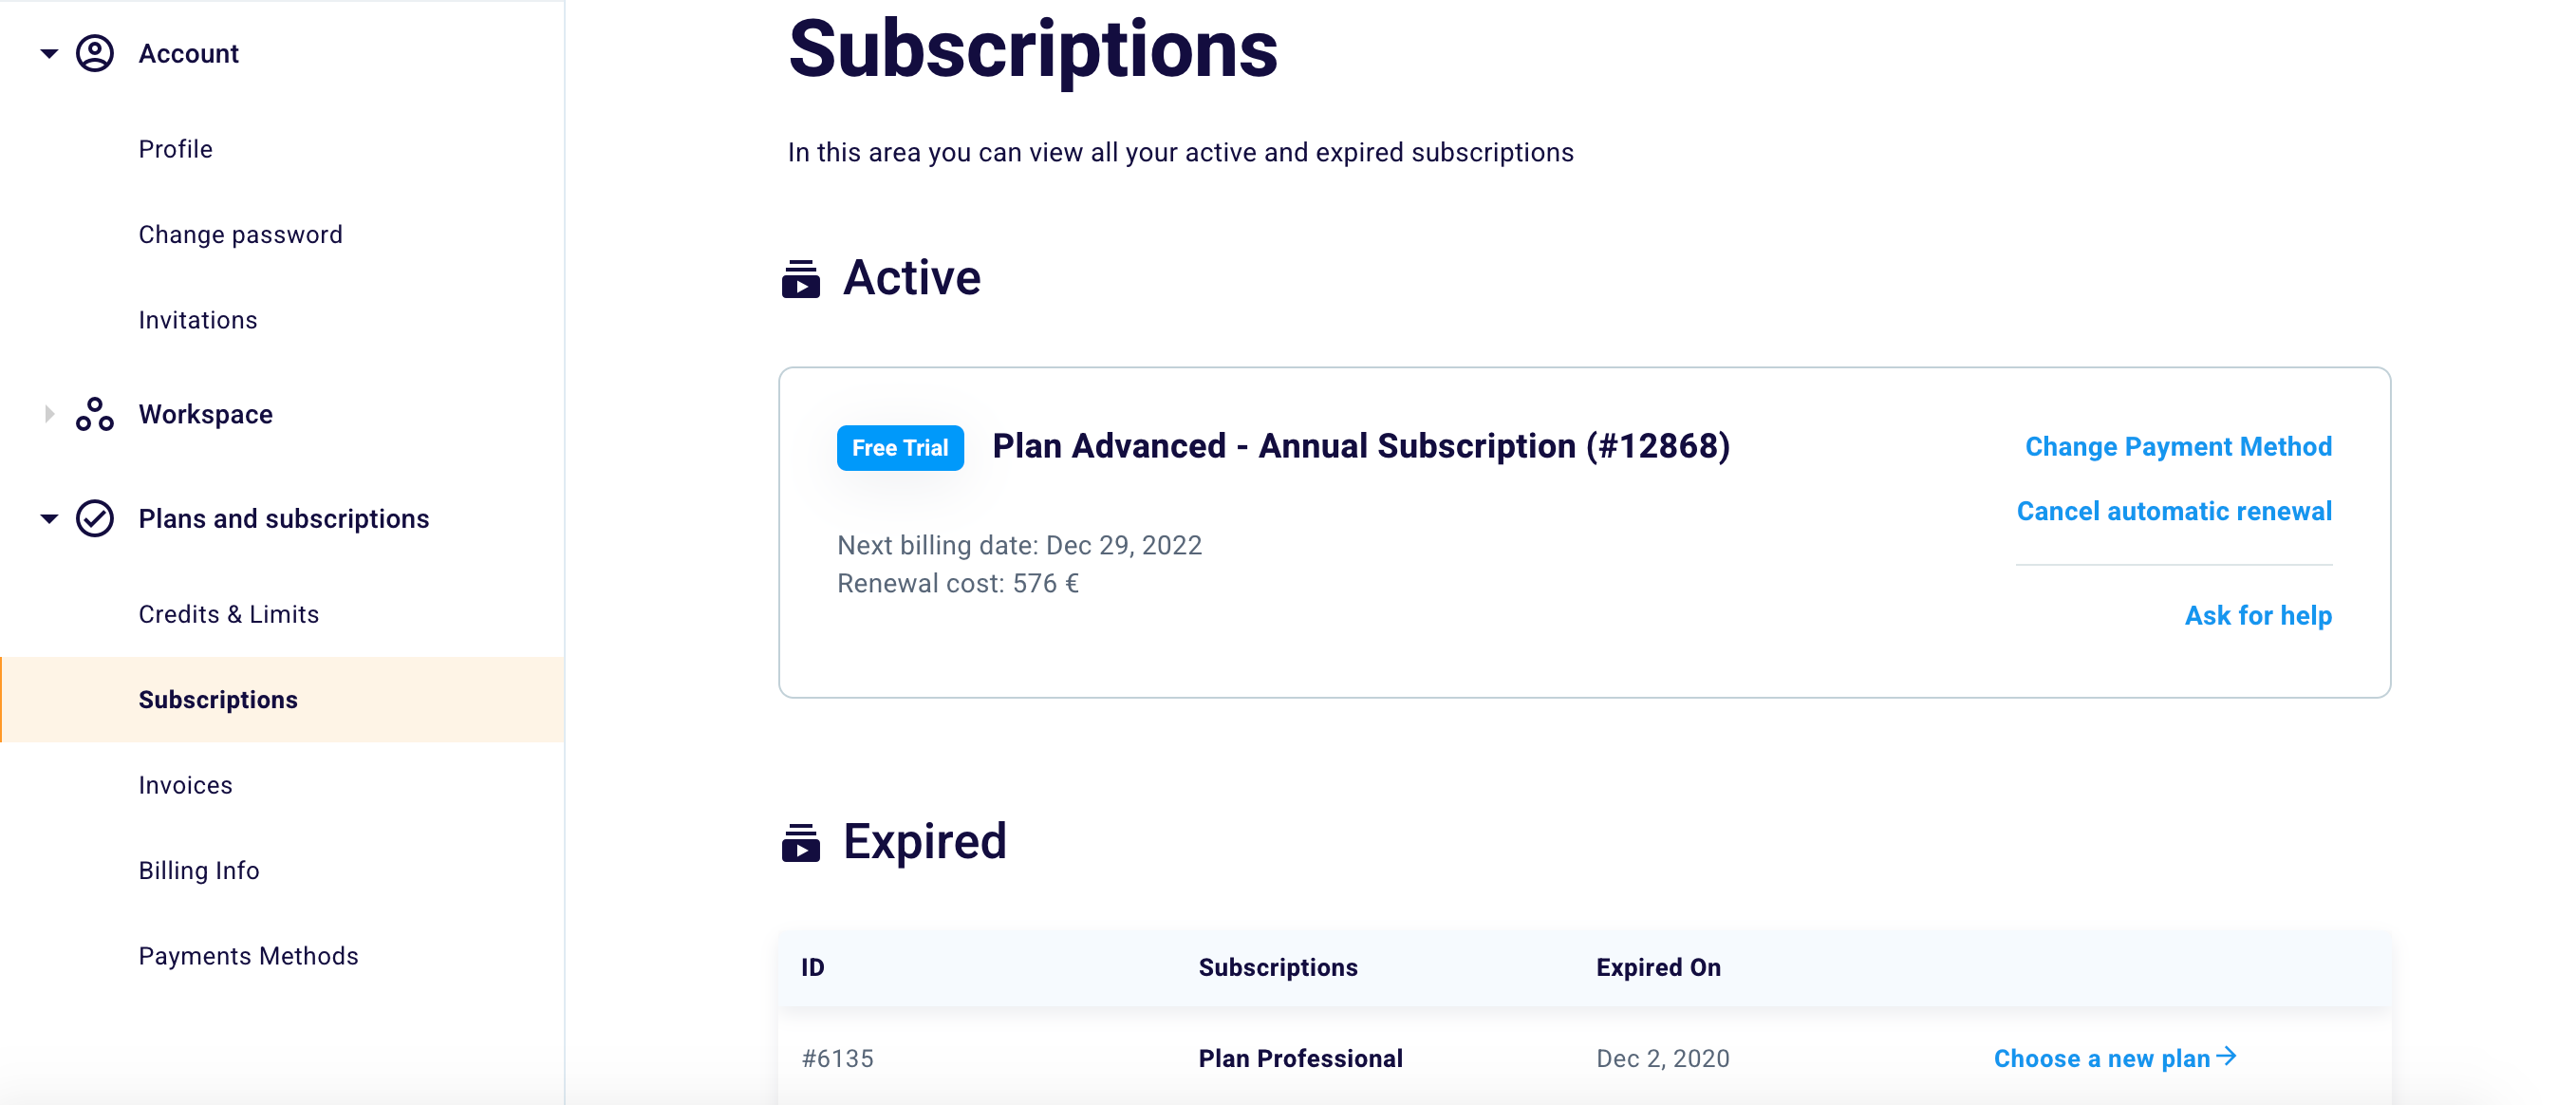
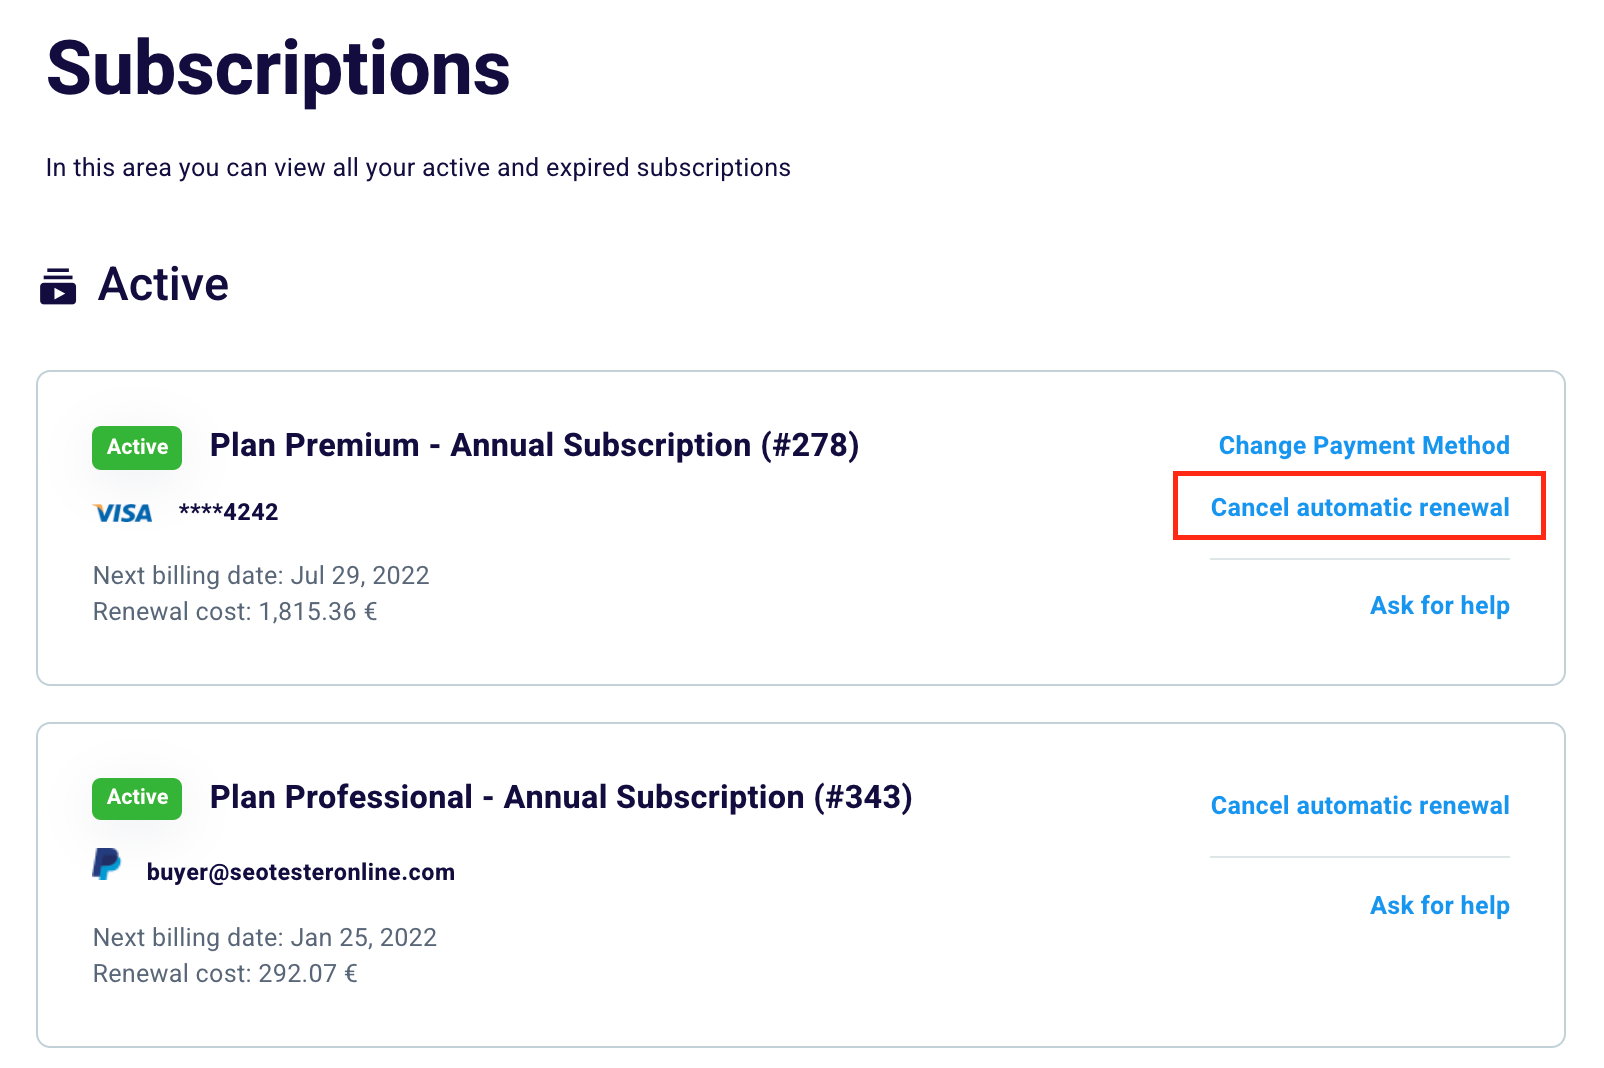
You can access this section by clicking “Subscriptions” on the left and monitoring all your active and expired subscriptions.
In the first part, you will have the opportunity to view the type of plan you have purchased, the next billing date, and the cost you will pay for the renewal of your plan.

How to change or add a payment method?

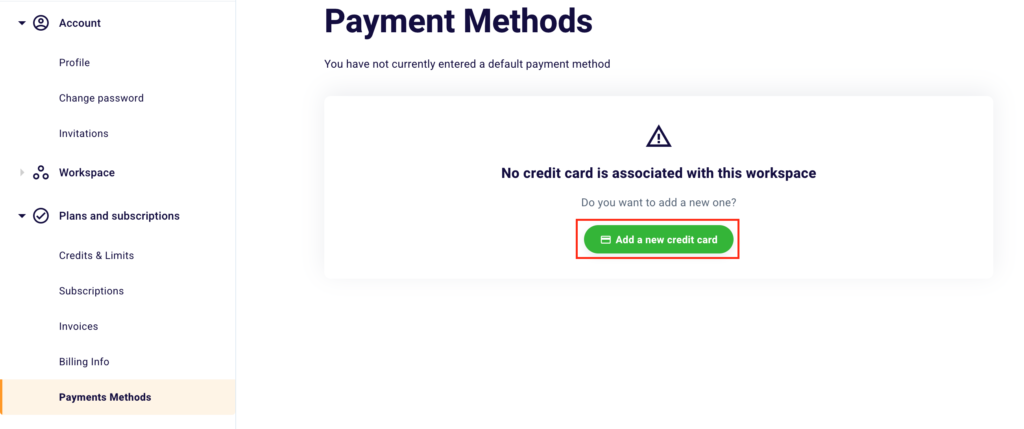
By clicking “Change Payment Method” (1) you will have the possibility to change the default payment method. Once clicked, you will land on “Payment Methods”, which you can also get to from the menu on the left.

To associate a new payment method, simply click the green button “Add a new credit card“.

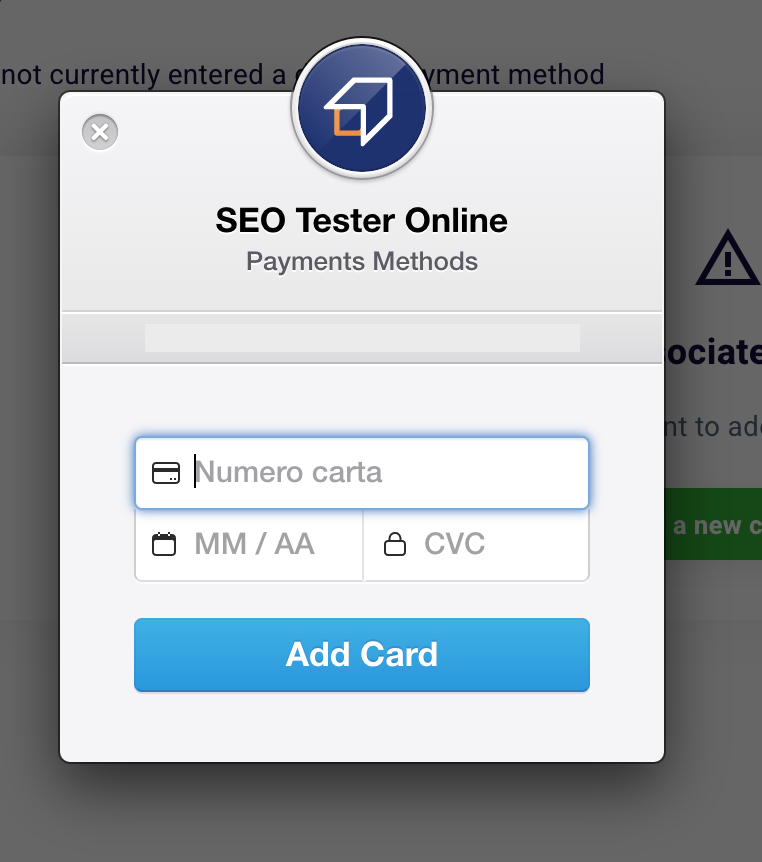
This screen will appear and you will only have to add your card number, the month and year of expiry, and the CVC code, present on the back of your payment card.

We remind you that we only use secure payment methods such as Stripe and PayPal and that we do not manage or store our customers’ payment data in any way to preserve their privacy and ensure payment security.

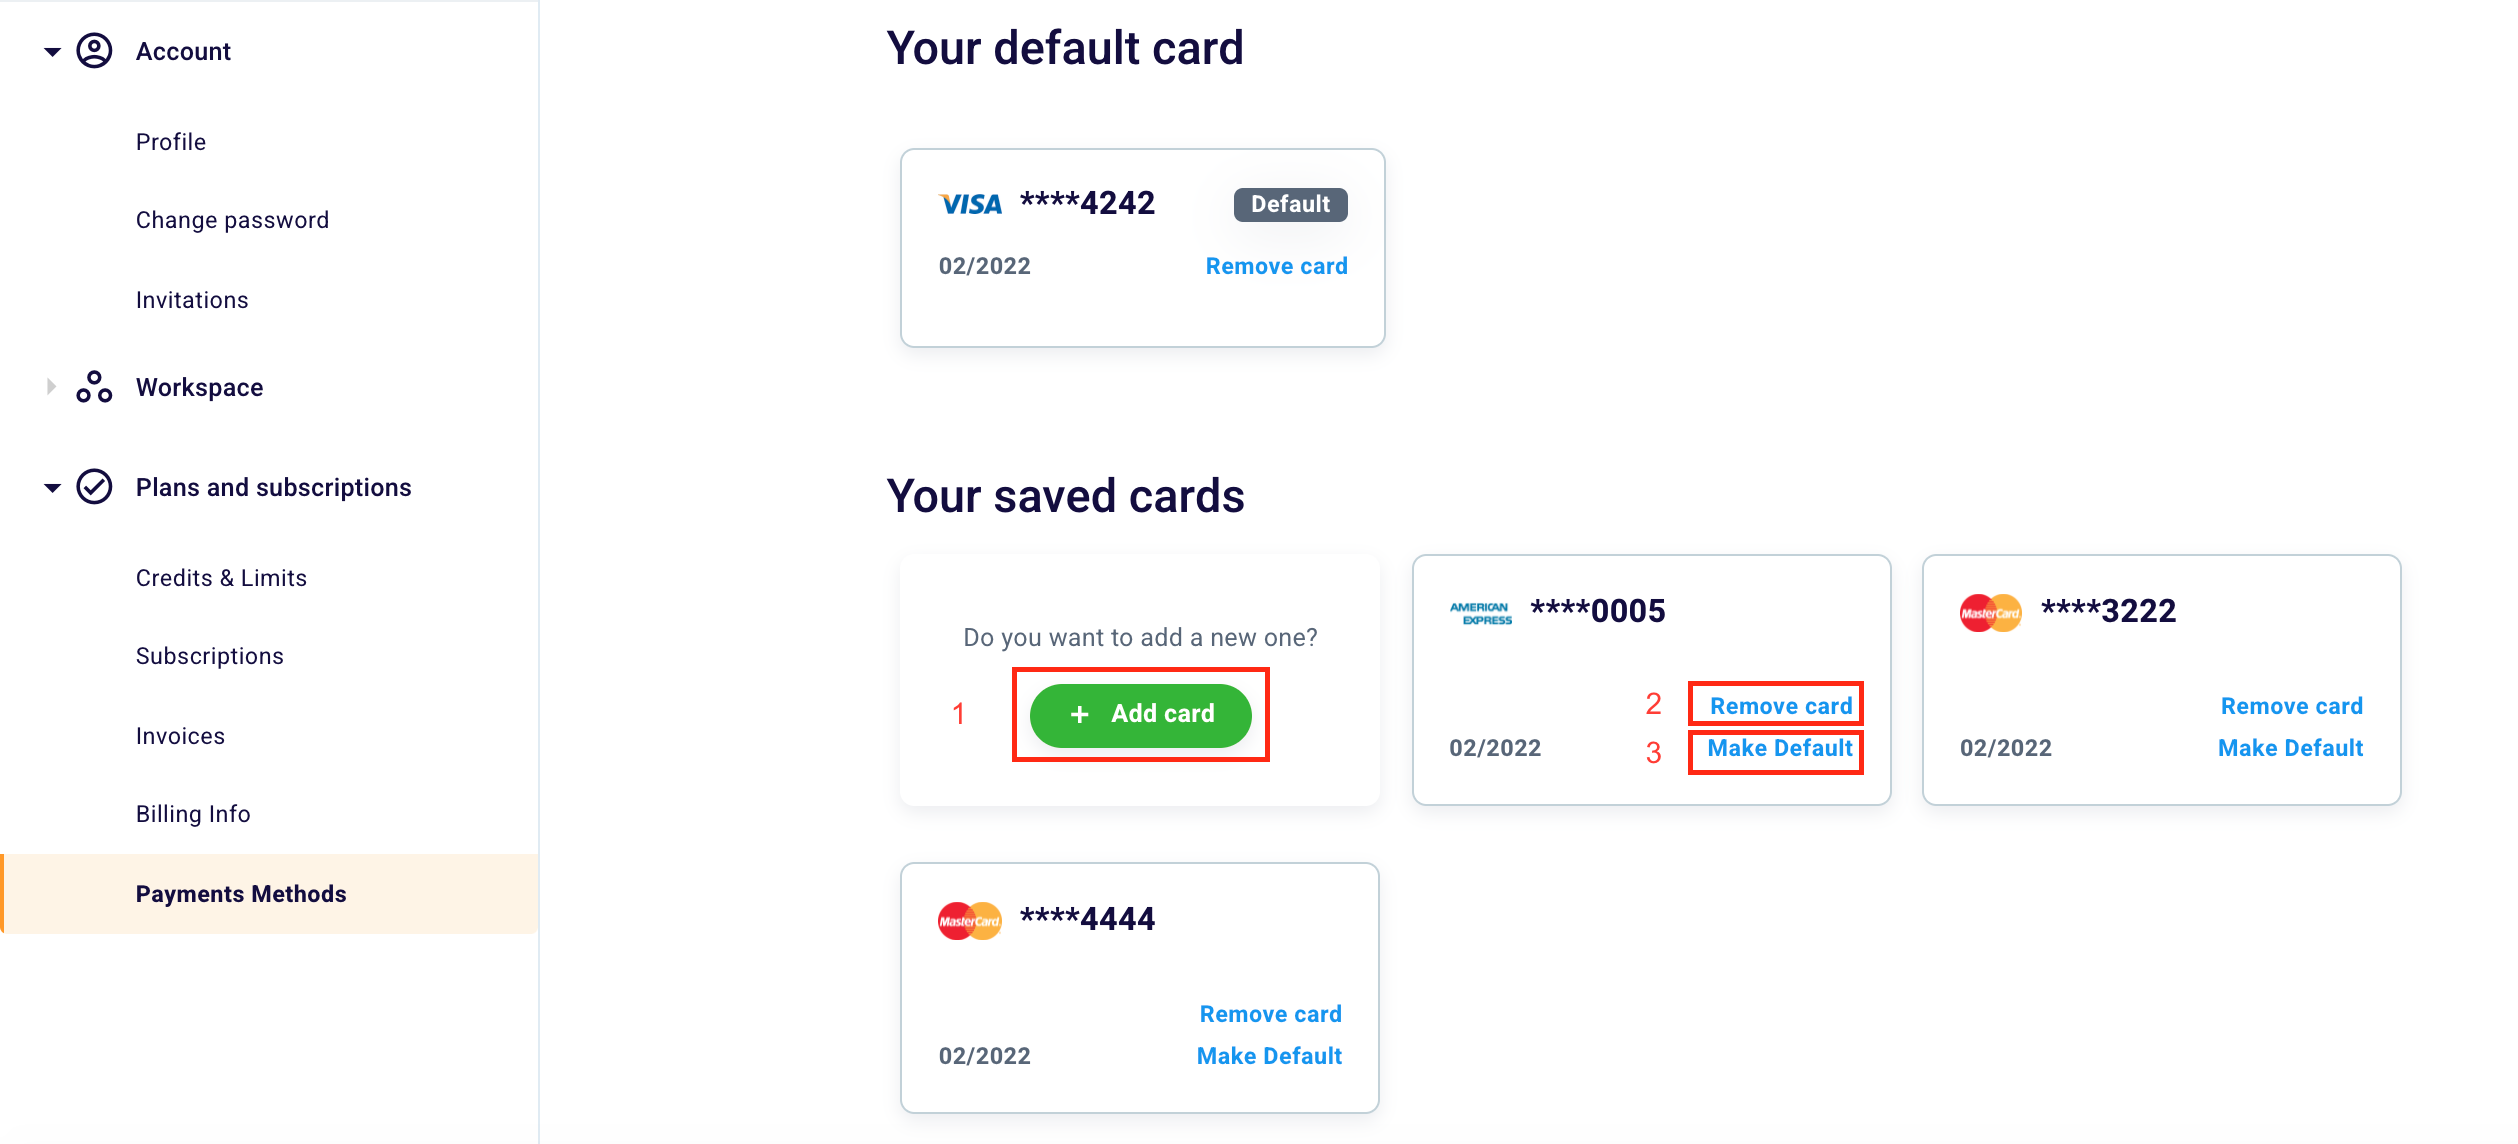
If you have set up more cards, always in the “Payment Methods” section, you will be faced with a similar situation.

On this screen, you can connect a new payment method by selecting “Add Card” (1). If you want to remove a payment method, click on “Remove card” (2). To select a default payment method for your future payments, simply click on “Make Default” (3).

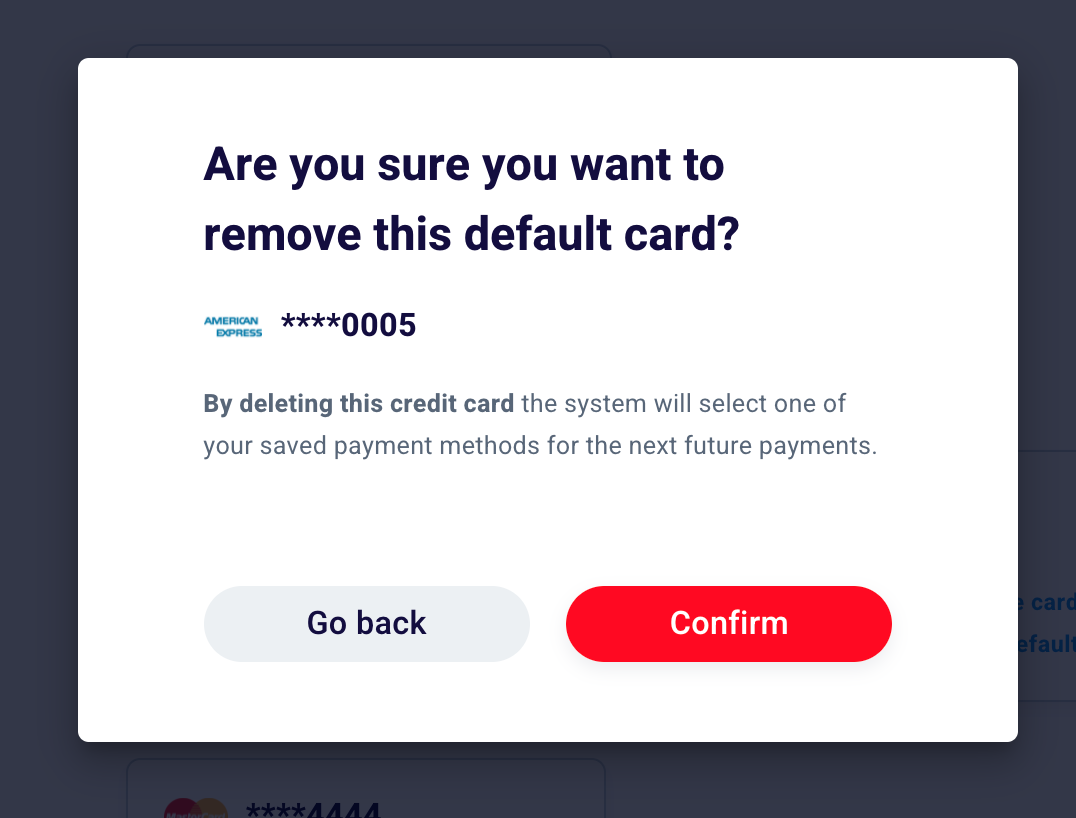
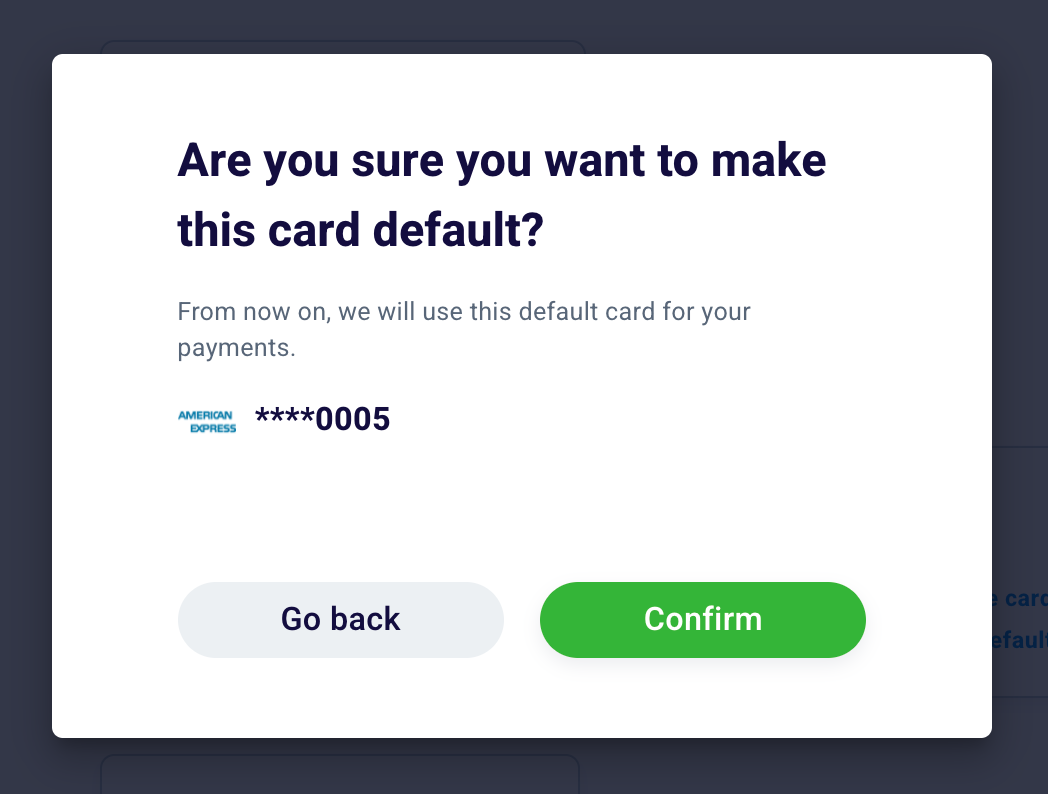
In both cases, our system will ask you to validate your choice. Click on “Confirm” if you really want to remove a card or make it a default.

How to disable automatic renewal?

To disable automatic renewal you will need to go to the “Subscriptions” section which you can find in your profile settings within the part relating to “Plans and Subscriptions”.

Your active subscriptions will appear here.

To deactivate the renewal you will then have to click “Cancel automatic renewal”. Just follow the deactivation flow to revoke the automatic renewal option.

How to activate automatic renewal?

If, on the other hand, you want to re-enable automatic renewal, just go to the “Subscriptions” section, and click the green button or the blue writing that says “Enable automatic renewal“.

Remember that, if you do not activate the automatic renewal, at the end of your subscription or free trial period, you will lose all the SEO data collected up to that moment!

In the same window, you can click “Contact us” if you want to speak to our Customer Care, which could help you solve your doubts and problems related to the use of the platform or your subscription.

How to choose a new subscription plan?

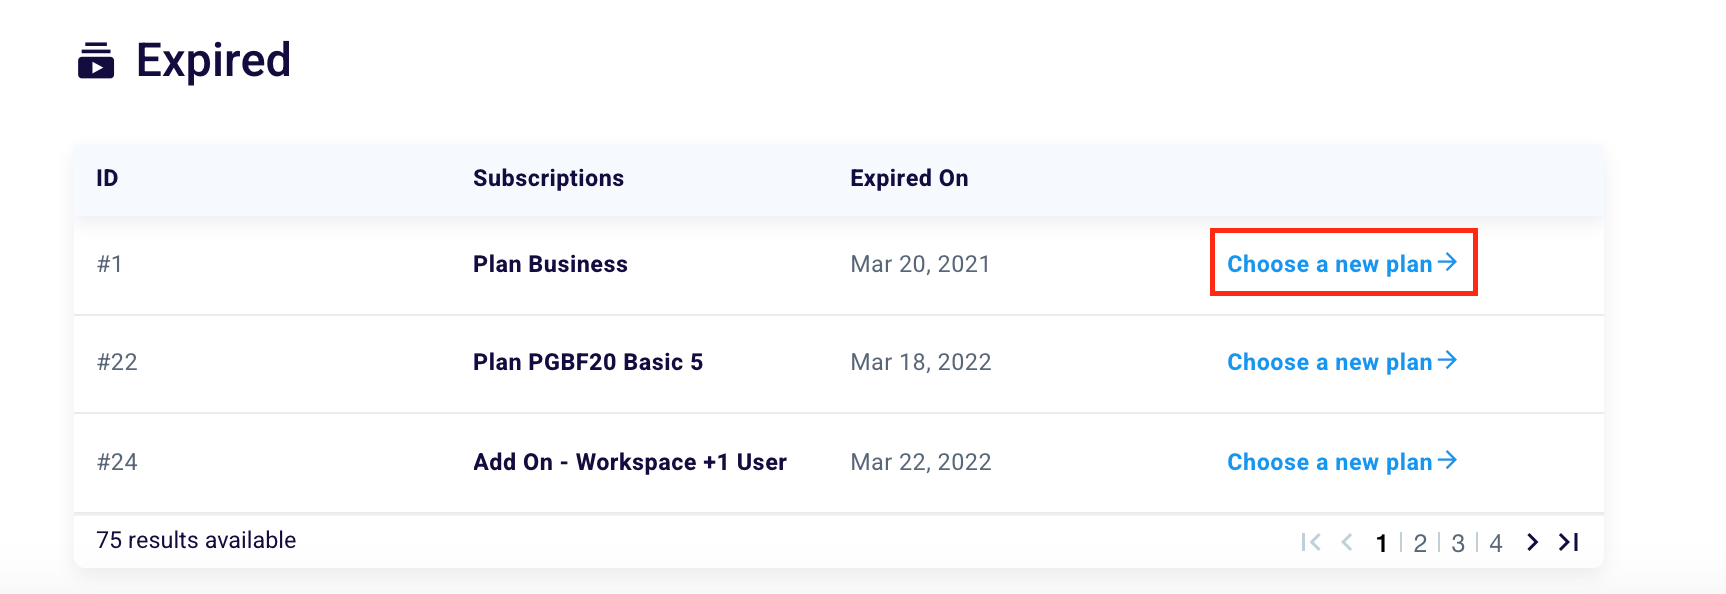
In the “Subscriptions” section you can also view your expired plans.

By clicking “Choose a new plan” you will be redirected to our Pricing Page where you can compare the different subscription solutions and choose the plan that best suits your needs.

How to download the payment invoice?

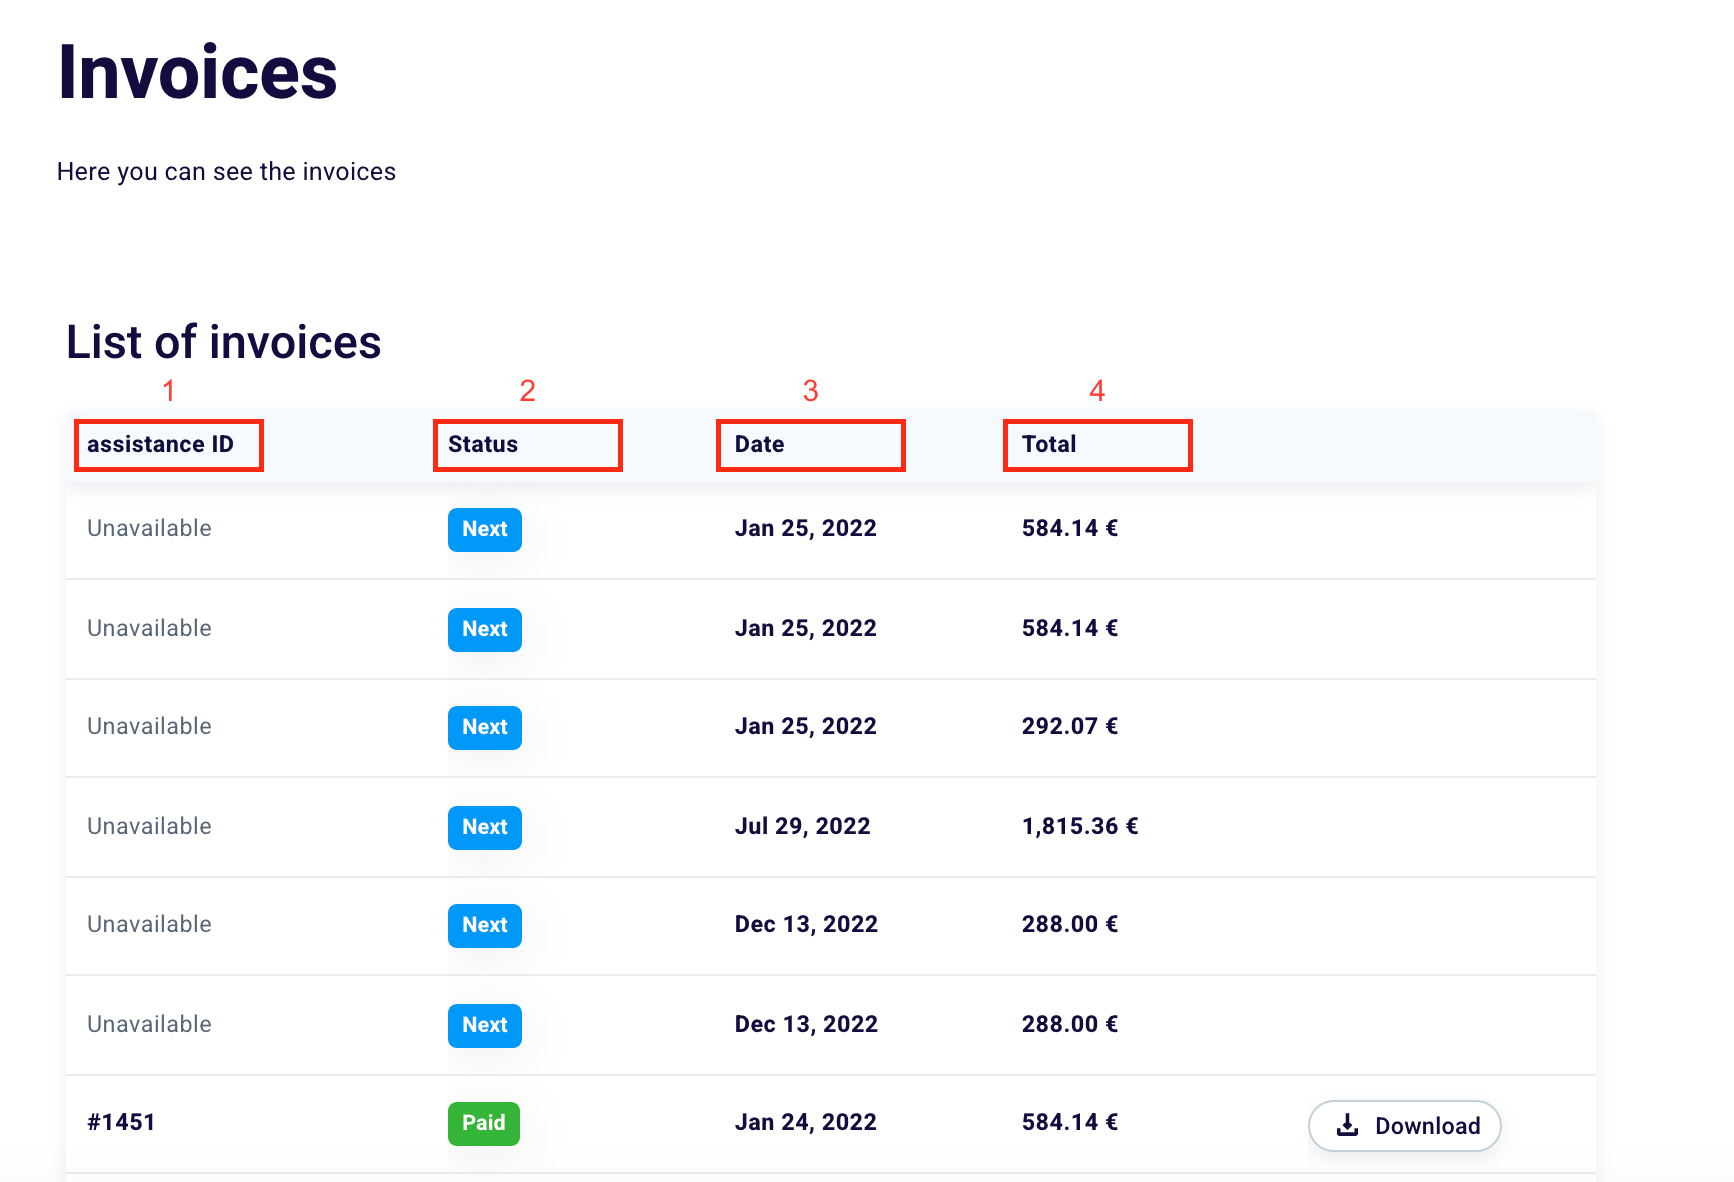
If you want to download the invoices relating to your plans, simply go to the “Invoices” section in the “Plans and Subscriptions” part of the Settings.

In the table, for each invoice, you can see 4 information.

Assistance ID” (1) indicates, if available, the code to be communicated to the assistance to identify a specific invoice in case of doubts or problems.

The “Status” (2) suggests the condition of an invoice. It can be “Next” or still open and to be paid, or “Paid”.

The “Date” (3) indicates the month, day, and year (in that order) of the invoice issue.

The “Total” (4) reveals the amount in euros of the invoice.

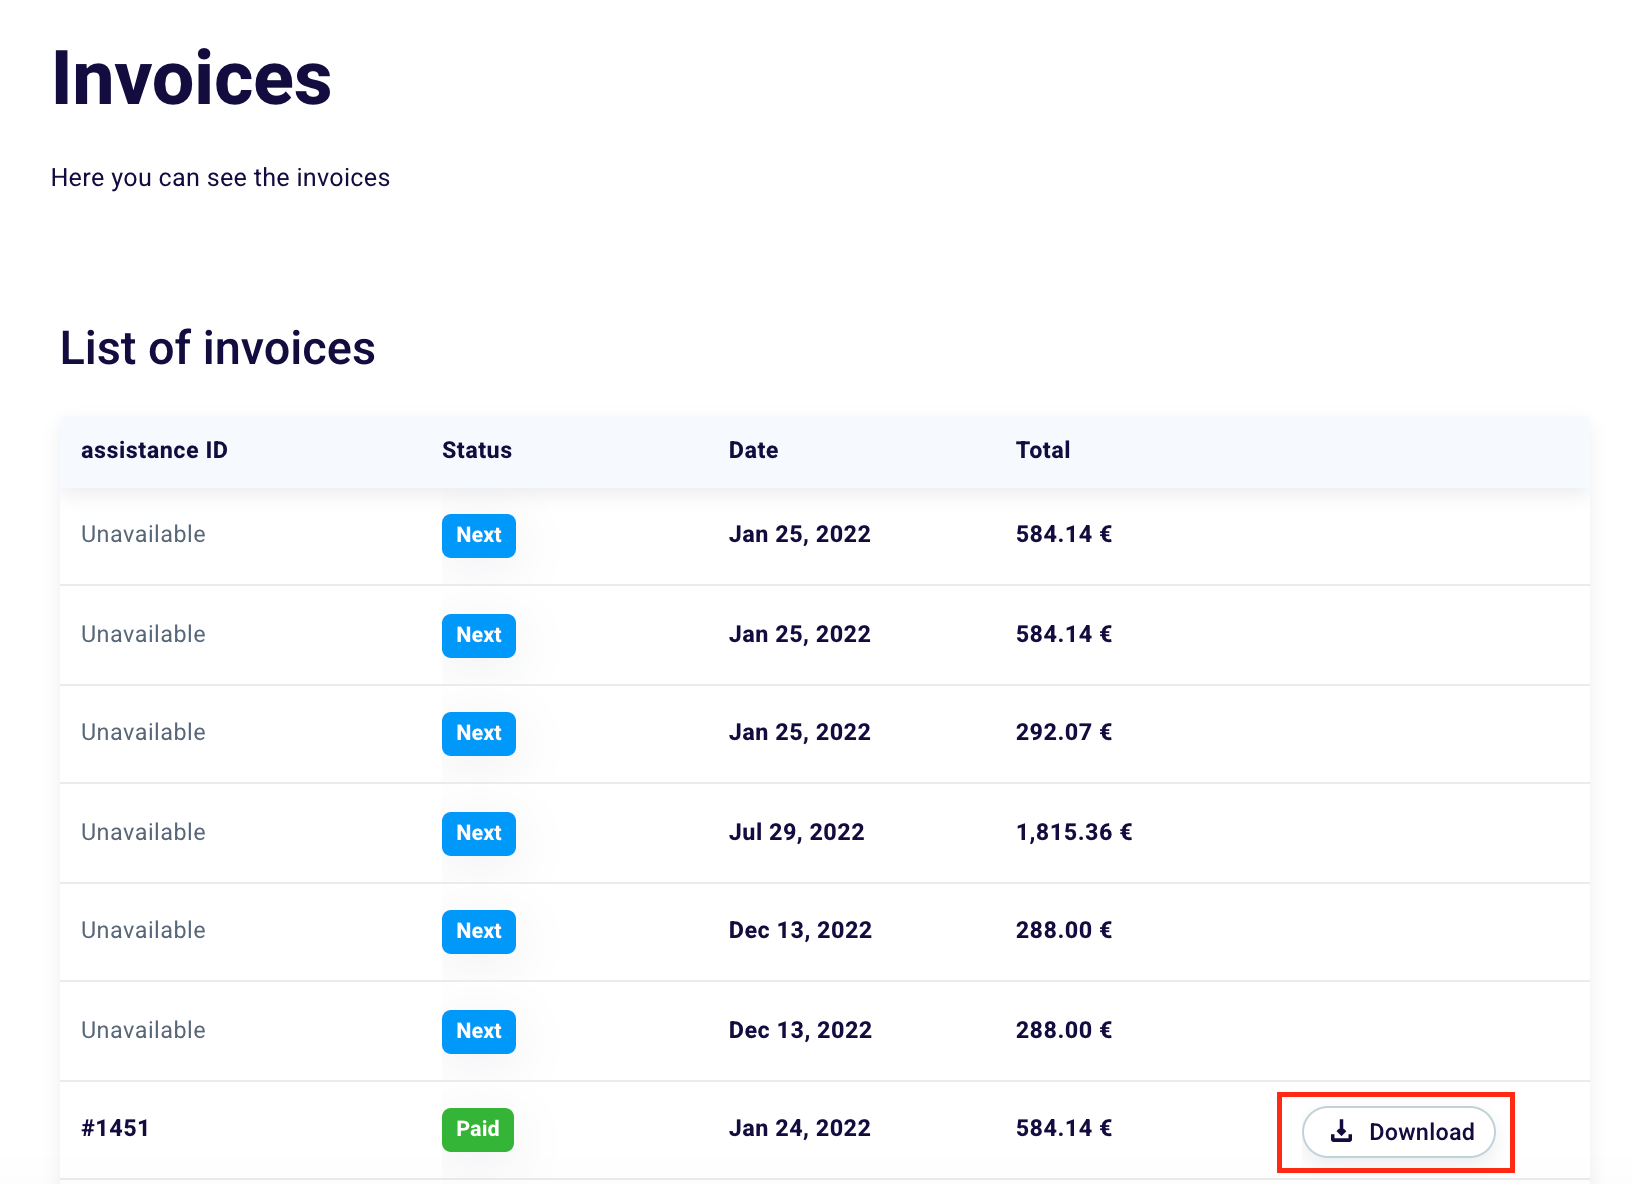
To download the invoice, you will need to click on the button of the same name to the right of the table.

How to change your billing information?

To change the billing information of your profile you must log in from here in the section of the same name.

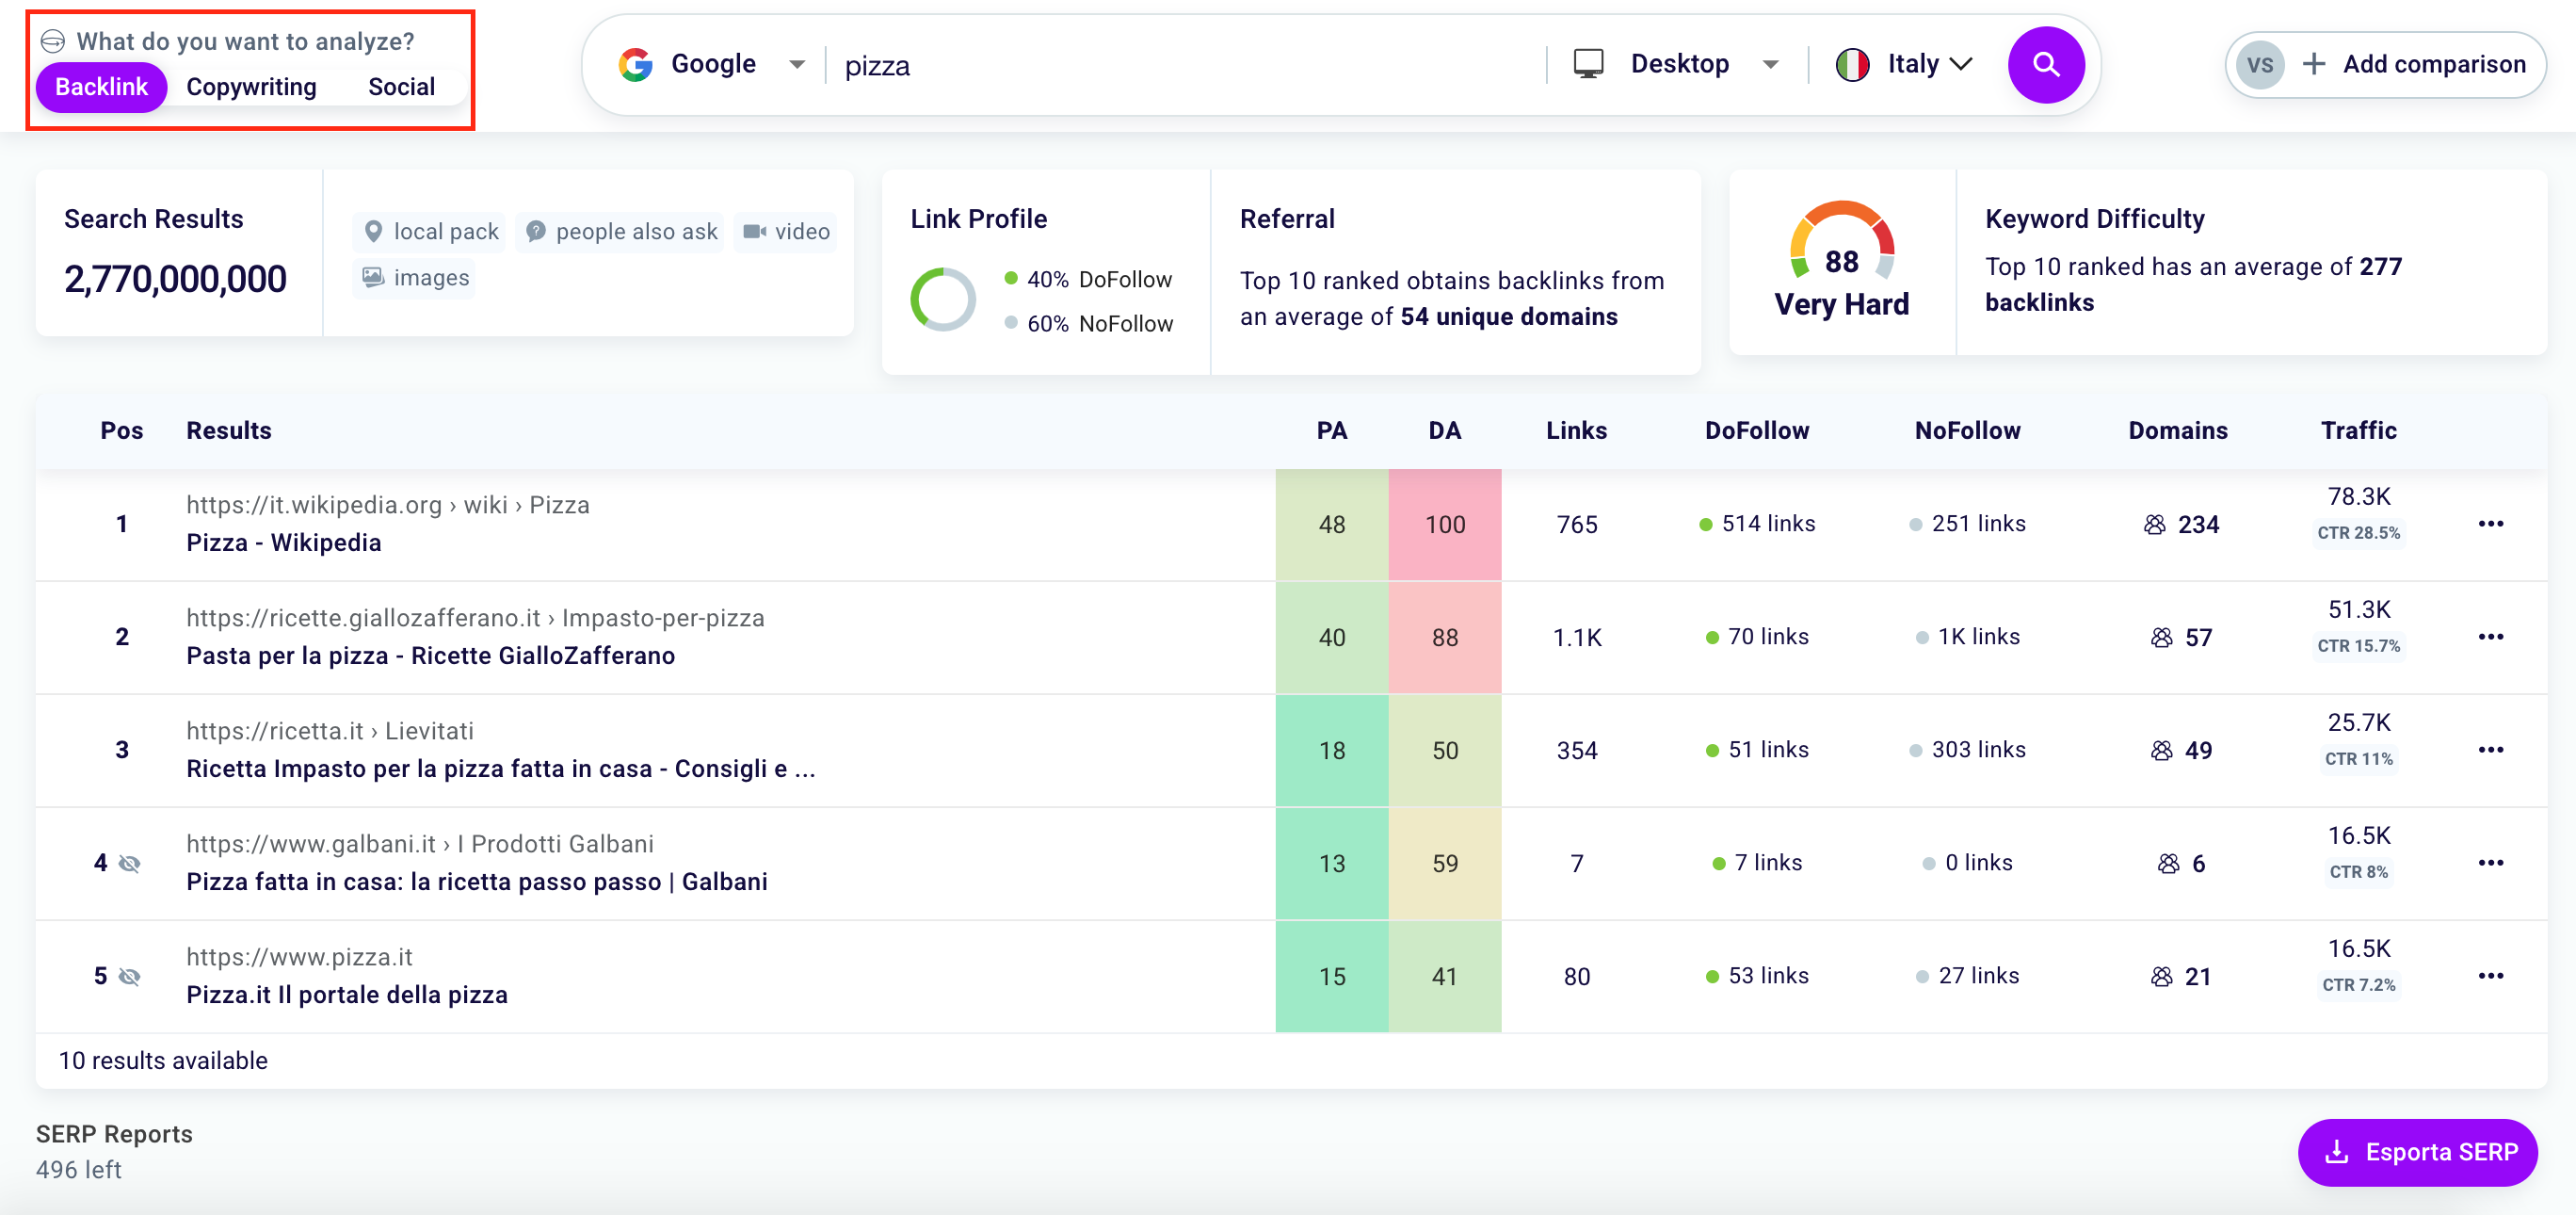
After having entered or modified one or more data including Name, Surname, Telephone for assistance, Country, Province, Address, Postal Code, Company Fiscal Code, click on the orange button at the bottom right “Save” to confirm the changes made to your billing information.